In the first part we learned how to manage containers, data and volumes, images, how to create applications with Docker, and how to use GPUs. In this second chapter we take the leap to **Docker Compose** to orchestrate multiple containers and to a series of **advanced topics** in Docker. 🐳
Disclaimer: This post has been translated to English using a machine translation model. Please, let me know if you find any mistakes.
📚 **This entry is part of the _Docker Guide_ series**, divided into two chapters that are read in order:
> * Part 1: Containers, images and applications
* 👉 **Part 2: Docker Compose and advanced topics**
Docker compose
Docker Compose vs docker-compose
docker-compose was a tool created to help with the maintenance of images and containers, and it had to be installed separately from Docker. However, Docker included it in its latest versions, and it is no longer necessary to install it; however, to use it, instead of using the docker-compose command, you must use the docker compose command. On many sites you will find information with docker-compose, but when you install Docker, docker compose will already be installed, so everything that could be done with docker-compose is compatible with docker compose
Docker compose
Docker Compose is a Docker tool that does everything we have seen so far, but saving us time and effort. By editing a .yml file, we can tell Docker Compose to create all the containers we want.
To use it once, there won’t be much difference between writing all the commands we saw before or writing the .yml file, but when you want to have the same container configuration working again, simply calling the .yml file will recreate the entire configuration.
Let's create a folder where we will store the Docker Compose files
InputPython!mkdir dockerComposeFilesCopied
We create the .yml file inside
InputPython!touch dockerComposeFiles/docker-compose.ymlCopied
A Docker Compose file has to start with the version
version: "<v.v>"At the time of writing this, the latest version is 3.8, so we write that
*docker-compose.yml*:
version: "3.8"The services, which are the containers, are listed below. For each service, you must specify the image and, in addition, you can add other parameters such as ports, environment variables, etc.
services:
container1:
    image: ubuntu

container2:
    image: ubuntu
The docker-compose.yml would look like this:
version: "3.8"

services:
container1:
    image: ubuntu
container2:
    image: ubuntu
Once we have created the file, in its path, we can run everything using the docker compose up command, but in addition, by adding the -d option, we will make it run in the background
InputPython!cd dockerComposeFiles && docker compose up -dCopied
[+] Running 1/0⠿ Network dockercomposefiles_default Created 0.1s⠋ Container dockercomposefiles-container2-1 Creating 0.0s⠋ Container dockercomposefiles-container1-1 Creating 0.0s[+] Running 1/3⠿ Network dockercomposefiles_default Created 0.1s⠙ Container dockercomposefiles-container2-1 Creating 0.1s⠙ Container dockercomposefiles-container1-1 Creating 0.1s[+] Running 1/3⠿ Network dockercomposefiles_default Created 0.1s⠿ Container dockercomposefiles-container2-1 Starting 0.2s⠿ Container dockercomposefiles-container1-1 Starting 0.2s[+] Running 1/3⠿ Network dockercomposefiles_default Created 0.1s⠿ Container dockercomposefiles-container2-1 Starting 0.3s⠿ Container dockercomposefiles-container1-1 Starting 0.3s[+] Running 1/3⠿ Network dockercomposefiles_default Created 0.1s⠿ Container dockercomposefiles-container2-1 Starting 0.4s⠿ Container dockercomposefiles-container1-1 Starting 0.4s[+] Running 1/3⠿ Network dockercomposefiles_default Created 0.1s⠿ Container dockercomposefiles-container2-1 Starting 0.5s⠿ Container dockercomposefiles-container1-1 Starting 0.5s[+] Running 2/3⠿ Network dockercomposefiles_default Created 0.1s⠿ Container dockercomposefiles-container2-1 Started 0.5s⠿ Container dockercomposefiles-container1-1 Starting 0.6s[+] Running 3/3⠿ Network dockercomposefiles_default Created 0.1s⠿ Container dockercomposefiles-container2-1 Started 0.5s⠿ Container dockercomposefiles-container1-1 Started 0.7s
If we look closely, it has created two containers dockercomposefiles-container1-1 and dockercomposefiles-container2-1, and the network that connects them dockercomposefiles_default
Let's delete the two containers
InputPython!docker rm -f dockercomposefiles-container1-1 dockercomposefiles-container2-1Copied
dockercomposefiles-container1-1dockercomposefiles-container2-1
And we delete the network that has been created
InputPython!docker network rm dockercomposefiles_defaultCopied
dockercomposefiles_default
Let's try to do what we did before with what we know so far. We create a new image that comes with ping installed
*Dockerfile*:
FROM ubuntu:20.04
      RUN apt update
      RUN apt install iputils-ping -y
And we compile it
InputPython!docker build -t ubuntu:ping ./dockerImagesCopied
Sending build context to Docker daemon 2.048kBStep 1/3 : FROM ubuntu:20.04---> a0ce5a295b63Step 2/3 : RUN apt update---> Running in 3bd5278d39b4WARNING: apt does not have a stable CLI interface. Use with caution in scripts.Get:1 http://security.ubuntu.com/ubuntu focal-security InRelease [114 kB]Get:2 http://archive.ubuntu.com/ubuntu focal InRelease [265 kB]Get:3 http://security.ubuntu.com/ubuntu focal-security/universe amd64 Packages [898 kB]Get:4 http://archive.ubuntu.com/ubuntu focal-updates InRelease [114 kB]Get:5 http://archive.ubuntu.com/ubuntu focal-backports InRelease [108 kB]Get:6 http://archive.ubuntu.com/ubuntu focal/universe amd64 Packages [11.3 MB]Get:7 http://security.ubuntu.com/ubuntu focal-security/main amd64 Packages [2133 kB]Get:8 http://security.ubuntu.com/ubuntu focal-security/multiverse amd64 Packages [27.5 kB]Get:9 http://security.ubuntu.com/ubuntu focal-security/restricted amd64 Packages [1501 kB]Get:10 http://archive.ubuntu.com/ubuntu focal/main amd64 Packages [1275 kB]Get:11 http://archive.ubuntu.com/ubuntu focal/restricted amd64 Packages [33.4 kB]Get:12 http://archive.ubuntu.com/ubuntu focal/multiverse amd64 Packages [177 kB]Get:13 http://archive.ubuntu.com/ubuntu focal-updates/main amd64 Packages [2594 kB]Get:14 http://archive.ubuntu.com/ubuntu focal-updates/restricted amd64 Packages [1613 kB]Get:15 http://archive.ubuntu.com/ubuntu focal-updates/multiverse amd64 Packages [30.2 kB]Get:16 http://archive.ubuntu.com/ubuntu focal-updates/universe amd64 Packages [1200 kB]Get:17 http://archive.ubuntu.com/ubuntu focal-backports/universe amd64 Packages [27.4 kB]...Successfully built c3d32aa9de02Successfully tagged ubuntu:pingUse 'docker scan' to run Snyk tests against images to find vulnerabilities and learn how to fix them
We verify that it has been created
InputPython!docker image lsCopied
REPOSITORY TAG IMAGE ID CREATED SIZEubuntu ping c3d32aa9de02 About a minute ago 112MBmaximofn/ubuntu test a78cf3ea16d8 25 hours ago 77.8MBnginx latest 2d389e545974 33 hours ago 142MBubuntu latest 2dc39ba059dc 12 days ago 77.8MBubuntu 20.04 a0ce5a295b63 12 days ago 72.8MBhello-world latest feb5d9fea6a5 11 months ago 13.3kB
We changed the tag
InputPython!docker tag ubuntu:ping maximofn/ubuntu:pingCopied
InputPython!docker image lsCopied
REPOSITORY TAG IMAGE ID CREATED SIZEubuntu ping c3d32aa9de02 About a minute ago 112MBmaximofn/ubuntu ping c3d32aa9de02 About a minute ago 112MBmaximofn/ubuntu test c3d32aa9de02 About a minute ago 112MBnginx latest 2d389e545974 33 hours ago 142MBubuntu latest 2dc39ba059dc 12 days ago 77.8MBubuntu 20.04 a0ce5a295b63 12 days ago 72.8MBhello-world latest feb5d9fea6a5 11 months ago 13.3kB
We edit the Docker Compose file so that it pulls the images we just created
*docker-compose.yml*:
version: "3.8"

services:
   container1:
markdown
image: maximofn/ubuntu:ping
container2:
    image: maximofn/ubuntu:ping
And we also tell it to execute a no-op
The docker-compose.yml would look like this:
version: "3.8"

services:
container1:
    image: ubuntu
command: tail -f /dev/null

container2:
    image: ubuntu
command: tail -f /dev/null
We set it up
InputPython!cd dockerComposeFiles && docker compose up -dCopied
[+] Running 0/0⠋ Container dockercomposefiles-container1-1 Recreate 0.1s⠋ Container dockercomposefiles-container2-1 Recreate 0.1s[+] Running 1/2⠿ Container dockercomposefiles-container1-1 Recreated 0.1s⠙ Container dockercomposefiles-container2-1 Recreate 0.2s[+] Running 1/2⠿ Container dockercomposefiles-container1-1 Recreated 0.1s⠹ Container dockercomposefiles-container2-1 Recreate 0.3s[+] Running 1/2⠿ Container dockercomposefiles-container1-1 Recreated 0.1s⠸ Container dockercomposefiles-container2-1 Recreate 0.4s[+] Running 1/2⠿ Container dockercomposefiles-container1-1 Recreated 0.1s⠼ Container dockercomposefiles-container2-1 Recreate 0.5s[+] Running 1/2⠿ Container dockercomposefiles-container1-1 Recreated 0.1s⠴ Container dockercomposefiles-container2-1 Recreate 0.6s[+] Running 1/2⠿ Container dockercomposefiles-container1-1 Recreated 0.1s...⠸ Container dockercomposefiles-container2-1 Recreate 1.4s[+] Running 1/2⠿ Container dockercomposefiles-container1-1 Recreated 0.1s...[+] Running 2/2⠿ Container dockercomposefiles-container1-1 Started 10.8s⠿ Container dockercomposefiles-container2-1 Started 10.9s[+] Running 2/2⠿ Container dockercomposefiles-container1-1 Started 10.8s⠿ Container dockercomposefiles-container2-1 Started 10.9s
We see the containers that are running
InputPython!docker psCopied
CONTAINER ID IMAGE COMMAND CREATED STATUS PORTS NAMES935939e5a75d maximofn/ubuntu:ping "tail -f /dev/null" 15 seconds ago Up 13 seconds dockercomposefiles-container2-1f9138d7064dd maximofn/ubuntu:ping "tail -f /dev/null" 25 seconds ago Up 13 seconds dockercomposefiles-container1-1
Both containers are running, now we enter one and try to ping the other
$ docker exec -it dockercomposefiles-container1-1 bash
root@f9138d7064dd:/# ping dockercomposefiles-container2-1
PING dockercomposefiles-container2-1 (172.21.0.3) 56(84) bytes of data.
64 bytes from dockercomposefiles-container2-1.dockercomposefiles_default (172.21.0.3): icmp_seq=1 ttl=64 time=0.110 ms
64 bytes from dockercomposefiles-container2-1.dockercomposefiles_default (172.21.0.3): icmp_seq=2 ttl=64 time=0.049 ms
64 bytes from dockercomposefiles-container2-1.dockercomposefiles_default (172.21.0.3): icmp_seq=3 ttl=64 time=0.049 ms
64 bytes from dockercomposefiles-container2-1.dockercomposefiles_default (172.21.0.3): icmp_seq=4 ttl=64 time=0.075 ms^C
--- dockercomposefiles-container2-1 ping statistics ---
4 packets transmitted, 4 received, 0% packet loss, time 3068ms
rtt min/avg/max/mdev = 0.049/0.070/0.110/0.025 ms
As we can see, we can run ping; we have successfully built the image with ping installed. Additionally, in the docker-compose we have made it execute a no-operation so that the containers keep running
We delete the two containers and the network that we have created
InputPython!docker rm -f dockercomposefiles-container1-1 dockercomposefiles-container2-1Copied
dockercomposefiles-container1-1dockercomposefiles-container2-1
InputPython!docker network rm dockercomposefiles_defaultCopied
dockercomposefiles_default
How Docker Compose names containers
If we look closely, the containers created by Docker are called dockercomposefiles-container1-1 and dockercomposefiles-container2-1. This is because the folder containing the Docker Compose file is in a folder called dockerComposeFiles, which is why the first part of the container names is dockercomposefiles, followed by the name of the service we gave in the Docker Compose file (container1 and container2) and finally a number so that more can be created if necessary
Similarly, the same happens with the network name that has been created dockercomposefiles_default
Logs in docker compose
Let’s now change the Docker Compose file. In the lines where we had command: tail -f /dev/null, we will set command: ping 0.0.0.0
And we also tell it to execute a no-operation
The docker-compose.yml would look like this:
version: "3.8"

services:
   container1:
    image: ubuntu
  command: ping 0.0.0.0

container2:
    image: ubuntu
markdown
command: ping 0.0.0.0
We do this so that each container is continuously outputting the ping, thus simulating some logs
If we run the docker compose again
InputPython!cd dockerComposeFiles && docker compose up -dCopied
[+] Running 0/0⠋ Container dockercomposefiles-container1-1 Recreate 0.1s⠋ Container dockercomposefiles-container2-1 Recreate 0.1s[+] Running 0/2⠙ Container dockercomposefiles-container1-1 Recreate 0.2s⠙ Container dockercomposefiles-container2-1 Recreate 0.2s[+] Running 0/2⠹ Container dockercomposefiles-container1-1 Recreate 0.3s⠹ Container dockercomposefiles-container2-1 Recreate 0.3s[+] Running 0/2⠸ Container dockercomposefiles-container1-1 Recreate 0.4s⠸ Container dockercomposefiles-container2-1 Recreate 0.4s[+] Running 0/2⠼ Container dockercomposefiles-container1-1 Recreate 0.5s⠼ Container dockercomposefiles-container2-1 Recreate 0.5s[+] Running 0/2⠴ Container dockercomposefiles-container1-1 Recreate 0.6s⠴ Container dockercomposefiles-container2-1 Recreate 0.6s[+] Running 0/2⠦ Container dockercomposefiles-container1-1 Recreate 0.7s⠦ Container dockercomposefiles-container2-1 Recreate 0.7s[+] Running 0/2⠧ Container dockercomposefiles-container1-1 Recreate 0.8s⠧ Container dockercomposefiles-container2-1 Recreate 0.8s[+] Running 0/2...⠿ Container dockercomposefiles-container1-1 Starting 11.0s⠿ Container dockercomposefiles-container2-1 Started 11.0s[+] Running 2/2⠿ Container dockercomposefiles-container1-1 Started 11.1s⠿ Container dockercomposefiles-container2-1 Started 11.0s
Now we can view the logs of both containers using the docker compose logs command
InputPython!cd dockerComposeFiles && docker compose logsCopied
dockercomposefiles-container2-1 | PING 0.0.0.0 (127.0.0.1) 56(84) bytes of data.dockercomposefiles-container2-1 | 64 bytes from 127.0.0.1: icmp_seq=1 ttl=64 time=0.042 msdockercomposefiles-container2-1 | 64 bytes from 127.0.0.1: icmp_seq=2 ttl=64 time=0.025 msdockercomposefiles-container2-1 | 64 bytes from 127.0.0.1: icmp_seq=3 ttl=64 time=0.022 msdockercomposefiles-container2-1 | 64 bytes from 127.0.0.1: icmp_seq=4 ttl=64 time=0.030 msdockercomposefiles-container2-1 | 64 bytes from 127.0.0.1: icmp_seq=5 ttl=64 time=0.021 msdockercomposefiles-container2-1 | 64 bytes from 127.0.0.1: icmp_seq=6 ttl=64 time=0.021 msdockercomposefiles-container2-1 | 64 bytes from 127.0.0.1: icmp_seq=7 ttl=64 time=0.030 msdockercomposefiles-container2-1 | 64 bytes from 127.0.0.1: icmp_seq=8 ttl=64 time=0.028 msdockercomposefiles-container2-1 | 64 bytes from 127.0.0.1: icmp_seq=9 ttl=64 time=0.028 msdockercomposefiles-container2-1 | 64 bytes from 127.0.0.1: icmp_seq=10 ttl=64 time=0.026 msdockercomposefiles-container2-1 | 64 bytes from 127.0.0.1: icmp_seq=11 ttl=64 time=0.028 msdockercomposefiles-container1-1 | PING 0.0.0.0 (127.0.0.1) 56(84) bytes of data.dockercomposefiles-container2-1 | 64 bytes from 127.0.0.1: icmp_seq=12 ttl=64 time=0.027 msdockercomposefiles-container2-1 | 64 bytes from 127.0.0.1: icmp_seq=13 ttl=64 time=0.039 msdockercomposefiles-container2-1 | 64 bytes from 127.0.0.1: icmp_seq=14 ttl=64 time=0.035 msdockercomposefiles-container2-1 | 64 bytes from 127.0.0.1: icmp_seq=15 ttl=64 time=0.034 msdockercomposefiles-container2-1 | 64 bytes from 127.0.0.1: icmp_seq=16 ttl=64 time=0.036 msdockercomposefiles-container2-1 | 64 bytes from 127.0.0.1: icmp_seq=17 ttl=64 time=0.034 msdockercomposefiles-container2-1 | 64 bytes from 127.0.0.1: icmp_seq=18 ttl=64 time=0.036 msdockercomposefiles-container2-1 | 64 bytes from 127.0.0.1: icmp_seq=19 ttl=64 time=0.032 msdockercomposefiles-container2-1 | 64 bytes from 127.0.0.1: icmp_seq=20 ttl=64 time=0.032 msdockercomposefiles-container2-1 | 64 bytes from 127.0.0.1: icmp_seq=21 ttl=64 time=0.033 msdockercomposefiles-container2-1 | 64 bytes from 127.0.0.1: icmp_seq=22 ttl=64 time=0.034 msdockercomposefiles-container1-1 | 64 bytes from 127.0.0.1: icmp_seq=1 ttl=64 time=0.037 ms...dockercomposefiles-container1-1 | 64 bytes from 127.0.0.1: icmp_seq=214 ttl=64 time=0.015 msdockercomposefiles-container1-1 | 64 bytes from 127.0.0.1: icmp_seq=215 ttl=64 time=0.021 msdockercomposefiles-container1-1 | 64 bytes from 127.0.0.1: icmp_seq=216 ttl=64 time=0.020 msdockercomposefiles-container1-1 | 64 bytes from 127.0.0.1: icmp_seq=217 ttl=64 time=0.049 ms
As we can see, we can view the logs of both containers, but if we want to see only those of one, we can specify the **service name**
InputPython!cd dockerComposeFiles && docker compose logs container1Copied
dockercomposefiles-container1-1 | PING 0.0.0.0 (127.0.0.1) 56(84) bytes of data.dockercomposefiles-container1-1 | 64 bytes from 127.0.0.1: icmp_seq=1 ttl=64 time=0.037 msdockercomposefiles-container1-1 | 64 bytes from 127.0.0.1: icmp_seq=2 ttl=64 time=0.025 msdockercomposefiles-container1-1 | 64 bytes from 127.0.0.1: icmp_seq=3 ttl=64 time=0.023 msdockercomposefiles-container1-1 | 64 bytes from 127.0.0.1: icmp_seq=4 ttl=64 time=0.031 msdockercomposefiles-container1-1 | 64 bytes from 127.0.0.1: icmp_seq=5 ttl=64 time=0.034 msdockercomposefiles-container1-1 | 64 bytes from 127.0.0.1: icmp_seq=6 ttl=64 time=0.033 msdockercomposefiles-container1-1 | 64 bytes from 127.0.0.1: icmp_seq=7 ttl=64 time=0.034 msdockercomposefiles-container1-1 | 64 bytes from 127.0.0.1: icmp_seq=8 ttl=64 time=0.022 msdockercomposefiles-container1-1 | 64 bytes from 127.0.0.1: icmp_seq=9 ttl=64 time=0.032 msdockercomposefiles-container1-1 | 64 bytes from 127.0.0.1: icmp_seq=10 ttl=64 time=0.029 msdockercomposefiles-container1-1 | 64 bytes from 127.0.0.1: icmp_seq=11 ttl=64 time=0.031 msdockercomposefiles-container1-1 | 64 bytes from 127.0.0.1: icmp_seq=12 ttl=64 time=0.024 msdockercomposefiles-container1-1 | 64 bytes from 127.0.0.1: icmp_seq=13 ttl=64 time=0.029 msdockercomposefiles-container1-1 | 64 bytes from 127.0.0.1: icmp_seq=14 ttl=64 time=0.032 msdockercomposefiles-container1-1 | 64 bytes from 127.0.0.1: icmp_seq=15 ttl=64 time=0.033 msdockercomposefiles-container1-1 | 64 bytes from 127.0.0.1: icmp_seq=16 ttl=64 time=0.034 msdockercomposefiles-container1-1 | 64 bytes from 127.0.0.1: icmp_seq=17 ttl=64 time=0.028 msdockercomposefiles-container1-1 | 64 bytes from 127.0.0.1: icmp_seq=18 ttl=64 time=0.034 ms...dockercomposefiles-container1-1 | 64 bytes from 127.0.0.1: icmp_seq=332 ttl=64 time=0.027 msdockercomposefiles-container1-1 | 64 bytes from 127.0.0.1: icmp_seq=333 ttl=64 time=0.030 msdockercomposefiles-container1-1 | 64 bytes from 127.0.0.1: icmp_seq=334 ttl=64 time=0.033 msdockercomposefiles-container1-1 | 64 bytes from 127.0.0.1: icmp_seq=335 ttl=64 time=0.036 ms
InputPython!cd dockerComposeFiles && docker compose logs container2Copied
dockercomposefiles-container2-1 | PING 0.0.0.0 (127.0.0.1) 56(84) bytes of data.dockercomposefiles-container2-1 | 64 bytes from 127.0.0.1: icmp_seq=1 ttl=64 time=0.042 msdockercomposefiles-container2-1 | 64 bytes from 127.0.0.1: icmp_seq=2 ttl=64 time=0.025 msdockercomposefiles-container2-1 | 64 bytes from 127.0.0.1: icmp_seq=3 ttl=64 time=0.022 msdockercomposefiles-container2-1 | 64 bytes from 127.0.0.1: icmp_seq=4 ttl=64 time=0.030 msdockercomposefiles-container2-1 | 64 bytes from 127.0.0.1: icmp_seq=5 ttl=64 time=0.021 msdockercomposefiles-container2-1 | 64 bytes from 127.0.0.1: icmp_seq=6 ttl=64 time=0.021 msdockercomposefiles-container2-1 | 64 bytes from 127.0.0.1: icmp_seq=7 ttl=64 time=0.030 msdockercomposefiles-container2-1 | 64 bytes from 127.0.0.1: icmp_seq=8 ttl=64 time=0.028 msdockercomposefiles-container2-1 | 64 bytes from 127.0.0.1: icmp_seq=9 ttl=64 time=0.028 msdockercomposefiles-container2-1 | 64 bytes from 127.0.0.1: icmp_seq=10 ttl=64 time=0.026 msdockercomposefiles-container2-1 | 64 bytes from 127.0.0.1: icmp_seq=11 ttl=64 time=0.028 msdockercomposefiles-container2-1 | 64 bytes from 127.0.0.1: icmp_seq=12 ttl=64 time=0.027 msdockercomposefiles-container2-1 | 64 bytes from 127.0.0.1: icmp_seq=13 ttl=64 time=0.039 msdockercomposefiles-container2-1 | 64 bytes from 127.0.0.1: icmp_seq=14 ttl=64 time=0.035 msdockercomposefiles-container2-1 | 64 bytes from 127.0.0.1: icmp_seq=15 ttl=64 time=0.034 msdockercomposefiles-container2-1 | 64 bytes from 127.0.0.1: icmp_seq=16 ttl=64 time=0.036 msdockercomposefiles-container2-1 | 64 bytes from 127.0.0.1: icmp_seq=17 ttl=64 time=0.034 msdockercomposefiles-container2-1 | 64 bytes from 127.0.0.1: icmp_seq=18 ttl=64 time=0.036 msdockercomposefiles-container2-1 | 64 bytes from 127.0.0.1: icmp_seq=19 ttl=64 time=0.032 msdockercomposefiles-container2-1 | 64 bytes from 127.0.0.1: icmp_seq=20 ttl=64 time=0.032 msdockercomposefiles-container2-1 | 64 bytes from 127.0.0.1: icmp_seq=21 ttl=64 time=0.033 msdockercomposefiles-container2-1 | 64 bytes from 127.0.0.1: icmp_seq=22 ttl=64 time=0.034 msdockercomposefiles-container2-1 | 64 bytes from 127.0.0.1: icmp_seq=23 ttl=64 time=0.035 msdockercomposefiles-container2-1 | 64 bytes from 127.0.0.1: icmp_seq=24 ttl=64 time=0.037 ms...dockercomposefiles-container2-1 | 64 bytes from 127.0.0.1: icmp_seq=340 ttl=64 time=0.034 msdockercomposefiles-container2-1 | 64 bytes from 127.0.0.1: icmp_seq=341 ttl=64 time=0.033 msdockercomposefiles-container2-1 | 64 bytes from 127.0.0.1: icmp_seq=342 ttl=64 time=0.034 msdockercomposefiles-container2-1 | 64 bytes from 127.0.0.1: icmp_seq=343 ttl=64 time=0.036 ms
If we want to view the logs continuously, we can add the -f option: docker compose logs -f <service name>
If I have created a Docker Compose with more than two services, when I want to view the logs of several services, I only need to add more names to the command, docker compose logs <name service 1> <name service 2> ...
Exec services
As we have seen, with the exec command we can enter a container by specifying the container name, the command to be executed, and the -it option. With Docker Compose this is easier, since only the service name and the command are needed, but the -it option is not necessary because Docker Compose assumes it by default.
$ docker compose exec container1 bash
root@a7cf282fe66c:/#
Stopping docker compose
When we're done working, with a single command (stop), Docker Compose handles everything; there's no need to stop each container one by one.
InputPython!cd dockerComposeFiles && docker compose stopCopied
[+] Running 0/0⠋ Container dockercomposefiles-container2-1 Stopping 0.1s⠋ Container dockercomposefiles-container1-1 Stopping 0.1s[+] Running 0/2⠙ Container dockercomposefiles-container2-1 Stopping 0.2s⠙ Container dockercomposefiles-container1-1 Stopping 0.2s[+] Running 0/2⠹ Container dockercomposefiles-container2-1 Stopping 0.3s⠹ Container dockercomposefiles-container1-1 Stopping 0.3s[+] Running 0/2⠸ Container dockercomposefiles-container2-1 Stopping 0.4s⠸ Container dockercomposefiles-container1-1 Stopping 0.4s[+] Running 0/2⠼ Container dockercomposefiles-container2-1 Stopping 0.5s⠼ Container dockercomposefiles-container1-1 Stopping 0.5s[+] Running 0/2⠴ Container dockercomposefiles-container2-1 Stopping 0.6s⠴ Container dockercomposefiles-container1-1 Stopping 0.6s[+] Running 0/2⠦ Container dockercomposefiles-container2-1 Stopping 0.7s⠦ Container dockercomposefiles-container1-1 Stopping 0.7s[+] Running 0/2⠧ Container dockercomposefiles-container2-1 Stopping 0.8s⠧ Container dockercomposefiles-container1-1 Stopping 0.8s...[+] Running 1/2⠿ Container dockercomposefiles-container2-1 Stopped 10.4s⠸ Container dockercomposefiles-container1-1 Stopping 10.4s[+] Running 2/2⠿ Container dockercomposefiles-container2-1 Stopped 10.4s⠿ Container dockercomposefiles-container1-1 Stopped 10.4s
As you can see, docker compose has stopped both containers, but has not deleted them, nor has it deleted the network
InputPython!docker psCopied
CONTAINER ID IMAGE COMMAND CREATED STATUS PORTS NAMES
InputPython!docker ps -aCopied
CONTAINER ID IMAGE COMMAND CREATED STATUS PORTS NAMES1e6c1dd9adb2 maximofn/ubuntu:ping "ping 0.0.0.0" 16 minutes ago Exited (137) 25 seconds ago dockercomposefiles-container2-1a7cf282fe66c maximofn/ubuntu:ping "ping 0.0.0.0" 16 minutes ago Exited (137) 25 seconds ago dockercomposefiles-container1-1
InputPython!docker network lsCopied
NETWORK ID NAME DRIVER SCOPE13cc632147f3 bridge bridge locald4a2f718cd83 dockercomposefiles_default bridge localda1f5f6fccc0 host host locald3b0d93993c0 none null local
Docker Compose as a development tool
As we saw before, in order to develop, the ideal thing would be to share the folder that contains the code with the service. With Docker Compose, this is done by adding the volumes label to the Docker Compose file. First, we need to add the path to the folder where the code is on the host and then the path in the container.
*docker-compose.yml*:
version: "3.8"

services:
container1:
image: ubuntu
    command: ping 0.0.0.0
    volumes:
      - ../dockerHostFolder/:/dockerContainerFolder

container2:
    image: ubuntu
command: ping 0.0.0.0
As you can see, I have set the host folder path as relative.
If we start the Docker Compose
InputPython!cd dockerComposeFiles && docker compose up -dCopied
[+] Running 1/0⠋ Container dockercomposefiles-container1-1 Recreate 0.1s⠿ Container dockercomposefiles-container2-1 Created 0.0s[+] Running 0/2⠿ Container dockercomposefiles-container1-1 Starting 0.2s⠿ Container dockercomposefiles-container2-1 Starting 0.2s[+] Running 0/2⠿ Container dockercomposefiles-container1-1 Starting 0.3s⠿ Container dockercomposefiles-container2-1 Starting 0.3s[+] Running 0/2⠿ Container dockercomposefiles-container1-1 Starting 0.4s⠿ Container dockercomposefiles-container2-1 Starting 0.4s[+] Running 1/2⠿ Container dockercomposefiles-container1-1 Started 0.5s⠿ Container dockercomposefiles-container2-1 Starting 0.5s[+] Running 2/2⠿ Container dockercomposefiles-container1-1 Started 0.5s⠿ Container dockercomposefiles-container2-1 Started 0.6s
If we enter the container, we can see what is inside the text.txt file
$ docker compose exec container1 bash
root@c8aae9d619d3:/# ls dockerContainerFolder/
bindFile.txt  fileExtract.txt  text.txt
root@c8aae9d619d3:/# cat dockerContainerFolder/text.txt
hello container
If we now open it on the host, type hola host, and check it again in the container
root@c8aae9d619d3:/# cat dockerContainerFolder/text.txt
hello host
And now the other way around, if we modify it in the container
root@c8aae9d619d3:/# echo hello compose > dockerContainerFolder/text.txt
root@c8aae9d619d3:/# exit
exit
If we view it from the host, we should get hola compose
InputPython!cat dockerHostFolder/text.txtCopied
hola compose
Port exposure in docker compose
We can also configure the ports in the Docker Compose file, using the ports label, specifying the host port and then the service IP.
ports:
- <host port>:<service port>
Docker compose in a team - docker override
If we are a group of people developing with Docker using Docker Compose, it is likely that many people will be modifying the Docker Compose file, which can cause it to not sync properly and lead to conflicts.
To solve this, Docker offers a tool called Docker Override. This way, there can be a base Docker Compose file and each one can modify it using Docker Override.
To do this, we now need to create a file called docker-compose.override.yml that we will be able to edit
InputPython!touch dockerComposeFiles/docker-compose.override.ymlCopied
If we now try to start Docker Compose, we are going to receive an error
InputPython!cd dockerComposeFiles && docker compose up -dCopied
Top-level object must be a mapping
And this is because Docker Compose has detected that there is a file called docker-compose.override.yml and that it is empty, so we are going to edit it. The docker-compose.override.yml file is used to edit the docker-compose.yml file, so if, for example, we want to make a change in the container2 service to add a volume, we would write the docker-compose.override.yml file like this
*docker-compose.override.yml*:
version: "3.8"

services:
container2:
markdown
volumes:
- ../dockerHostFolder/:/dockerOverrideFolderNotice that the shared folder in the service is named dockerOverrideFolder, so we are going to bring up the Docker Compose and see if we can see that folder in the container2 container
InputPython!cd dockerComposeFiles && docker compose up -dCopied
[+] Running 1/0⠋ Container dockercomposefiles-container2-1 Recreate 0.1s⠿ Container dockercomposefiles-container1-1 Running 0.0s[+] Running 1/2⠙ Container dockercomposefiles-container2-1 Recreate 0.2s⠿ Container dockercomposefiles-container1-1 Running 0.0s[+] Running 1/2⠹ Container dockercomposefiles-container2-1 Recreate 0.3s⠿ Container dockercomposefiles-container1-1 Running 0.0s[+] Running 1/2⠸ Container dockercomposefiles-container2-1 Recreate 0.4s⠿ Container dockercomposefiles-container1-1 Running 0.0s[+] Running 1/2⠼ Container dockercomposefiles-container2-1 Recreate 0.5s⠿ Container dockercomposefiles-container1-1 Running 0.0s[+] Running 1/2⠴ Container dockercomposefiles-container2-1 Recreate 0.6s⠿ Container dockercomposefiles-container1-1 Running 0.0s[+] Running 1/2⠦ Container dockercomposefiles-container2-1 Recreate 0.7s⠿ Container dockercomposefiles-container1-1 Running 0.0s[+] Running 1/2⠧ Container dockercomposefiles-container2-1 Recreate 0.8s⠿ Container dockercomposefiles-container1-1 Running 0.0s...[+] Running 1/2⠿ Container dockercomposefiles-container2-1 Starting 10.8s⠿ Container dockercomposefiles-container1-1 Running 0.0s[+] Running 2/2⠿ Container dockercomposefiles-container2-1 Started 10.8s⠿ Container dockercomposefiles-container1-1 Running 0.0s
We see that it took 10 seconds to mount the container2 service; that's because it had been applying the changes.
$ docker compose exec container2 bash
root@d8777a4e611a:/# ls dockerOverrideFolder/
bindFile.txt  fileExtract.txt  text.txt
root@d8777a4e611a:/# cat dockerOverrideFolder/text.txthello compose
root@d8777a4e611a:/# exit
We bring down the Compose and delete the containers and the network created
InputPython!cd dockerComposeFiles && docker compose downCopied
[+] Running 0/0⠋ Container dockercomposefiles-container2-1 Stopping 0.1s⠋ Container dockercomposefiles-container1-1 Stopping 0.1s[+] Running 0/2⠙ Container dockercomposefiles-container2-1 Stopping 0.2s⠙ Container dockercomposefiles-container1-1 Stopping 0.2s[+] Running 0/2⠹ Container dockercomposefiles-container2-1 Stopping 0.3s⠹ Container dockercomposefiles-container1-1 Stopping 0.3s[+] Running 0/2⠸ Container dockercomposefiles-container2-1 Stopping 0.4s⠸ Container dockercomposefiles-container1-1 Stopping 0.4s[+] Running 0/2⠼ Container dockercomposefiles-container2-1 Stopping 0.5s⠼ Container dockercomposefiles-container1-1 Stopping 0.5s[+] Running 0/2⠴ Container dockercomposefiles-container2-1 Stopping 0.6s⠴ Container dockercomposefiles-container1-1 Stopping 0.6s[+] Running 0/2⠦ Container dockercomposefiles-container2-1 Stopping 0.7s⠦ Container dockercomposefiles-container1-1 Stopping 0.7s[+] Running 0/2⠧ Container dockercomposefiles-container2-1 Stopping 0.8s⠧ Container dockercomposefiles-container1-1 Stopping 0.8s...⠸ Container dockercomposefiles-container2-1 Stopping 10.4s⠸ Container dockercomposefiles-container1-1 Stopping 10.4s[+] Running 1/2⠿ Container dockercomposefiles-container2-1 Removed 10.4s⠿ Container dockercomposefiles-container1-1 Removing 10.5s[+] Running 2/2⠿ Container dockercomposefiles-container2-1 Removed 10.4s⠿ Container dockercomposefiles-container1-1 Removed 10.5s⠋ Network dockercomposefiles_default Removing 0.1s[+] Running 3/3⠿ Container dockercomposefiles-container2-1 Removed 10.4s⠿ Container dockercomposefiles-container1-1 Removed 10.5s⠿ Network dockercomposefiles_default Removed 0.2s
In this case, only with down Docker Compose has stopped and deleted everything, since, as we can see in the containers and in the network, it says Removed
Docker compose restart
When writing a Docker Compose file, we can add the restart label so that if the container crashes, it restarts automatically
restart: alwaysIn this way, if the container crashes, it will restart automatically. If we want it to restart only a certain number of times, we can add the on-failure option
restart: on-failure:<number>Now the container will restart a number of times, but if it fails more times, it will not restart. If we want it to always restart, we can add the unless-stopped option.
restart: unless-stoppedNow the container will always restart, unless it is stopped manually
Advanced Docker
Manage workspace environment
Deletion of stopped containers
After spending some time developing, we may have several stopped containers saved on the computer. This ends up taking up memory, so with docker container prune we can delete all the ones that are stopped
InputPython!docker run ubuntuCopied
InputPython!docker psCopied
CONTAINER ID IMAGE COMMAND CREATED STATUS PORTS NAMES
InputPython!docker ps -aCopied
CONTAINER ID IMAGE COMMAND CREATED STATUS PORTS NAMESeffcee24f54a ubuntu "bash" 37 seconds ago Exited (0) 36 seconds ago musing_rosalind
$ docker container prune
WARNING! Esto eliminará todos los contenedores detenidos.
Are you sure you want to continue? [y/N] y
Contenedores eliminados:
effcee24f54aab22e34fdea2465b3b7af132d8c627e5432ba3e915a370876977

Total reclaimed space: 0B
In this case, we have saved 0 bytes, but in the case of leaving containers turned off after a lot of development, the memory savings will surely be greater
Deletion of all containers
In case there are running containers, we can remove all containers using another command
The command docker ps -q returns the ID of all containers, so with the command docker rm -f $(docker ps -aq) we will stop and delete them all
InputPython!docker run -d ubuntu tail -f /dev/nullCopied
c22516186ef7e3561fb1ad0d508a914857dbc61274a218f297c4d80b1fc33863
InputPython!docker psCopied
CONTAINER ID IMAGE COMMAND CREATED STATUS PORTS NAMESc22516186ef7 ubuntu "tail -f /dev/null" About a minute ago Up About a minute agitated_knuth
InputPython!docker rm -f $(docker ps -aq)Copied
c22516186ef7
InputPython!docker ps -aCopied
CONTAINER ID IMAGE COMMAND CREATED STATUS PORTS NAMES
Deleting Everything
As we have seen, Docker also creates networks, images, volumes, etc., so with the command docker system prune we can delete all stopped containers, all networks that are not used by at least one container, duplicate images, and anything duplicated in the build cache
$ docker system prune
WARNING! This will remove:
- all stopped containers
- all networks not used by at least one container
 - all dangling images
- all dangling build cache
Are you sure you want to continue? [y/N] y
Total reclaimed space: 0B
As before, not much space has been saved, but after a long time of development, the savings will be considerable
Host resource usage by containers
For example, when creating a container, we can limit the RAM that the host can use using the --memory option
InputPython!docker run -d --memory 1g ubuntu tail -f /dev/nullCopied
d84888eafe531831ef8915d2270422365adec02678122bf59580e2da782e6972
But with docker ps we don't have access to the resources the container is consuming
InputPython!docker psCopied
CONTAINER ID IMAGE COMMAND CREATED STATUS PORTS NAMESd84888eafe53 ubuntu "tail -f /dev/null" 35 seconds ago Up 34 seconds musing_ritchie
For that, we have the docker stats command
$ docker stats
CONTAINER ID   NAME             CPU %     MEM USAGE / LIMIT   MEM %     NET I/O       BLOCK I/O   PIDS
d84888eafe53   musing_ritchie   0.00%     540KiB / 1GiB       0.05%     5.62kB / 0B   0B / 0B     1
This is very useful if we want to simulate an environment with a RAM limit
Properly stopping containers: SHELL vs EXEC
As we have explained, when we assign a process to a container, when that process ends, the container stops, but sometimes we may encounter problems with this. Let's create a new folder called Dockerfile_loop
InputPython!mkdir Dockerfile_loopCopied
Now we are going to create a file called loop.sh inside Dockerfile_loop
InputPython!touch Dockerfile_loop/loop.shCopied
And we are going to write the following inside loop.sh
#!/usr/bin/env bash
      trap "exit 0" SIGTERM
      while true; do :; done
If I run this script on the host, it keeps running until I press CTRL+C
./loop
^C
Now we are going to create a Dockerfile file inside Dockerfile_loop
InputPython!touch Dockerfile_loop/DockerfileCopied
*Dockerfile*:
FROM ubuntu:trusty
      COPY ["loop.sh", "/"]CMD /loop.sh
Let's create an image based on Ubuntu that copies the script inside and runs it, and the script runs until it receives the SIGTERM signal from the operating system. We build the image.
InputPython!docker build -t ubuntu:loop ./Dockerfile_loopCopied
Sending build context to Docker daemon 3.072kBStep 1/3 : FROM ubuntu:trusty---> 13b66b487594Step 2/3 : COPY ["loop.sh", "/"]---> 89f2bbd25a88Step 3/3 : CMD /loop.sh---> Running in ff52569c35fdRemoving intermediate container ff52569c35fd---> feb091e4efa3Successfully built feb091e4efa3Successfully tagged ubuntu:loopUse 'docker scan' to run Snyk tests against images to find vulnerabilities and learn how to fix them
We run the container
docker run -d --name looper ubuntu:loop bashInputPython!docker run -d --name looper ubuntu:loopCopied
8a28f8cc9892213c4e0603dfdde320edf52c091b82c60510083549a391cd6645
We check and see that the container is running
InputPython!docker psCopied
CONTAINER ID IMAGE COMMAND CREATED STATUS PORTS NAMES8a28f8cc9892 ubuntu:loop "/bin/sh -c /loop.sh" 4 seconds ago Up 3 seconds looper
We tried to stop the container with docker stop looper. docker stop tries to stop the container by sending it the SIGTERM signal.
InputPython%%time!docker stop looperCopied
looperCPU times: user 89.2 ms, sys: 21.7 ms, total: 111 msWall time: 10.6 s
This has taken about 10 seconds to stop, when it should have been immediate. This is because stop sent the SIGTERM command to stop the container, but since it did not stop, after a while it sent a SIGKILL to force it to stop. Let's see what happens if we list the containers
InputPython!docker ps -aCopied
CONTAINER ID IMAGE COMMAND CREATED STATUS PORTS NAMES8a28f8cc9892 ubuntu:loop "/bin/sh -c /loop.sh" 23 seconds ago Exited (137) 2 seconds ago looper
We can see that the Exited signal is 137, which corresponds to SIGKILL; that is, Docker had to force the shutdown.
Let's delete the container and run it again
InputPython!docker rm looperCopied
looper
InputPython!docker run -d --name looper ubuntu:loopCopied
84bc37f944d270be5f84a952968db2b8cf5372c61146d29383468198ceed18fd
If we now try to stop the container with docker kill looper
InputPython%%time!docker kill looperCopied
looperCPU times: user 9.1 ms, sys: 857 µs, total: 9.96 msWall time: 545 ms
We see that the time is about 500 ms, that is, Docker stopped it at some point by sending it the SIGKILL command. Because kill does not send SIGTERM, and if the container has not stopped after some time, it sends SIGKILL; what it does is send SIGKILL from the start.
If we look at the containers, we see that the exit signal is the same, 137
InputPython!docker ps -aCopied
CONTAINER ID IMAGE COMMAND CREATED STATUS PORTS NAMES84bc37f944d2 ubuntu:loop "/bin/sh -c /loop.sh" 6 seconds ago Exited (137) 2 seconds ago looper
This is not the correct way to shut down a container, because when we want to shut down the container, it should be done using the SIGTERM signal, so that it finishes processing whatever it was doing and then shuts down
If we delete the container and run it again
InputPython!docker rm looperCopied
looper
InputPython!docker run -d --name looper ubuntu:loopCopied
b9d9f370cc0de7569eb09d0a85cd67e8ea6babc0754a517ccba5c5057f5cc50e
If we now see the processes that are running inside the container
InputPython!docker exec looper ps -efCopied
UID PID PPID C STIME TTY TIME CMDroot 1 0 0 14:05 ? 00:00:00 /bin/sh -c /loop.shroot 7 1 93 14:05 ? 00:00:02 bash /loop.shroot 8 0 0 14:05 ? 00:00:00 ps -ef
Actually, the main process, the 1, is not /loop.sh but rather /bin/sh -c /loop.sh, that is, it is a child process of the shell. So when the SIGTERM signal arrived, it reached the shell, but it does not send it to its child processes, which is why it never reached loop.sh
To prevent this from happening, the Dockerfile needs to be changed to the following
*Dockerfile*:
FROM ubuntu:trusty
      COPY ["loop.sh", "/"]
      CMD ["/loop.sh"]    # before it was CMD /loop.sh
This form is called exec form, while the previous one is called shell form, so in the previous form the process runs as a child of the shell, whereas in the exec form the process we specify is executed. So we delete the container, rebuild it, and run the container again with the image
InputPython!docker rm -f looperCopied
looper
InputPython!docker build -t ubuntu:loop ./Dockerfile_loopCopied
Sending build context to Docker daemon 3.072kBStep 1/3 : FROM ubuntu:trusty---> 13b66b487594Step 2/3 : COPY ["loop.sh", "/"]---> Using cache---> 89f2bbd25a88Step 3/3 : CMD ["/loop.sh"]---> Running in 6b8d92fcd57cRemoving intermediate container 6b8d92fcd57c---> 35a7bb2b1892Successfully built 35a7bb2b1892Successfully tagged ubuntu:loopUse 'docker scan' to run Snyk tests against images to find vulnerabilities and learn how to fix them
InputPython!docker run -d --name looper ubuntu:loopCopied
850ae70c071426850b28428ac60dcbf875c6d35d9b7cc66c17cf391a23392965
Yes, now I see the processes inside the container
InputPython!docker exec looper ps -efCopied
UID PID PPID C STIME TTY TIME CMDroot 1 0 88 14:14 ? 00:00:02 bash /loop.shroot 7 0 0 14:14 ? 00:00:00 ps -ef
Now I see that the main process, 1, is /loop.sh
If I now try to stop the container
InputPython%%time!docker stop looperCopied
looperCPU times: user 989 µs, sys: 7.55 ms, total: 8.54 msWall time: 529 ms
We see that it takes longer. Let's look at the code where it stopped
InputPython!docker ps -aCopied
CONTAINER ID IMAGE COMMAND CREATED STATUS PORTS NAMES850ae70c0714 ubuntu:loop "/loop.sh" About a minute ago Exited (0) 33 seconds ago looper
Executable Containers
If we want a binary to run as an executable, in the dockerfile we need to specify the command in ENTRYPOINT and the command parameters in CMD, let's see it
Let's create a new folder where we will store the Dockerfile
InputPython!mkdir dockerfile_pingCopied
Now we create a Dockerfile inside
InputPython!touch dockerfile_ping/DockerfileCopied
We write the following inside the Dockerfile
FROM ubuntu:trusty
      ENTRYPOINT [ "/bin/ping", "-c", "3" ]
      CMD [ "localhost" ]
We built the image
InputPython!docker build -t ubuntu:ping ./dockerfile_pingCopied
Sending build context to Docker daemon 3.072kBStep 1/3 : FROM ubuntu:trusty---> 13b66b487594Step 2/3 : ENTRYPOINT [ "/bin/ping", "-c", "3" ]---> Using cache---> 1cebcfb542b1Step 3/3 : CMD [ "localhost" ]---> Using cache---> 04ddc3de52a2Successfully built 04ddc3de52a2Successfully tagged ubuntu:pingUse 'docker scan' to run Snyk tests against images to find vulnerabilities and learn how to fix them
If we now run the image without passing it a parameter, the container will ping itself
InputPython!docker run --name ping_localhost ubuntu:pingCopied
PING localhost (127.0.0.1) 56(84) bytes of data.64 bytes from localhost (127.0.0.1): icmp_seq=1 ttl=64 time=0.041 ms64 bytes from localhost (127.0.0.1): icmp_seq=2 ttl=64 time=0.058 ms64 bytes from localhost (127.0.0.1): icmp_seq=3 ttl=64 time=0.054 ms--- localhost ping statistics ---3 packets transmitted, 3 received, 0% packet loss, time 2027msrtt min/avg/max/mdev = 0.041/0.051/0.058/0.007 ms
But if we now pass it a parameter, it will ping the address we tell it to.
InputPython!docker run --name ping_google ubuntu:ping google.comCopied
PING google.com (216.58.209.78) 56(84) bytes of data.64 bytes from waw02s06-in-f14.1e100.net (216.58.209.78): icmp_seq=1 ttl=111 time=3.93 ms64 bytes from waw02s06-in-f14.1e100.net (216.58.209.78): icmp_seq=2 ttl=111 time=6.80 ms64 bytes from waw02s06-in-f14.1e100.net (216.58.209.78): icmp_seq=3 ttl=111 time=6.92 ms--- google.com ping statistics ---3 packets transmitted, 3 received, 0% packet loss, time 2002msrtt min/avg/max/mdev = 3.930/5.886/6.920/1.383 ms
We remove the containers
InputPython!docker rm ping_localhost ping_googleCopied
ping_localhostping_google
The build context
Let's create a folder called dockerfile_contexto
InputPython!mkdir dokerfile_contextoCopied
Now we create two files in it: a test.txt and the Dockerfile
InputPython!touch dokerfile_contexto/Dockerfile dokerfile_contexto/text.txtCopied
We modify the Dockerfile and put the following:
FROM ubuntu:trusty
      COPY [".", "/"]
This will copy into the image everything that is in the folder where the Dockerfile is located. We build the image
InputPython!docker build -t ubuntu:contexto ./dokerfile_contextoCopied
Sending build context to Docker daemon 2.56kBStep 1/2 : FROM ubuntu:trusty---> 13b66b487594Step 2/2 : COPY [".", "/"]---> 3ab79fdce389Successfully built 3ab79fdce389Successfully tagged ubuntu:contextoUse 'docker scan' to run Snyk tests against images to find vulnerabilities and learn how to fix them
Let's see what's inside the container
InputPython!docker run --name ls ubuntu:contexto lsCopied
Dockerfilebinbootdevetchomeliblib64mediamntoptprocrootrunsbinsrvsystext.txttmpusrvar
As we can see, there is the text.txt file. But it is possible that inside the folder that is in the same directory as the Dockerfile there are files or folders that we do not want to be copied into the image, for whatever reason, so just like in git we have .gitignore, in Docker we have .dockerignore, where we put the files or folders that we do not want to be taken into account when building
So we create a .dockerignore file
InputPython!touch dokerfile_contexto/.dockerignoreCopied
And inside we add the text.txt, and while we’re at it, the Dockerfile, which we don’t need inside the image
*.dockerignore*:
```Dockerfiletext.txt Dockerfiletext.txt ```We delete the container we had created, rebuild it, and see what is inside the container
InputPython!docker rm lsCopied
ls
InputPython!docker build -t ubuntu:contexto ./dokerfile_contextoCopied
Sending build context to Docker daemon 3.072kBStep 1/2 : FROM ubuntu:trusty---> 13b66b487594Step 2/2 : COPY [".", "/"]---> 7a6689546da4Successfully built 7a6689546da4Successfully tagged ubuntu:contextoUse 'docker scan' to run Snyk tests against images to find vulnerabilities and learn how to fix them
InputPython!docker run --name ls ubuntu:contexto lsCopied
binbootdevetchomeliblib64mediamntoptprocrootrunsbinsrvsystmpusrvar
We see that now neither Dockerfile nor text.txt are there. We delete the container
InputPython!docker rm lsCopied
ls
Multi-stage build
At the end of a development, we do not want all the code to be in the image that is going to be deployed to production.
We can split the dockerfile into two, for example, the developer.Dockerfile and the production.Dockerfile, where development will include more things than production. When building them, using the -f option, we choose the dockerfile we want to use
docker build -t <tag> -f developer.Dockerfiledocker build -t <tag> -f production.DockerfileBut so as not to have to create two Dockerfile files, Docker created multi-stage builds. With a single Dockerfile, we’re going to solve the problem
We create the folder where we are going to save the Dockerfile
InputPython!mkdir docker_multi_stageCopied
And inside we create the Dockerfile file
InputPython!cd docker_multi_stage && touch DockerfileCopied
We edit the file, adding the following
# Stage 1: Generate the executable with Python based on Alpine
FROM python:3.9-alpine as build-stage
WORKDIR /app
# Install dependencies for PyInstaller
RUN apk add --no-cache gcc musl-dev libc-dev
# Generate hello.py
RUN echo 'print("Hello from Alpine!")' > hello.py
# Install PyInstaller
RUN pip install pyinstaller
# Use PyInstaller to create a standalone executable
RUN pyinstaller --onefile hello.py

# Stage 2: Run the executable in an Alpine image
FROM alpine:latest
WORKDIR /app
# Copy the executable from the build stage
COPY --from=build-stage /app/dist/hello .
# Default command to run the executable
CMD ["./hello"]
As can be seen, the Dockerfile is divided into two parts. On the one hand, work is done on the python:3.9-alpine image, which is called build-stage. And, on the other hand, we work on the alpine:latest image, which is a very lightweight Linux image and is widely used in production
We compiled it
InputPython!docker build -t maximofn/multistagebuild:latest ./docker_multi_stageCopied
[+] Building 0.0s (0/2) docker:default
[+] Building 0.2s (4/6) docker:default=> [internal] load build definition from Dockerfile 0.0s=> => transferring dockerfile: 722B 0.0s=> [internal] load .dockerignore 0.0s=> => transferring context: 2B 0.0s=> [internal] load metadata for docker.io/library/alpine:latest 0.1s=> [internal] load metadata for docker.io/library/python:3.9-alpine 0.1s...=> CACHED [stage-1 3/3] COPY --from=build-stage /app/dist/hello . 0.0s=> exporting to image 0.0s=> => exporting layers 0.0s=> => writing image sha256:7fb090d1495d00e892118b6bc3c03400b63a435fd4703 0.0s=> => naming to docker.io/maximofn/multistagebuild:latest 0.0s
If we now look at the images we have
InputPython!docker image lsCopied
REPOSITORY TAG IMAGE ID CREATED SIZEmaximofn/multistagebuild latest 7fb090d1495d 8 minutes ago 13.6MB
Let's download the Python image to see how much it weighs
InputPython!docker pull python:3.9-alpineCopied
3.9-alpine: Pulling from library/pythona8db6415: Already existsd5e70e42: Already exists3fe96417: Already existsaa4dddbb: Already exists518be9f7: Already exists Digest: sha256:6e508b43604ff9a81907ec17405c9ad5c13664e45a5affa2206af128818c7486Status: Downloaded newer image for python:3.9-alpinedocker.io/library/python:3.9-alpine
InputPython!docker image lsCopied
REPOSITORY TAG IMAGE ID CREATED SIZEmaximofn/multistagebuild latest 7fb090d1495d 9 minutes ago 13.6MBpython 3.9-alpine 6946662f018b 9 days ago 47.8MB
We can see that while our image weighs only 13.6 MB, the Python image with which the application was built weighs 47.8 MB. So we can draw two conclusions: with the first image, the Python one, the application was built, the executable was generated, and that executable is the one we use in the second image, the Alpine one. We can also see that although the first image used is Python, it is not downloaded to our system, since we had to download it ourselves
Well, all that’s left is to try it.
InputPython!docker run --rm --name multi_stage_build maximofn/multistagebuildCopied
Hello from Alpine!
It works!
Compilaciones multiarquitectura
Suppose we want to make an image that can run on a computer and on a Raspberry Pi. The computer will probably have a CPU with AMD64 architecture, while the Raspberry Pi has a CPU with ARM architecture. Therefore, we cannot create the same image for both. That is, when we create an image, we create it with a Dockerfile that usually starts like this
FROM ...Therefore, the Dockerfile of the computer image could start like this
FROM ubuntu:latestWhile the Raspberry one could start like this
FROM arm64v8/ubuntu:latestWe would need to create two Dockerfile files, build them, and use one image on the computer and another on the Raspberry Pi
To avoid having to check the computer architecture and determine which image we need to use, Docker creates the manifest, which, as its name suggests, is a manifest that indicates, depending on the CPU architecture we have, which image to use.
So let's see how to do this
First, we create a folder where we are going to create our Dockerfile files
InputPython!mkdir docker_multi_archCopied
Now we create the two Dockerfiles
InputPython!cd docker_multi_arch && touch Dockerfile_arm64 Dockerfile_amd64Copied
We write the Dockerfile for AMD64
InputPython!cd docker_multi_arch && echo "FROM ubuntu:20.04" >> Dockerfile_amd64 && echo "CMD echo 'Hello from amd64'" >> Dockerfile_amd64Copied
InputPython!cd docker_multi_arch && echo "FROM arm64v8/ubuntu:latest" >> Dockerfile_arm && echo "CMD echo 'Hello from ARM'" >> Dockerfile_armCopied
Now we combine the two images
InputPython!cd docker_multi_arch && docker build -t maximofn/multiarch:arm -f Dockerfile_arm .Copied
[+] Building 0.0s (0/1) docker:default[+] Building 0.2s (2/3) docker:default=> [internal] load build definition from Dockerfile_amd64 0.1s=> => transferring dockerfile: 89B 0.0s=> [internal] load .dockerignore 0.1s=> => transferring context: 2B 0.0s=> [internal] load metadata for docker.io/library/ubuntu:20.04 0.1s[+] Building 0.3s (2/3) docker:default=> [internal] load build definition from Dockerfile_amd64 0.1s=> => transferring dockerfile: 89B 0.0s=> [internal] load .dockerignore 0.1s=> => transferring context: 2B 0.0s=> [internal] load metadata for docker.io/library/ubuntu:20.04 0.2s[+] Building 0.5s (2/3) docker:default=> [internal] load build definition from Dockerfile_amd64 0.1s=> => transferring dockerfile: 89B 0.0s=> [internal] load .dockerignore 0.1s=> => transferring context: 2B 0.0s=> [internal] load metadata for docker.io/library/ubuntu:20.04 0.4s[+] Building 0.6s (2/3) docker:default=> [internal] load build definition from Dockerfile_amd64 0.1s=> => transferring dockerfile: 89B 0.0s=> [internal] load .dockerignore 0.1s=> => transferring context: 2B 0.0s=> [internal] load metadata for docker.io/library/ubuntu:20.04 0.5s...=> => transferring context: 2B 0.0s=> [internal] load build definition from Dockerfile_arm 0.0s=> => transferring dockerfile: 94B 0.0s=> [internal] load metadata for docker.io/arm64v8/ubuntu:latest 1.8s=> [auth] arm64v8/ubuntu:pull token for registry-1.docker.io 0.0s=> CACHED [1/1] FROM docker.io/arm64v8/ubuntu:latest@sha256:94d12db896d0 0.0s=> exporting to image 0.0s=> => exporting layers 0.0s=> => writing image sha256:a9732c1988756dc8e836fd96e5c9512e349c97ea5af46 0.0s=> => naming to docker.io/maximofn/multiarch:arm 0.0s
Let's see what we have in the two compiled images
InputPython!docker image lsCopied
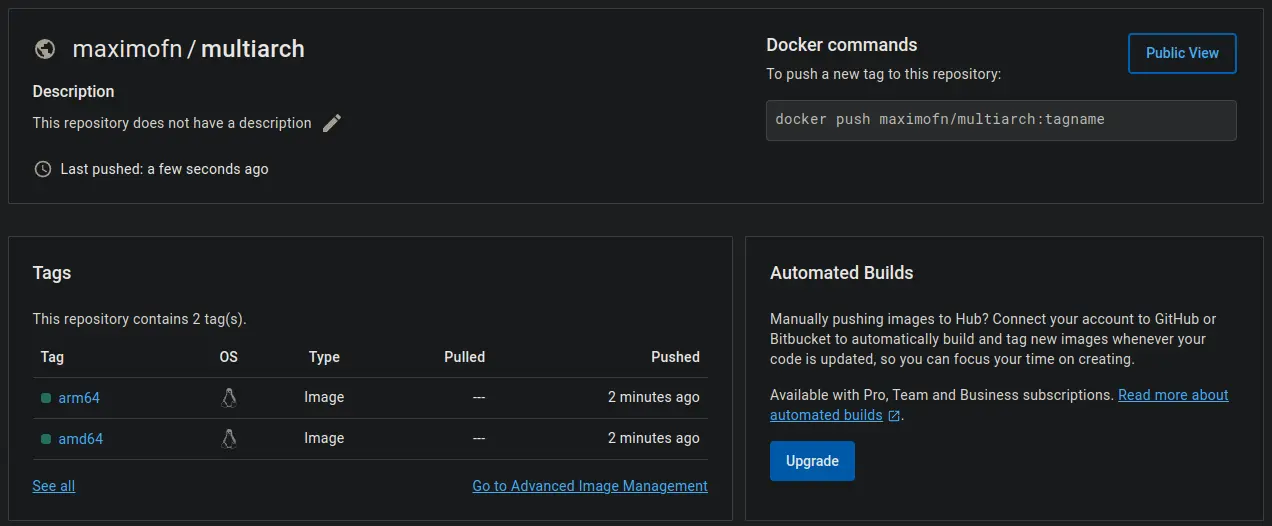
REPOSITORY TAG IMAGE ID CREATED SIZEmaximofn/multiarch arm a9732c198875 4 weeks ago 69.2MBmaximofn/multiarch amd64 5b612c83025f 6 weeks ago 72.8MB
We see that we have built the two images. To be able to create a manifest, we first need to upload the images to Docker Hub, so we upload them
InputPython!docker push maximofn/multiarch:amd64Copied
The push refers to repository [docker.io/maximofn/multiarch]82bdeb5f: Mounted from library/ubuntu amd64: digest: sha256:30e820f2a11a24ad4d8fb624ae485f7c1bcc299e8cfc72c88adce1acd0447e1d size: 529
InputPython!docker push maximofn/multiarch:armCopied
The push refers to repository [docker.io/maximofn/multiarch]
eda53374: Layer already exists arm: digest: sha256:6ec5a0752d49d3805061314147761bf25b5ff7430ce143adf34b70d4eda15fb8 size: 529
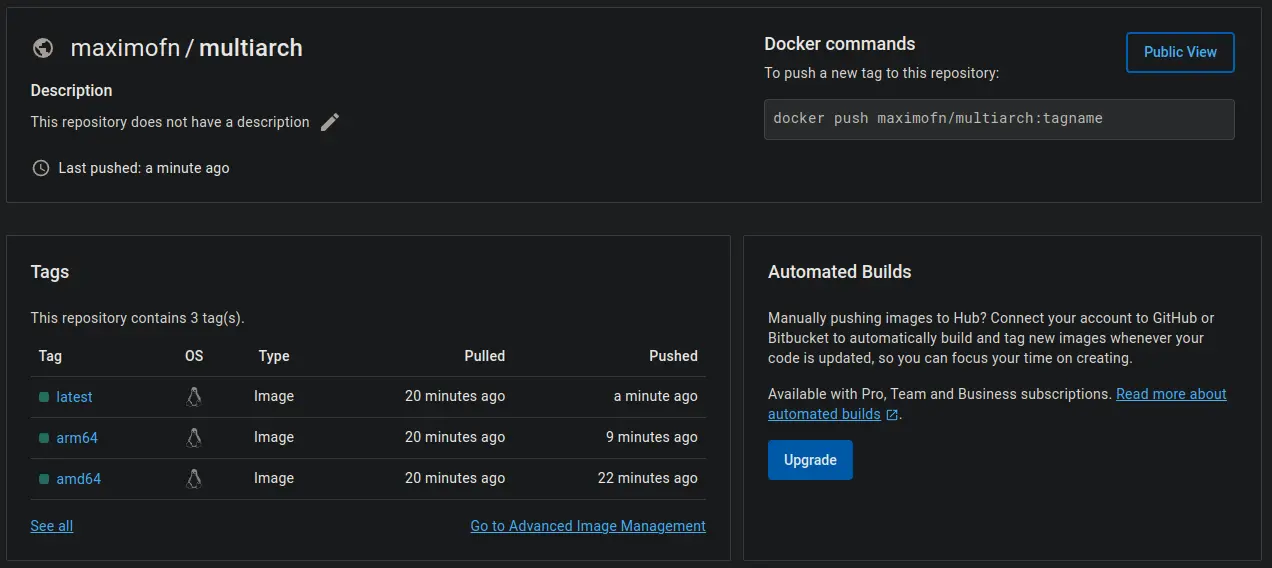
If I go to my Docker Hub, I can see that my image maximofn/multiarch has the amd64 and arm tags
Now we are going to create the manifest based on these two images
InputPython!docker manifest create maximofn/multiarch:latest maximofn/multiarch:amd64 maximofn/multiarch:armCopied
Created manifest list docker.io/maximofn/multiarch:latest
Once created, we need to indicate the CPU architectures to which each one corresponds.
InputPython!docker manifest annotate maximofn/multiarch:latest maximofn/multiarch:amd64 --os linux --arch amd64Copied
InputPython!docker manifest annotate maximofn/multiarch:latest maximofn/multiarch:arm64 --os linux --arch arm64Copied
manifest for image maximofn/multiarch:arm64 does not exist in maximofn/multiarch:latest
Once created and annotated, we can upload the manifest to Docker Hub
InputPython!docker manifest push maximofn/multiarch:latestCopied
sha256:1ea28e9a04867fe0e0d8b0efa455ce8e4e29e7d9fd4531412b75dbd0325e9304
If I look again now at the tags my maximofn/multiarch image has, I also see the latest one
Now, whether I want to use my image from a machine with an AMD64 CPU or an ARM CPU when using FROM maximofn/multiarch:latest, Docker will check the CPU architecture and pull the amd64 tag or the arm tag. Let's see it; if I run the image from my computer, I get
InputPython!docker run maximofn/multiarch:latestCopied
Unable to find image 'maximofn/multiarch:latest' locally
latest: Pulling from maximofn/multiarchDigest: sha256:7cef0de10f7fa2b3b0dca0fbf398d1f48af17a0bbc5b9beca701d7c427c9fd84Status: Downloaded newer image for maximofn/multiarch:latestHello from amd64
Since he doesn't have it, he downloads it
If I now connect via SSH to a Raspberry Pi and try the same thing, I get
raspberry@raspberrypi:~ $ docker run maximofn/multiarch:latest
Unable to find image 'maximofn/multiarch:latest' locally
latest: Pulling from maximofn/multiarch
Digest: sha256:1ea28e9a04867fe0e0d8b0efa455ce8e4e29e7d9fd4531412b75dbd0325e9304
Status: Downloaded newer image for maximofn/multiarch:latest
Hello from ARM
Hello from ARM appears because the Raspberry has a processor with ARM architecture
As can be seen, each machine has downloaded the image it needed
Advanced Dockerfile Writing
We already saw how to write Dockerfiles correctly, but there is one more thing we can do now that we know about multi-stage builds, and that is to create one container to build the executable and another smaller one to run it
We came to the conclusion that a good Dockerfile could be this one
FROM python:3.9.18-alpine
      WORKDIR /sourceCode/sourceApp
      COPY ./sourceCode/sourceApp .
      CMD ["python3", "app.py"]
Let's now create an executable in a builder container and run it in a smaller one.
FROM python:3.9.18-alpine as builder
WORKDIR /sourceCode/sourceApp
RUN apk add --no-cache gcc musl-dev libc-dev && pip install pyinstaller
COPY ./sourceCode/sourceApp .
RUN pyinstaller --onefile app.py

FROM alpine:3.18.3
WORKDIR /sourceCode/sourceApp
COPY --from=builder /sourceCode/sourceApp/dist/app .
CMD ["./app"]
We created the Python code in the necessary path
InputPython!mkdir multistagebuild/sourceCode!mkdir multistagebuild/sourceCode/sourceApp!touch multistagebuild/sourceCode/sourceApp/app.py!echo 'print("Hello from Alpine!")' > multistagebuild/sourceCode/sourceApp/app.pyCopied
Now compiling the image
InputPython!docker build -t maximofn/multistagebuild:alpine-3.18.3 ./multistagebuildCopied
[+] Building 0.0s (0/0) docker:default[+] Building 0.0s (0/1) docker:default[+] Building 0.2s (3/5) docker:default=> [internal] load build definition from Dockerfile 0.1s=> => transferring dockerfile: 357B 0.0s=> [internal] load .dockerignore 0.1s=> => transferring context: 2B 0.0s=> [internal] load metadata for docker.io/library/alpine:3.18.3 0.1s=> [internal] load metadata for docker.io/library/python:3.9.18-alpine 0.1s=> [auth] library/alpine:pull token for registry-1.docker.io 0.0s[+] Building 0.3s (3/5) docker:default=> [internal] load build definition from Dockerfile 0.1s=> => transferring dockerfile: 357B 0.0s=> [internal] load .dockerignore 0.1s=> => transferring context: 2B 0.0s=> [internal] load metadata for docker.io/library/alpine:3.18.3 0.2s=> [internal] load metadata for docker.io/library/python:3.9.18-alpine 0.2s=> [auth] library/alpine:pull token for registry-1.docker.io 0.0s[+] Building 0.5s (4/6) docker:default=> [internal] load build definition from Dockerfile 0.1s=> => transferring dockerfile: 357B 0.0s=> [internal] load .dockerignore 0.1s=> => transferring context: 2B 0.0s=> [internal] load metadata for docker.io/library/alpine:3.18.3 0.4s...=> exporting to image 0.1s=> => exporting layers 0.1s=> => writing image sha256:8a22819145c6fee17e138e818610ccf46d7e13c786825 0.0s=> => naming to docker.io/maximofn/multistagebuild:alpine-3.18.3 0.0s
We run it
InputPython!docker run --rm --name multi_stage_build maximofn/multistagebuild:alpine-3.18.3Copied
Hello from Alpine!
The image maximofn/multistagebuild:alpine-3.18.3 only weighs 13.6 MB
Difference between RUN, CMD and ENTRYPOINT
RUN
The RUN command is the simplest; it simply executes a command during image build time. For example, if we want to install a package in the image, we do so using RUN.
Therefore, it is important: RUN is executed at image build time, not when the container runs
CMD
The CMD command is the command that runs when the container is executed. For example, if we want the container to run a command when it is executed, we do it through CMD. For example, if we have a Python application in a container, with CMD we can indicate that when the container is run, it should run the Python application.
In this way, when the container starts, the Python application will be executed. That is, if we run docker run <image> the Python application will be executed. But CMD allows us to override the command that is executed when the container starts; for example, if we run docker run <image> bash, bash will be executed instead of the Python application.
ENTRYPOINT
The ENTRYPOINT command is similar to the CMD command, but with one difference: ENTRYPOINT is not meant to be overridden. In other words, if we have a Python application in a container, with ENTRYPOINT we can tell it that when the container is run it should execute the Python application. But if we run docker run <image> bash, the Python application will be executed, not bash.
A very common use of ENTRYPOINT is when we want the container to be an executable, for example, if we want the container to be an executable for a version of Python that we do not have on our host, because, for example, we want to test the new version of Python that has been released, we can do:
FROM python:3.9.18-alpine
      ENTRYPOINT ["python3"]
In this way, when the container starts, Python will be executed. That is, if we run docker run <image>, Python will be executed. But ENTRYPOINT allows us to override the command that is executed when the container starts; for example, if we run docker run <image> myapp.py, python3 myapp.py will be executed inside the container. This way, we can test our Python application on the new version of Python
Changes in a container
With docker diff we can see the differences between the container and the image, which is the same as the difference in the container from when it was created until now
Let's run a container and create a file inside it
InputPython!docker run --rm -it --name ubuntu-20.04 ubuntu:20.04 bashCopied
root@895a19aef124:/# touch file.txt
Now we can see the difference
InputPython!docker diff ubuntu-20.04Copied
C /rootA /root/.bash_historyA /file.txt
A means that it has been added, C means that it has been changed, and D means that it has been deleted
Docker in Docker
Suppose we have containers that need to start up or shut down other containers. This is achieved as follows
Since on Linux everything is a file and the host communicates with Docker via a socket. So for Linux, that socket is a file. So if we mount that socket as a file into the container, it will be able to talk to Docker
First, let's set up a container with Ubuntu.
InputPython!docker run -d --name ubuntu ubuntu:latest tail -f /dev/nullCopied
144091e4a3325c9068064ff438f8865b40f944af5ce649c7156ca55a3453e423
Let's mount the container that will be able to talk to Docker by mounting the /var/run/docker.sock folder
$ docker run -it --rm --name main -v /var/run/docker.sock:/var/run/docker.sock docker:19.03.12
/ #
We have entered a container, and if inside we run docker ps
# docker ps
CONTAINER ID        IMAGE               COMMAND                  CREATED             STATUS              PORTS               NAMES9afb778d6c20        docker:19.03.12     "docker-entrypoint.s…"   3 seconds ago       Up 2 seconds                            main
144091e4a332        ubuntu:latest       "tail -f /dev/null"      19 seconds ago      Up 18 seconds                           ubuntu
As we can see, inside Docker we can see the host's containers
We can run a new container
# docker run -d --name ubuntu_from_main ubuntu:latest tail -f /dev/null
362654a72bb0fb047c13968707a6f16b87fed7ce051eb5c1a146b15828589a1a
/ #
And if we look at the containers again
# docker ps
CONTAINER ID        IMAGE               COMMAND                  CREATED              STATUS              PORTS               NAMES362654a72bb0        ubuntu:latest       "tail -f /dev/null"      3 seconds ago        Up 3 seconds                            ubuntu_from_main
9afb778d6c20        docker:19.03.12     "docker-entrypoint.s…"   About a minute ago   Up About a minute                       main
144091e4a332        ubuntu:latest       "tail -f /dev/null"      2 minutes ago        Up About a minute                       ubuntu
But if we now run a new host terminal, we will see the container created from inside the container
InputPython!docker psCopied
CONTAINER ID IMAGE COMMAND CREATED STATUS PORTS NAMES362654a72bb0 ubuntu:latest "tail -f /dev/null" About a minute ago Up About a minute ubuntu_from_main9afb778d6c20 docker:19.03.12 "docker-entrypoint.s…" 3 minutes ago Up 3 minutes main144091e4a332 ubuntu:latest "tail -f /dev/null" 3 minutes ago Up 3 minutes ubuntu
Everything we do from the main container will be reflected on the host
This has the advantage that we can install programs in a container that has access to the host so we don't have to install them on the host. For example dive is a tool for exploring containers, but if you don't want to install it on the host you can install it in a container with access to the host, so from that main container you can explore the rest of the containers without having to install it on the host