In the previous parts we saw the fundamentals of the terminal and the network, compression and process utilities. In this final chapter we put on the administrator’s hat: **memory, disk and interface management**, **package handling**, **administration users and permissions**, **security**, **command scheduling** and some final **miscellaneous tricks**.
Disclaimer: This post has been translated to English using a machine translation model. Please, let me know if you find any mistakes.
📚 **This entry is part of the _Introduction to the terminal_ series**, divided into three chapters that are read in order:
> * Part 1: Navigation, files, and commands
* Part 2: Network, compression, and processes
* 👉 **Part 3: System administration**
RAM memory management
If we only want to obtain information from memory, we can use the free command
InputPython!freeCopied
total usado libre compartido búfer/caché disponibleMemoria: 32774516 6563544 20091804 276296 6119168 25479600Swap: 2097148 0 2097148
But since this information isn't very easy to digest, we added the -h (human) flag to make it easier to read
InputPython!free -hCopied
total usado libre compartido búfer/caché disponibleMemoria: 31Gi 6,3Gi 19Gi 270Mi 5,8Gi 24GiSwap: 2,0Gi 0B 2,0Gi
Hard Drive Management
To get information about the hard drive, we use the du command. If we only enter this command in the terminal, it will give us information about all the folders on our machine, so, in order not to get too much information, it is necessary to provide it with a path that we want to scan
InputPython!du ~/Documentos/web/portafolio/posts/Copied
8 /home/wallabot/Documentos/web/portafolio/posts/__pycache__1648 /home/wallabot/Documentos/web/portafolio/posts/notebooks_translated4288 /home/wallabot/Documentos/web/portafolio/posts/html_files336 /home/wallabot/Documentos/web/portafolio/posts/prueba/tocompress1132 /home/wallabot/Documentos/web/portafolio/posts/prueba16 /home/wallabot/Documentos/web/portafolio/posts/introduccion_python/__pycache__28 /home/wallabot/Documentos/web/portafolio/posts/introduccion_python11232 /home/wallabot/Documentos/web/portafolio/posts/
As before, we add the -h flag (human) to make it easier to read
InputPython!du ~/Documentos/web/portafolio/posts/ -hCopied
8,0K /home/wallabot/Documentos/web/portafolio/posts/__pycache__1,7M /home/wallabot/Documentos/web/portafolio/posts/notebooks_translated4,2M /home/wallabot/Documentos/web/portafolio/posts/html_files336K /home/wallabot/Documentos/web/portafolio/posts/prueba/tocompress1,2M /home/wallabot/Documentos/web/portafolio/posts/prueba16K /home/wallabot/Documentos/web/portafolio/posts/introduccion_python/__pycache__28K /home/wallabot/Documentos/web/portafolio/posts/introduccion_python11M /home/wallabot/Documentos/web/portafolio/posts/
Interface management
In Ubuntu, by default we start in a graphical interface, but we can open other interfaces, which will not be graphical, by pressing CTRL+ALT+F<num> where the number can range from 1 to 6. Only 2 will have the graphical interface and 1 will be the login prompt
When handling multiple interfaces, we may not know which one we are in, so by entering the tty command, it will tell us which one we are in
InputPython!ttyCopied
/dev/pts/0
Package management
PPA Repositories (Personal Package Archives)
In Linux, package management is done through repositories. This is a list of addresses where the binaries of our programs are located. Thus, when we want to update or install our programs (we will explain how later), what the operating system will do is look at the list of these repositories and go to the indicated addresses to search for the binaries
This list of repositories is located in /etc/apt/sources.list and inside the /etc/apt/sources.list.d folder. Let's take a look at this list.
InputPythonterminal("cat /etc/apt/sources.list", max_lines_output=10)Copied
# deb cdrom:[Ubuntu 20.04.2.0 LTS _Focal Fossa_ - Release amd64 (20210209.1)]/ focal main restricted# See http://help.ubuntu.com/community/UpgradeNotes for how to upgrade to# newer versions of the distribution.deb http://es.archive.ubuntu.com/ubuntu/ focal main restricted# deb-src http://es.archive.ubuntu.com/ubuntu/ focal main restricted## Major bug fix updates produced after the final release of the## distribution.deb http://es.archive.ubuntu.com/ubuntu/ focal-updates main restricted...deb https://developer.download.nvidia.com/compute/cuda/repos/ubuntu2004/x86_64/ /# deb-src https://developer.download.nvidia.com/compute/cuda/repos/ubuntu2004/x86_64/ /deb https://apt.kitware.com/ubuntu/ focal main# deb-src https://apt.kitware.com/ubuntu/ focal main
The first lines that include the word cd-rom are references to the installation CD; they always come with the words deb cdrom: even if the system was installed over the network or from a USB drive.
From here on, various lines begin to appear that start with deb or deb-src. deb contains the binaries, and deb-src contains the source code.
Every valid repository address has one of these formats:
- deb http://server_address/folder_name version_name (main or universe or multiverse or main restricted, etc)
- deb-src http://server_address/folder_name version_name (main or universe or multiverse or main restricted, etc)
The six types of Ubuntu repositories are:
- Main
The Main repository is enabled by default and contains only free and open-source software or FOSS for its acronym in English (Free and Open-Source Software).
- Universe
As Main, Universe also offers FOSS. The difference is that in this repository it is not Ubuntu that guarantees regular security updates, but rather the community that is responsible for its support. It comes enabled by default, but not always. Some operating systems have it disabled by default and we may need to enable it if we are running a Live Session. If we have not added it, we can do so with this command:
sudo add-apt-repository universeWhat do we find in «Universe»? I’d say most of the worthwhile software, including VLC and OpenShot.
- Multiverse
From here on come the Ubuntu repositories with less freedom. Multiverse contains software that is no longer FOSS, and Ubuntu cannot enable this repository by default due to legal and licensing issues. On the other hand, it also cannot provide patches and updates. With this in mind, we need to decide whether or not to add it, something we can do with this command:
sudo add-apt-repository multiverse- Restricted
In Ubuntu repositories we can find free and open-source software, but this is not possible when it comes to something related to hardware. In the Restricted repositories, we will find drivers, such as those for graphics cards, touchpads, or network cards.
sudo add-apt-repository restricted- Partner
This repository contains proprietary software compiled by Ubuntu from its partners.
- Third-party Ubuntu repositories
Finally, we have third-party repositories. Ubuntu always tries to offer the best possible user experience, and that is one of the reasons why it rejects certain software. There are also developers who prefer to have total control over what they offer, and for that reason they create their own repositories.
Add repositories
If we are on Ubuntu, we can add a repository using the command add-apt-repository <repository>. But as in other distributions that are not Ubuntu, we do not have this command
Update the repositories
By using the apt update command, we can update to the latest versions of the packages we have in our repository.
Update the packages
Using the apt upgrade command, we can update the programs we have installed and whose repository we have previously updated.
Update the kernel
If we use the apt dist-upgrade command, kernel packages will also be updated
Warning!: Updating kernel packages can cause some packages to break
Reminder: When updating kernel packages, for them to take effect it is necessary to restart the computer
Package search
With the command apt search <package> we can find packages
InputPythonterminal("apt search vlc", max_lines_output=10)Copied
Ordenando...Buscar en todo el texto...anacrolix-dms/focal 1.1.0-1 amd64Go UPnP DLNA Digital Media Server with basic video transcodingcubemap/focal 1.4.3-1build1 amd64scalable video reflector, designed to be used with VLCdvblast/focal 3.4-1 amd64Simple and powerful dvb-streaming application...x264/focal 2:0.155.2917+git0a84d98-2 amd64video encoder for the H.264/MPEG-4 AVC standard
List of installed packages
To see which packages we have installed, we can use dpkg -l, which will give us a list of all the packages installed on our computer.
InputPythonterminal("dpkg -l", max_lines_output=10)Copied
Deseado=desconocido(U)/Instalar/eliminaR/Purgar/retener(H)| Estado=No/Inst/ficheros-Conf/desempaqUetado/medio-conF/medio-inst(H)/espera-disparo(W)/pendienTe-disparo|/ Err?=(ninguno)/requiere-Reinst (Estado,Err: mayúsc.=malo)||/ Nombre Versión Arquitectura Descripción+++-==========================================-=====================================-============-===========================================================================================================================================================================================================================================================================================================================================================================================================================================ii accountsservice 0.6.55-0ubuntu12~20.04.5 amd64 query and manipulate user account informationii acl 2.2.53-6 amd64 access control list - utilitiesii acpi-support 0.143 amd64 scripts for handling many ACPI eventsii acpid 1:2.0.32-1ubuntu1 amd64 Advanced Configuration and Power Interface event daemonii adduser 3.118ubuntu2 all add and remove users and groups...ii zip 3.0-11build1 amd64 Archiver for .zip filesii zlib1g:amd64 1:1.2.11.dfsg-2ubuntu1.5 amd64 compression library - runtimeii zlib1g:i386 1:1.2.11.dfsg-2ubuntu1.5 i386 compression library - runtimeii zlib1g-dev:amd64 1:1.2.11.dfsg-2ubuntu1.5 amd64 compression library - development
If we want to check whether we have a package installed, we can use the previous command, create a pipe, and search for the package name with grep
InputPythonterminal("dpkg -l | grep vlc")Copied
Deseado=desconocido(U)/Instalar/eliminaR/Purgar/retener(H)| Estado=No/Inst/ficheros-Conf/desempaqUetado/medio-conF/medio-inst(H)/espera-disparo(W)/pendienTe-disparo|/ Err?=(ninguno)/requiere-Reinst (Estado,Err: mayúsc.=malo)||/ Nombre Versión Arquitectura Descripción+++-==============-============-============-=================================ii grep 3.4-1 amd64 GNU grep, egrep and fgrepii vlc 3.0.9.2-1 amd64 multimedia player and streamer
Install downloaded packages and not from repositories
On some occasions, when you want to install a program, what they do is give you a .deb file, so to install it, we use the command dpkg -i <file.deb>
User Administrator
Active user information with id
Using the id command, I can see which user I am
InputPython!idCopied
uid=1000(wallabot) gid=1000(wallabot) grupos=1000(wallabot),4(adm),24(cdrom),27(sudo),30(dip),46(plugdev),120(lpadmin),131(lxd),132(sambashare),998(docker)
With this command, I can see my id, the group ID gid, and the groups I belong to. In Debian-based distributions, users are assigned an ID starting from 1000, while the root user is assigned ID 0
Active user information with whoami
Another command to find out which user I am is whoami
InputPython!whoamiCopied
wallabot
File with information on all users
User information is in the /etc/passwd file
InputPythonterminal("cat /etc/passwd", max_lines_output=10)Copied
root:x:0:0:root:/root:/bin/bashdaemon:x:1:1:daemon:/usr/sbin:/usr/sbin/nologinbin:x:2:2:bin:/bin:/usr/sbin/nologinsys:x:3:3:sys:/dev:/usr/sbin/nologinsync:x:4:65534:sync:/bin:/bin/syncgames:x:5:60:games:/usr/games:/usr/sbin/nologinman:x:6:12:man:/var/cache/man:/usr/sbin/nologinlp:x:7:7:lp:/var/spool/lpd:/usr/sbin/nologinmail:x:8:8:mail:/var/mail:/usr/sbin/nologinnews:x:9:9:news:/var/spool/news:/usr/sbin/nologin...sshd:x:126:65534::/run/sshd:/usr/sbin/nologinnvidia-persistenced:x:127:135:NVIDIA Persistence Daemon,,,:/nonexistent:/usr/sbin/nologinfwupd-refresh:x:128:136:fwupd-refresh user,,,:/run/systemd:/usr/sbin/nologinglances:x:129:137::/var/lib/glances:/usr/sbin/nologin
Change a user's password
If you want to change a user's password, you have to use the command passwd <user> <password>. If the user is not specified, it will use whatever the command whoami returns.
Create users with useradd
To create a new user, use the command useradd <user name>, let's create a new user
InputPython!sudo useradd usertest1Copied
Let's see if it is in the file with all the users
InputPython!cat /etc/passwd | grep usertestCopied
usertest1:x:1001:1001::/home/usertest1:/bin/sh
As we can see, the user has been created with id 1001, the next one after the one my wallabot user had, which was the last one
However, when creating this user, it did not ask us to assign a password. In addition, if we look at what is inside home
InputPython!ls /homeCopied
wallabot
Only the wallabot user folder is present, but not the test1 user folder
Create users with adduser
Therefore, let's look at another command for creating users that does require a password and does create a folder in home. This command is adduser
InputPython!sudo adduser usertest2Copied
[sudo] contraseña para wallabot:Añadiendo el usuario `usertest2' ...Añadiendo el nuevo grupo `usertest2' (1002) ...Añadiendo el nuevo usuario `usertest2' (1002) con grupo `usertest2' ...Creando el directorio personal `/home/usertest2' ...Copiando los ficheros desde `/etc/skel' ...Nueva contraseña:Vuelva a escribir la nueva contraseña:passwd: contraseña actualizada correctamenteCambiando la información de usuario para usertest2Introduzca el nuevo valor, o presione INTRO para el predeterminadoNombre completo []:Número de habitación []:Teléfono del trabajo []:Teléfono de casa []:Otro []:¿Es correcta la información? [S/n] s
If we look in the file with all the users
InputPython!cat /etc/passwd | grep usertestCopied
usertest1:x:1001:1001::/home/usertest1:/bin/shusertest2:x:1002:1002:,,,:/home/usertest2:/bin/bash
We see that the user usertest2 has been created
InputPython!ls /homeCopied
usertest2 wallabot
And we can see that a folder has been created for it in home
To delete a user, use the command userdel <username>
InputPython!sudo userdel usertest1Copied
InputPython!sudo userdel usertest2Copied
Let's see if they are in the file with all the users.
InputPython!cat /etc/passwd | grep usertestCopied
We see that nothing appears anymore; in fact, we see the end of that file.
InputPython!tail /etc/passwdCopied
geoclue:x:122:127::/var/lib/geoclue:/usr/sbin/nologinpulse:x:123:128:PulseAudio daemon,,,:/var/run/pulse:/usr/sbin/nologingnome-initial-setup:x:124:65534::/run/gnome-initial-setup/:/bin/falsegdm:x:125:130:Gnome Display Manager:/var/lib/gdm3:/bin/falsewallabot:x:1000:1000:wallabot,,,:/home/wallabot:/bin/bashsystemd-coredump:x:999:999:systemd Core Dumper:/:/usr/sbin/nologinsshd:x:126:65534::/run/sshd:/usr/sbin/nologinnvidia-persistenced:x:127:135:NVIDIA Persistence Daemon,,,:/nonexistent:/usr/sbin/nologinfwupd-refresh:x:128:136:fwupd-refresh user,,,:/run/systemd:/usr/sbin/nologinglances:x:129:137::/var/lib/glances:/usr/sbin/nologin
Make an administrator user
First, we are going to create a new user, who will not be an administrator at first.
InputPython!sudo adduser noadminCopied
Añadiendo el usuario `noadmin' ...Añadiendo el nuevo grupo `noadmin' (1001) ...Añadiendo el nuevo usuario `noadmin' (1001) con grupo `noadmin' ...Creando el directorio personal `/home/noadmin' ...Copiando los ficheros desde `/etc/skel' ...Nueva contraseña:Vuelva a escribir la nueva contraseña:passwd: contraseña actualizada correctamenteCambiando la información de usuario para noadminIntroduzca el nuevo valor, o presione INTRO para el predeterminadoNombre completo []:Número de habitación []:Teléfono del trabajo []:Teléfono de casa []:Otro []:¿Es correcta la información? [S/n] s
Let's see which groups the user we just created belongs to; to do this, we use the command groups <user>
InputPython!groups noadminCopied
noadmin : noadmin
As we can see, it is only in the noadmin group, which is a group that was created when the user was created
Let's see which groups my user belongs to
InputPython!groups wallabotCopied
wallabot : wallabot adm cdrom sudo dip plugdev lpadmin lxd sambashare docker
As we can see, my user belongs to several more groups, including one called sudo. Users who have access to this group have administrator privileges, so for the new user we have created to have these privileges, we need to add it to the sudo group.
To add a user to a group there are two ways: one is with the command gpasswd -a <user> <group>
InputPython!sudo gpasswd -a noadmin sudoCopied
Añadiendo al usuario noadmin al grupo sudo
We now see which groups the noadmin user belongs to
InputPython!groups noadminCopied
noadmin : noadmin sudo
As we can see, it already belongs to the sudo group, so it would already have administrator privileges
We remove the user noadmin from the sudo group with the command gpasswd -d <user> <group>
InputPython!sudo gpasswd -d noadmin sudoCopied
Eliminando al usuario noadmin del grupo sudo
We see that noadmin no longer belongs to the sudo group
InputPython!groups noadminCopied
noadmin : noadmin
The second command to add a user to a group is usermod -aG <group> <user>
InputPython!sudo usermod -aG sudo noadminCopied
We return to see which groups the user noadmin belongs to
InputPython!groups noadminCopied
noadmin : noadmin sudo
We remove the user noadmin from the sudo group and delete it
InputPython!sudo gpasswd -d noadmin sudoCopied
Eliminando al usuario noadmin del grupo sudo
InputPython!sudo userdel noadminCopied
Command history
history
If we enter the history command in the terminal, we see a history of the commands used
InputPython!historyCopied
1009 docker build . nvidia/cuda1010 docker build --help1011 docker build --build-arg nvidia/cuda1012 docker build --build-arg [nvidia/cuda]1013 cd ../docker/1014 docker ps -a1015 docker rm boring_wescoff1016 docker compose up -d1017 docker compose exec deepstream61 bash1018 cd ......1996 ps1997 ps aux1998 camerasIP.sh1999 sudo su2000 sudo useradd usertest2001 sudo userdel usertest2002 sudo useradd usertest2003 sudo userdel usertest2004 sudo su2005 sudo apt install history2006 history2007 clear2008 history
If we want to execute one of the commands from the history, we do so using !<num command>, for example, if I want to re-run command 1996
InputPython! !1996Copied
PID TTY TIME CMD6610 pts/0 00:00:00 bash20826 pts/0 00:00:00 ps
reverse-i-search
A more refined way to search through the history is to press CTRL+r. When you do this, the following message will appear in the console
InputPython!reverse-i-search)`':Copied
So as you type, commands matching what you’ve entered will appear. For example, if I type if, the last time I used ifconfig appears.
If we enter CTRL+r again, older matches will appear.
Remove commands from history
There are commands like ls, cd, and pwd that do not add much value if they are kept in the history, so it can be configured so they are not saved in the history. To do this, we modify the ~/.bashrc file and add the line HISTIGNORE="pwd:ls:cd"
Security
Firewall ufw
Ubuntu comes with the ufw firewall installed, but to verify it we use the following command
InputPython!sudo ufw statusCopied
Estado: inactivo
As we can see, by default it is inactive, so we are going to create a set of rules. For example, let’s start by opening port 22 (SSH). To do this, we use the command sudo allow <port> comment "<coment>", which lets us open a port and add a comment
InputPython!sudo ufw allow 22 comment 'ssh'Copied
Regla añadidaRegla añadida (v6)
As we can see, it has opened port 22 for IPv4 and IPv6. Now let's activate ufw with the command ufw enable
InputPython!sudo ufw enableCopied
El cortafuegos está activo y habilitado en el arranque del sistema
If we want to see the rules we have in the firewall, we use the ufw status command
InputPython!sudo ufw enableCopied
Hasta Acción Desde----- ------ -----22 ALLOW Anywhere # ssh22 (v6) ALLOW Anywhere (v6) # ssh
We can also tell it to show us the numbered rules with the command ufw status numbered
InputPython!sudo ufw status numberedCopied
Estado: activoHasta Acción Desde----- ------ -----[ 1] 22 ALLOW IN Anywhere # ssh[ 2] 22 (v6) ALLOW IN Anywhere (v6) # ssh
Since they are numbered, we can delete one using the command ufw delete <rule number>, so to remove the rule for IPv6 we do
InputPython!sudo ufw delete 2Copied
Estado: activoBorrando:allow 22 comment 'ssh'¿Continuar con la operación (s|n)? sRegla eliminada (v6)
We see the status again
InputPython!sudo ufw status numberedCopied
Estado: activoHasta Acción Desde----- ------ -----[ 1] 22 ALLOW IN Anywhere # ssh
We see that rule number 2 has indeed been removed.
If we want to enable SSH access from a single IP, we use the from <IP> flag
InputPython!sudo ufw allow from 192.168.1.103 proto tcp to any port 22 comment 'ssh ip'Copied
Regla añadida
We check the rules again
InputPython!sudo ufw status numberedCopied
Estado: activoHasta Acción Desde----- ------ -----[ 1] 22 ALLOW IN Anywhere # ssh[ 2] 22/tcp ALLOW IN 192.168.1.103 # ssh ip
If we want to delete all the rules, we use the reset command
InputPython!sudo ufw resetCopied
Estado: activoReiniciando todas las reglas a sus valores predeterminados instalados.¿Continuar con la operación (s|n)? sRespaldando «user.rules» en «/etc/ufw/user.rules.20221205_171730»Respaldando «before.rules» en «/etc/ufw/before.rules.20221205_171730»Respaldando «after.rules» en «/etc/ufw/after.rules.20221205_171730»Respaldando «user6.rules» en «/etc/ufw/user6.rules.20221205_171730»Respaldando «before6.rules» en «/etc/ufw/before6.rules.20221205_171730»Respaldando «after6.rules» en «/etc/ufw/after6.rules.20221205_171730»
We check the status again
InputPython!sudo ufw status numberedCopied
Estado: inactivo
We see that there are no more rules
To disable the firewall, we use the ufw disable command
InputPython!sudo ufw disableCopied
El cortafuegos está detenido y deshabilitado en el arranque del sistema
We check the status again
InputPython!sudo ufw statusCopied
Estado: inactivo
Security audit with Lynis
To install Lynis, you have to use the command sudo apt install lynis
To perform an audit of your system, you need to use the command lynis audit system. This starts a scan of the entire system and reports it back to you.
I’m not going to show the result of my system scan so as not to expose my vulnerabilities on the Internet
Command Scheduling
Scheduling periodic commands with cron
With the cron command, we can schedule commands to run periodically. To do this, we need to edit the /etc/crontab file
InputPython!cat /etc/crontabCopied
# /etc/crontab: system-wide crontab# Unlike any other crontab you don't have to run the `crontab'# command to install the new version when you edit this file# and files in /etc/cron.d. These files also have username fields,# that none of the other crontabs do.SHELL=/bin/shPATH=/usr/local/sbin:/usr/local/bin:/sbin:/bin:/usr/sbin:/usr/bin# Example of job definition:# .---------------- minute (0 - 59)# | .------------- hour (0 - 23)# | | .---------- day of month (1 - 31)# | | | .------- month (1 - 12) OR jan,feb,mar,apr ...# | | | | .---- day of week (0 - 6) (Sunday=0 or 7) OR sun,mon,tue,wed,thu,fri,sat# | | | | |# * * * * * user-name command to be executed17 * * * * root cd / && run-parts --report /etc/cron.hourly25 6 * * * root test -x /usr/sbin/anacron || ( cd / && run-parts --report /etc/cron.daily )47 6 * * 7 root test -x /usr/sbin/anacron || ( cd / && run-parts --report /etc/cron.weekly )52 6 1 * * root test -x /usr/sbin/anacron || ( cd / && run-parts --report /etc/cron.monthly )#
As can be seen, in this file there is a series of commands that are executed periodically. The format of these commands is as follows
<minute> <hour> <day of the month> <month> <day of the week> <user> <command>To properly create the date and time when you want the command to run, there are plenty of online pages that help you write it correctly, such as crontab guru
One-time command scheduling with at
When we want a command to be executed in the future, but we do not want it to run periodically, only once, we can use the at command. For example, you start an Azure or Amazon machine, for which you are charged, and you want to make sure it will be turned off so you do not get a surprise on the bill; you can schedule it to shut down at night. That way, even if you forget to turn it off, it will shut itself down.
We do an ls to the /tmp folder
InputPython!ls -l /tmpCopied
total 60-rw------- 1 wallabot wallabot 0 sep 24 08:51 config-err-QM3AAe-rw-r--r-- 1 root root 2049 sep 24 08:51 glances-root.logdrwx------ 2 wallabot wallabot 4096 sep 24 09:06 pyright-9853-BG3nXEXw0Taodrwxrwxr-x 3 wallabot wallabot 4096 sep 24 09:06 python-languageserver-cancellationdrwx------ 3 root root 4096 sep 24 08:51 snap-private-tmpdrwx------ 2 wallabot wallabot 4096 sep 24 08:51 ssh-mHjlSPPoqCp7drwx------ 3 root root 4096 sep 24 08:51 systemd-private-371a1d9479324db8bd79b6844b8b589b-colord.service-rpjPridrwx------ 3 root root 4096 sep 24 08:51 systemd-private-371a1d9479324db8bd79b6844b8b589b-fwupd.service-FzPoQfdrwx------ 3 root root 4096 sep 24 08:51 systemd-private-371a1d9479324db8bd79b6844b8b589b-geoclue.service-F6pMWidrwx------ 3 root root 4096 sep 24 08:51 systemd-private-371a1d9479324db8bd79b6844b8b589b-ModemManager.service-Orf6Bidrwx------ 3 root root 4096 sep 24 08:51 systemd-private-371a1d9479324db8bd79b6844b8b589b-switcheroo-control.service-1QXRqjdrwx------ 3 root root 4096 sep 24 08:51 systemd-private-371a1d9479324db8bd79b6844b8b589b-systemd-logind.service-lL35tgdrwx------ 3 root root 4096 sep 24 08:51 systemd-private-371a1d9479324db8bd79b6844b8b589b-systemd-resolved.service-iaswSidrwx------ 3 root root 4096 sep 24 08:51 systemd-private-371a1d9479324db8bd79b6844b8b589b-systemd-timesyncd.service-Yet8ljdrwx------ 3 root root 4096 sep 24 08:51 systemd-private-371a1d9479324db8bd79b6844b8b589b-upower.service-oTL7Ggdrwx------ 2 wallabot wallabot 4096 sep 24 09:31 tracker-extract-files.1000
Now let’s program it to create a new file in /tmp within 5 minutes
InputPython!at 09:55 touch /tmp/at.txtCopied
warning: commands will be executed using /bin/shat> touch /tmp/at.txtat> <EOT>job 1 at Sun Sep 24 09:55:00 2023
As we can see, you need to write at <time> and on the next line the command you want to run
We now see the files in /tmp
InputPython!ls -l /tmpCopied
total 60-rw-rw-r-- 1 wallabot wallabot 0 sep 24 09:55 at.txt-rw------- 1 wallabot wallabot 0 sep 24 08:51 config-err-QM3AAe-rw-r--r-- 1 root root 2049 sep 24 08:51 glances-root.logdrwx------ 2 wallabot wallabot 4096 sep 24 09:06 pyright-9853-BG3nXEXw0Taodrwxrwxr-x 3 wallabot wallabot 4096 sep 24 09:06 python-languageserver-cancellationdrwx------ 3 root root 4096 sep 24 08:51 snap-private-tmpdrwx------ 2 wallabot wallabot 4096 sep 24 08:51 ssh-mHjlSPPoqCp7drwx------ 3 root root 4096 sep 24 08:51 systemd-private-371a1d9479324db8bd79b6844b8b589b-colord.service-rpjPridrwx------ 3 root root 4096 sep 24 08:51 systemd-private-371a1d9479324db8bd79b6844b8b589b-fwupd.service-FzPoQfdrwx------ 3 root root 4096 sep 24 08:51 systemd-private-371a1d9479324db8bd79b6844b8b589b-geoclue.service-F6pMWidrwx------ 3 root root 4096 sep 24 08:51 systemd-private-371a1d9479324db8bd79b6844b8b589b-ModemManager.service-Orf6Bidrwx------ 3 root root 4096 sep 24 08:51 systemd-private-371a1d9479324db8bd79b6844b8b589b-switcheroo-control.service-1QXRqjdrwx------ 3 root root 4096 sep 24 08:51 systemd-private-371a1d9479324db8bd79b6844b8b589b-systemd-logind.service-lL35tgdrwx------ 3 root root 4096 sep 24 08:51 systemd-private-371a1d9479324db8bd79b6844b8b589b-systemd-resolved.service-iaswSidrwx------ 3 root root 4096 sep 24 08:51 systemd-private-371a1d9479324db8bd79b6844b8b589b-systemd-timesyncd.service-Yet8ljdrwx------ 3 root root 4096 sep 24 08:51 systemd-private-371a1d9479324db8bd79b6844b8b589b-upower.service-oTL7Ggdrwx------ 2 wallabot wallabot 4096 sep 24 09:31 tracker-extract-files.1000
As we can see, there is an at.txt file that was created at 09:55
Keyboard shortcuts
Below are a few useful keyboard shortcuts for using the terminal
- Ctrl+a: moves the cursor to the beginning of the command line.
- Ctrl+e: moves the cursor to the end of the command line.
- Ctrl+l: clears the terminal, similar to what the
clearcommand does. - Ctrl+u: clears from the cursor position to the beginning of the line. If at the end, clears the entire line.
- Ctrl+k: clears from the cursor position to the end of the line. If at the beginning, clears the entire line.
- Ctrl+h: does the same as the backspace key, deletes the character immediately before the cursor position.
- Ctrl+w: deletes the word immediately before the cursor.
- Alt+d or Esc+d: deletes the next word after the cursor.
- Ctrl+p: sets the command line to the last command entered.
- Ctrl+r: starts the search for previously used commands, typing part of a previously used command that we have executed, including options and parameters. Perform a search by pressing the key combination again and we will find earlier matches.
- Ctrl+c: ends the process that is running, useful for regaining control of the system.
- Ctrl+d: exits the terminal, similar to the
exitcommand. - Ctrl+z: suspends the execution of the process that is running and puts it in the background; with the
fgcommand, we can resume its execution. - Ctrl+t: swaps the position of the two characters before the cursor, useful for correcting typos.
- Esc+t: swaps the position of the two words before the cursor, useful for correcting typos.
- Alt+f: moves the cursor to the beginning of the next word on the line, the same as Ctrl+right in the GNOME terminal.
- Alt+b: moves the cursor to the beginning of the previous word on the line, the same as Ctrl+left in the GNOME terminal.
- Tab: auto-completes commands or directory or file paths.
- Ctrl+Shift+F: opens a dialog to search for text in the terminal output.
- Ctrl+Shift+g: searches for the next occurrence of the previous search in the terminal.
- Ctrl+Shift+h: searches for the previous occurrence of the previous search in the terminal.
- Ctrl+Shift+c: copies the selected terminal text to the clipboard.
- Ctrl+Shift+v: pastes the clipboard text into the command line.
- Up: sets in the command line the previous command from the history, just like Ctrl+p.
- Down: sets the next command from the history in the command line.
- Left Mouse: selects lines of text from the terminal.
- Ctrl+Left Mouse: selects blocks of text in the terminal.
Folder system in Linux
In the following image, we can see what the folder system in Linux looks like
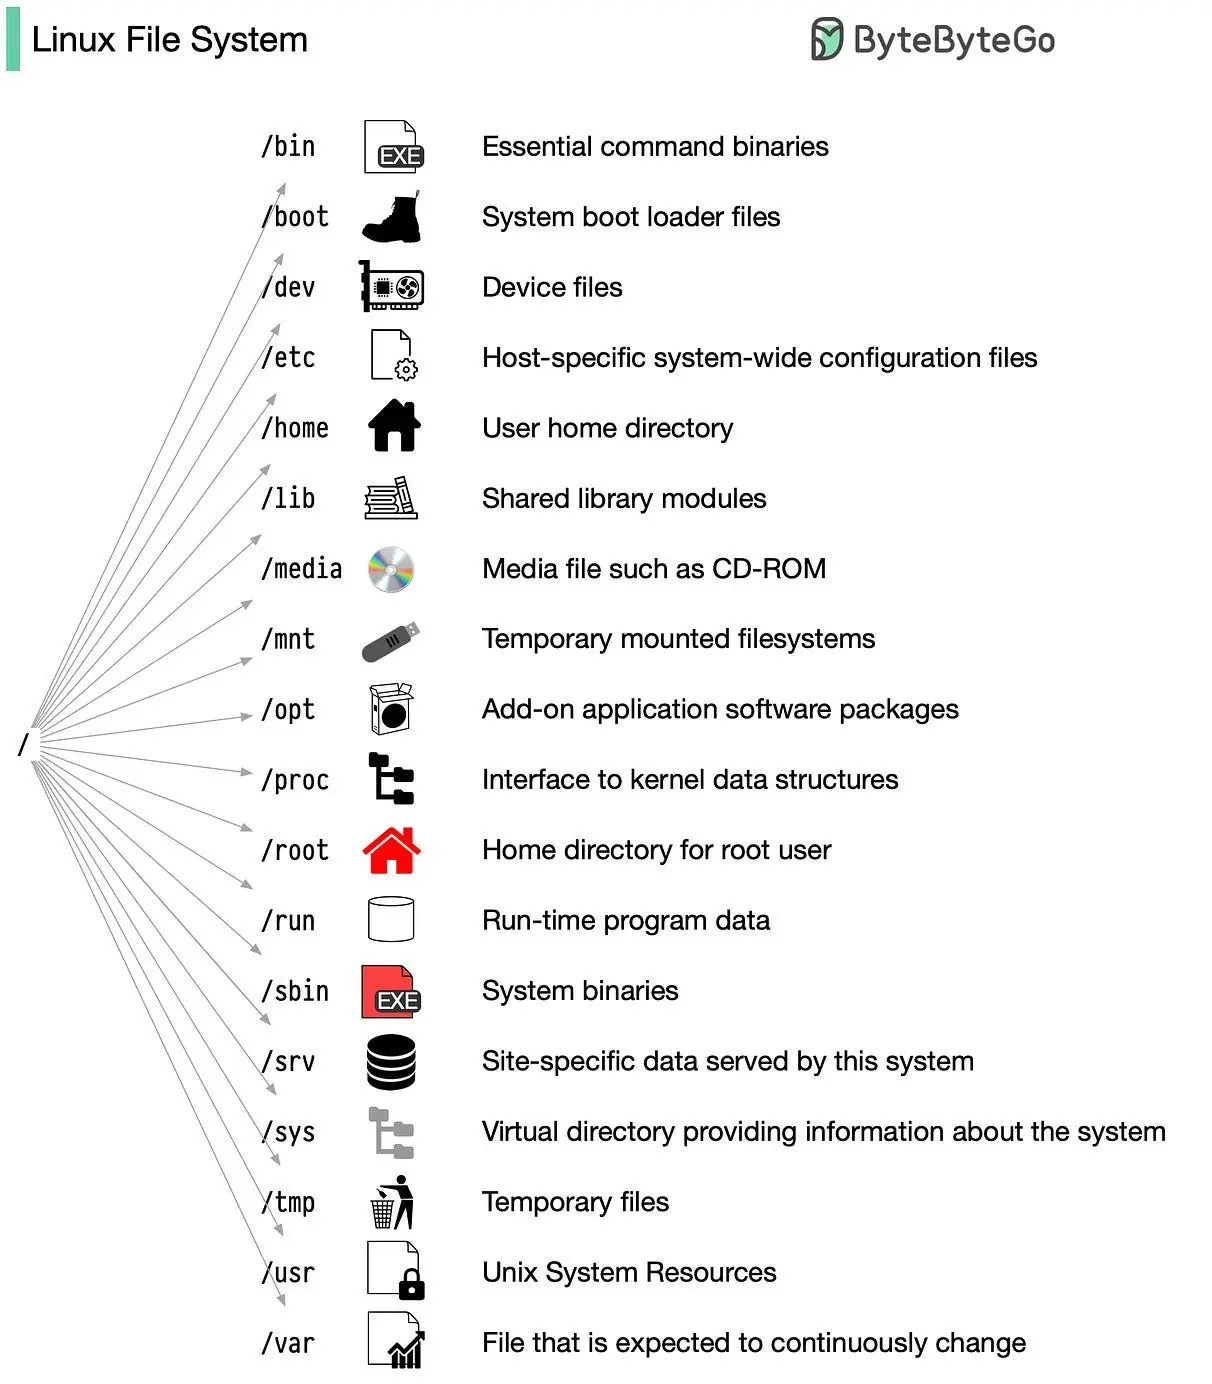
This image has been taken from the post on LinkedIn by Roberto Morais
Oddities
You forgot to use sudo
Has it ever happened to you that you were about to use a command that needed to be run with sudo, but you forgot to type sudo? Well, after receiving the corresponding error, if you run sudo !!, the previous command will be executed with sudo
InputPython!apt updateCopied
Leyendo lista de paquetes... HechoE: No se pudo abrir el fichero de bloqueo «/var/lib/apt/lists/lock» - open (13: Permiso denegado)E: No se pudo bloquear el directorio /var/lib/apt/lists/W: Se produjo un problema al desligar el fichero /var/cache/apt/pkgcache.bin - RemoveCaches (13: Permiso denegado)W: Se produjo un problema al desligar el fichero /var/cache/apt/srcpkgcache.bin - RemoveCaches (13: Permiso denegado)
As can be seen, when running sudo update we get an error, but if we now run sudo !! it will execute sudo apt update
InputPython!sudo !!Copied
[sudo] contraseña para wallabot:
Kernel messages
With the dmesg command (display kernel ring buffer messages) we can view the kernel messages. For example, this is very useful for seeing whether a USB device has been connected, or for debugging hardware errors on our computer
InputPython!dmesg | tailCopied
[ 35.812312] input: LogiOps Virtual Input as /devices/virtual/input/input33[ 35.916406] input: LogiOps Virtual Input as /devices/virtual/input/input34[ 36.002064] input: LogiOps Virtual Input as /devices/virtual/input/input35[ 63.879806] input: MX Master 3 as /devices/virtual/misc/uhid/0005:046D:B023.0006/input/input36[ 63.879931] logitech-hidpp-device 0005:046D:B023.0006: input,hidraw3: BLUETOOTH HID v0.15 Keyboard [MX Master 3] on 4c:77:cb:1d:66:d0[ 63.902120] logitech-hidpp-device 0005:046D:B023.0006: HID++ 4.5 device connected.[ 69.604899] input: MX Keys Keyboard as /devices/virtual/misc/uhid/0005:046D:B35B.0007/input/input37[ 69.605221] input: MX Keys Mouse as /devices/virtual/misc/uhid/0005:046D:B35B.0007/input/input38[ 69.606204] hid-generic 0005:046D:B35B.0007: input,hidraw4: BLUETOOTH HID v0.13 Keyboard [MX Keys] on 4c:77:cb:1d:66:d0[ 188.285030] input: T9 (AVRCP) as /devices/virtual/input/input40
With the --follow flag, we can see in real time the new messages that are generated.
InputPython!dmesg --followCopied
[ 0.000000] Linux version 5.15.0-84-generic (buildd@lcy02-amd64-005) (gcc (Ubuntu 9.4.0-1ubuntu1~20.04.2) 9.4.0, GNU ld (GNU Binutils for Ubuntu) 2.34) #93~20.04.1-Ubuntu SMP Wed Sep 6 16:15:40 UTC 2023 (Ubuntu 5.15.0-84.93~20.04.1-generic 5.15.116)[ 0.000000] Command line: BOOT_IMAGE=/boot/vmlinuz-5.15.0-84-generic root=UUID=59002381-d88d-44a6-b83d-8c5a226ce058 ro quiet splash vt.handoff=7[ 0.000000] KERNEL supported cpus:[ 0.000000] Intel GenuineIntel[ 0.000000] AMD AuthenticAMD[ 0.000000] Hygon HygonGenuine[ 0.000000] Centaur CentaurHauls[ 0.000000] zhaoxin Shanghai[ 0.000000] BIOS-provided physical RAM map:[ 0.000000] BIOS-e820: [mem 0x0000000000000000-0x000000000009ffff] usable[ 0.000000] BIOS-e820: [mem 0x00000000000a0000-0x00000000000fffff] reserved[ 0.000000] BIOS-e820: [mem 0x0000000000100000-0x0000000009d01fff] usable[ 0.000000] BIOS-e820: [mem 0x0000000009d02000-0x0000000009ffffff] reserved[ 0.000000] BIOS-e820: [mem 0x000000000a000000-0x000000000a1fffff] usable[ 0.000000] BIOS-e820: [mem 0x000000000a200000-0x000000000a20bfff] ACPI NVS[ 0.000000] BIOS-e820: [mem 0x000000000a20c000-0x00000000b8983fff] usable[ 0.000000] BIOS-e820: [mem 0x00000000b8984000-0x00000000b8acdfff] reserved[ 0.000000] BIOS-e820: [mem 0x00000000b8ace000-0x00000000b8c56fff] ACPI data[ 0.000000] BIOS-e820: [mem 0x00000000b8c57000-0x00000000b9107fff] ACPI NVS[ 0.000000] BIOS-e820: [mem 0x00000000b9108000-0x00000000ba55cfff] reserved[ 0.000000] BIOS-e820: [mem 0x00000000ba55d000-0x00000000bcffffff] usable[ 0.000000] BIOS-e820: [mem 0x00000000bd000000-0x00000000bfffffff] reserved[ 0.000000] BIOS-e820: [mem 0x00000000f8000000-0x00000000fbffffff] reserved...[ 35.916406] input: LogiOps Virtual Input as /devices/virtual/input/input34[ 36.002064] input: LogiOps Virtual Input as /devices/virtual/input/input35[ 63.879806] input: MX Master 3 as /devices/virtual/misc/uhid/0005:046D:B023.0006/input/input36[ 63.879931] logitech-hidpp-device 0005:046D:B023.0006: input,hidraw3: BLUETOOTH HID v0.15 Keyboard [MX Master 3] on 4c:77:cb:1d:66:d0[ 63.902120] logitech-hidpp-device 0005:046D:B023.0006: HID++ 4.5 device connected.[ 69.604899] input: MX Keys Keyboard as /devices/virtual/misc/uhid/0005:046D:B35B.0007/input/input37[ 69.605221] input: MX Keys Mouse as /devices/virtual/misc/uhid/0005:046D:B35B.0007/input/input38[ 69.606204] hid-generic 0005:046D:B35B.0007: input,hidraw4: BLUETOOTH HID v0.13 Keyboard [MX Keys] on 4c:77:cb:1d:66:d0[ 188.285030] input: T9 (AVRCP) as /devices/virtual/input/input40
^C
Hardware Information
With lshw we can see information about our computer's hardware
InputPython!lshwCopied
AVISO: debería ejecutar este programa como superusuario.wallabotdescripción: Computeranchura: 64 bitscapacidades: smp vsyscall32*-coredescripción: Motherboardid físico: 0*-memorydescripción: Memoria de sistemaid físico: 0tamaño: 32GiB...producto: PnP device PNP0501id físico: 6capacidades: pnpconfiguración: driver=serial*-pnp00:05producto: PnP device PNP0c02id físico: 7capacidades: pnpconfiguración: driver=systemAVISO: la salida puede ser incompleta o imprecisa, debería ejecutar este programa como superusuario.
Cowsay
There is a command called cowsay that takes a text as a parameter and draws a cow saying that text.
It’s possible that you don’t have it installed, so to install it, you need to enter the command
sudo apt install cowsayInputPythonterminal("cowsay MaximoFN")Copied
__________< MaximoFN >----------\ ^__^\ (oo)\_______(__)\ )\/\||----w ||| ||
If you add the -f dragon flag, the speaker is a dragon.
InputPythonterminal("cowsay -f dragon MaximoFN")Copied
__________< MaximoFN >----------\ / \ //\\ |\___/| / \// \\/0 0 \__ / // | \ \/ / \/_/ // | \ \@_^_@'/ \/_ // | \ \//_^_/ \/_ // | \ \( //) | \/// | \ \( / /) _|_ / ) // | \ _\( // /) '/,_ _ _/ ( ; -. | _ _\.-~ .-~~~^-.(( / / )) ,-{ _ `-.|.-~-. .~ `.(( // / )) '/\ / ~-. _ .-~ .-~^-. \(( /// )) `. { } / \ \(( / )) .----~-.\ \-' .~ \ `. \^-.///.----..> \ _ -~ `. ^-` ^-_///-._ _ _ _ _ _ _}^ - - - - ~ ~-- ,.-~/.-~
InputPythonterminal("cowsay -f dragon-and-cow MaximoFN")Copied
__________< MaximoFN >----------\ ^ /^\ / \ // \\ |\___/| / \// .\\ /O O \__ / // | \ \ *----*/ / \/_/ // | \ \ \ |@___@` \/_ // | \ \ \/\ \0/0/| \/_ // | \ \ \ \0/0/0/0/| \/// | \ \ | |0/0/0/0/0/_|_ / ( // | \ _\ | /0/0/0/0/0/0/`/,_ _ _/ ) ; -. | _ _\.-~ / /,-} _ *-.|.-~-. .~ ~\ \__/ `/\ / ~-. _ .-~ /\____(oo) *. } { /( (--) .----~-.\ \-` .~//__\\ \__ Ack! ///.----..< \ _ -~// \\ ///-._ _ _ _ _ _ _{^ - - - - ~
Cleaning
Since the prueba folder has been created, we delete it to leave everything as we found it.
InputPython!rm -r pruebaCopied