📚 **Esta entrada es parte de la serie _Introducción a la terminal_**, dividida en tres capítulos que se leen en orden:
> * 👉 **Parte 1: Navegación, archivos y comandos**
* Parte 2: Red, compresión y procesos
* Parte 3: Administración del sistema
Formato del post
Para no tener que estar poniendo imágenes de la consola en cada acción que haga, he creado la siguiente función que recibe el comando de la terminal que queramos ejecutar y devuelve la salida que nos daría la terminal.
Unas veces usaré esta función, y otras usaré ! antes de cada comando, que en notebooks quiere decir que vas a ejecutar un comando de la terminal.
InputPythonimport subprocessimport oslast_directory = ''def terminal(command, max_lines_output=None):global last_directorydebug = Falsestr = command.split()# Check if there are " or ' charactersfor i in range(len(str)):if debug: print(f"i = {i}, str[i] = {str[i]}")if len(str[i]) > 0:if str[i][0] == '"' or str[i][0] == "'":for j in range(i+1,len(str)):if debug: print(f" j = {j}, str[j] = {str[j]}")if str[j][-1] == '"' or str[j][-1] == "'":for k in range(i+1,j+1):if debug: print(f" k = {k}, str[i] = {str[i]}, str[k] = {str[k]}")str[i] = str[i] + " " + str[k]if debug: print(f" k = {k}, str[i] = {str[i]}, str[k] = {str[k]}")str[j:] = [""]str[i] = str[i].replace('"','')# Remove empty stringsstr = [x for x in str if x != ""]if debug:print(str)returnif str[0] == "cd":last_dir = os.getcwd()if len(str) == 1:os.chdir('/home/wallabot')else:if str[1] == "-":os.chdir(last_directory)else:os.chdir(str[1])last_directory = last_direlse:result = subprocess.run(str, stdout=subprocess.PIPE).stdout.decode('utf-8')if max_lines_output is not None:result_split = result.split(' ')print(' '.join(result_split[:max_lines_output]))print(" ...")print(' '.join(result_split[-5:]))else:print(result)Copied
Primeros comandos para moverse por la terminal
ls (list directory)
El primer comando que vamos a ver es ls (list directory), que sirve para listar todos los archivos de la carpeta en la que estemos.
InputPythonterminal("ls")Copied
2021-02-11-Introduccion-a-Python.ipynb2021-04-23-Calculo-matricial-con-Numpy.ipynb2021-06-15-Manejo-de-datos-con-Pandas.ipynb2022-09-12 Introduccion a la terminal.ipynb2022-09-12 Introduccion a la terminal.txtcommand-line-cheat-sheet.pdfCSS.ipynbDocker.htmlDocker.ipynbExpresiones regulares.htmlExpresiones regulares.ipynbhtml_fileshtml.ipynbintroduccion_pythonmovies.csvmovies.datnotebooks_translated__pycache__ssh.ipynbtest.htmltest.ipynb
Los comandos normalmente pueden recibir opciones (flags), que se introducen con el carácter -, por ejemplo, veamos ls -l que nos devuelve la lista de archivos del directorio en el que estamos, pero con más información
InputPythonterminal('ls -l')Copied
total 4512-rw-rw-r-- 1 wallabot wallabot 285898 nov 12 02:07 2021-02-11-Introduccion-a-Python.ipynb-rw-rw-r-- 1 wallabot wallabot 78450 nov 13 00:10 2021-04-23-Calculo-matricial-con-Numpy.ipynb-rw-rw-r-- 1 wallabot wallabot 484213 nov 13 00:44 2021-06-15-Manejo-de-datos-con-Pandas.ipynb-rw-rw-r-- 1 wallabot wallabot 320810 dic 6 00:11 2022-09-12 Introduccion a la terminal.ipynb-rw-rw-r-- 1 wallabot wallabot 320594 dic 6 00:04 2022-09-12 Introduccion a la terminal.txt-rw-rw-r-- 1 wallabot wallabot 119471 oct 3 16:13 command-line-cheat-sheet.pdf-rw-rw-r-- 1 wallabot wallabot 2660 sep 18 03:32 CSS.ipynb-rw-rw-r-- 1 wallabot wallabot 699225 nov 27 04:16 Docker.html-rw-rw-r-- 1 wallabot wallabot 509125 sep 22 16:48 Docker.ipynb-rw-rw-r-- 1 wallabot wallabot 156193 nov 27 04:21 Expresiones regulares.html-rw-rw-r-- 1 wallabot wallabot 53094 oct 2 04:57 Expresiones regulares.ipynbdrwxrwxr-x 2 wallabot wallabot 4096 nov 28 14:39 html_files-rw-rw-r-- 1 wallabot wallabot 14775 sep 18 03:29 html.ipynbdrwxrwxr-x 3 wallabot wallabot 4096 nov 12 01:51 introduccion_python-rw-rw-r-- 1 wallabot wallabot 446172 oct 2 04:39 movies.csv-rw-rw-r-- 1 wallabot wallabot 522197 oct 2 04:33 movies.datdrwxrwxr-x 2 wallabot wallabot 4096 nov 28 14:39 notebooks_translateddrwxrwxr-x 2 wallabot wallabot 4096 ago 27 03:25 __pycache__-rw-rw-r-- 1 wallabot wallabot 586 dic 4 02:31 ssh.ipynb-rw-rw-r-- 1 wallabot wallabot 292936 nov 9 01:46 test.html-rw-rw-r-- 1 wallabot wallabot 260227 nov 9 01:13 test.ipynb
Como vemos, tenemos cuántos bytes ocupa cada archivo, pero cuando tenemos archivos que ocupan mucho, esto no es muy fácil de leer, así que podemos añadir la opción h (human) que nos da información más fácil de leer
InputPythonterminal('ls -lh')Copied
total 4,5M-rw-rw-r-- 1 wallabot wallabot 280K nov 12 02:07 2021-02-11-Introduccion-a-Python.ipynb-rw-rw-r-- 1 wallabot wallabot 77K nov 13 00:10 2021-04-23-Calculo-matricial-con-Numpy.ipynb-rw-rw-r-- 1 wallabot wallabot 473K nov 13 00:44 2021-06-15-Manejo-de-datos-con-Pandas.ipynb-rw-rw-r-- 1 wallabot wallabot 314K dic 6 00:11 2022-09-12 Introduccion a la terminal.ipynb-rw-rw-r-- 1 wallabot wallabot 314K dic 6 00:04 2022-09-12 Introduccion a la terminal.txt-rw-rw-r-- 1 wallabot wallabot 117K oct 3 16:13 command-line-cheat-sheet.pdf-rw-rw-r-- 1 wallabot wallabot 2,6K sep 18 03:32 CSS.ipynb-rw-rw-r-- 1 wallabot wallabot 683K nov 27 04:16 Docker.html-rw-rw-r-- 1 wallabot wallabot 498K sep 22 16:48 Docker.ipynb-rw-rw-r-- 1 wallabot wallabot 153K nov 27 04:21 Expresiones regulares.html-rw-rw-r-- 1 wallabot wallabot 52K oct 2 04:57 Expresiones regulares.ipynbdrwxrwxr-x 2 wallabot wallabot 4,0K nov 28 14:39 html_files-rw-rw-r-- 1 wallabot wallabot 15K sep 18 03:29 html.ipynbdrwxrwxr-x 3 wallabot wallabot 4,0K nov 12 01:51 introduccion_python-rw-rw-r-- 1 wallabot wallabot 436K oct 2 04:39 movies.csv-rw-rw-r-- 1 wallabot wallabot 510K oct 2 04:33 movies.datdrwxrwxr-x 2 wallabot wallabot 4,0K nov 28 14:39 notebooks_translateddrwxrwxr-x 2 wallabot wallabot 4,0K ago 27 03:25 __pycache__-rw-rw-r-- 1 wallabot wallabot 586 dic 4 02:31 ssh.ipynb-rw-rw-r-- 1 wallabot wallabot 287K nov 9 01:46 test.html-rw-rw-r-- 1 wallabot wallabot 255K nov 9 01:13 test.ipynb
Si queremos ver los archivos ocultos, podemos usar la opción a, que nos mostrará todos los archivos de un directorio.
InputPythonterminal('ls -lha')Copied
total 4,5Mdrwxrwxr-x 6 wallabot wallabot 4,0K dic 6 00:04 .drwxrwxr-x 5 wallabot wallabot 4,0K oct 2 03:10 ..-rw-rw-r-- 1 wallabot wallabot 280K nov 12 02:07 2021-02-11-Introduccion-a-Python.ipynb-rw-rw-r-- 1 wallabot wallabot 77K nov 13 00:10 2021-04-23-Calculo-matricial-con-Numpy.ipynb-rw-rw-r-- 1 wallabot wallabot 473K nov 13 00:44 2021-06-15-Manejo-de-datos-con-Pandas.ipynb-rw-rw-r-- 1 wallabot wallabot 314K dic 6 00:11 2022-09-12 Introduccion a la terminal.ipynb-rw-rw-r-- 1 wallabot wallabot 314K dic 6 00:04 2022-09-12 Introduccion a la terminal.txt-rw-rw-r-- 1 wallabot wallabot 117K oct 3 16:13 command-line-cheat-sheet.pdf-rw-rw-r-- 1 wallabot wallabot 2,6K sep 18 03:32 CSS.ipynb-rw-rw-r-- 1 wallabot wallabot 683K nov 27 04:16 Docker.html-rw-rw-r-- 1 wallabot wallabot 498K sep 22 16:48 Docker.ipynb-rw-rw-r-- 1 wallabot wallabot 153K nov 27 04:21 Expresiones regulares.html-rw-rw-r-- 1 wallabot wallabot 52K oct 2 04:57 Expresiones regulares.ipynbdrwxrwxr-x 2 wallabot wallabot 4,0K nov 28 14:39 html_files-rw-rw-r-- 1 wallabot wallabot 15K sep 18 03:29 html.ipynbdrwxrwxr-x 3 wallabot wallabot 4,0K nov 12 01:51 introduccion_python-rw-rw-r-- 1 wallabot wallabot 436K oct 2 04:39 movies.csv-rw-rw-r-- 1 wallabot wallabot 510K oct 2 04:33 movies.datdrwxrwxr-x 2 wallabot wallabot 4,0K nov 28 14:39 notebooks_translateddrwxrwxr-x 2 wallabot wallabot 4,0K ago 27 03:25 __pycache__-rw-rw-r-- 1 wallabot wallabot 586 dic 4 02:31 ssh.ipynb-rw-rw-r-- 1 wallabot wallabot 287K nov 9 01:46 test.html-rw-rw-r-- 1 wallabot wallabot 255K nov 9 01:13 test.ipynb
Si lo que queremos es que nos los ordene por tamaño, podemos usar la opción S
InputPythonterminal('ls -lhS')Copied
total 4,5M-rw-rw-r-- 1 wallabot wallabot 683K nov 27 04:16 Docker.html-rw-rw-r-- 1 wallabot wallabot 510K oct 2 04:33 movies.dat-rw-rw-r-- 1 wallabot wallabot 498K sep 22 16:48 Docker.ipynb-rw-rw-r-- 1 wallabot wallabot 473K nov 13 00:44 2021-06-15-Manejo-de-datos-con-Pandas.ipynb-rw-rw-r-- 1 wallabot wallabot 436K oct 2 04:39 movies.csv-rw-rw-r-- 1 wallabot wallabot 314K dic 6 00:11 2022-09-12 Introduccion a la terminal.ipynb-rw-rw-r-- 1 wallabot wallabot 314K dic 6 00:04 2022-09-12 Introduccion a la terminal.txt-rw-rw-r-- 1 wallabot wallabot 287K nov 9 01:46 test.html-rw-rw-r-- 1 wallabot wallabot 280K nov 12 02:07 2021-02-11-Introduccion-a-Python.ipynb-rw-rw-r-- 1 wallabot wallabot 255K nov 9 01:13 test.ipynb-rw-rw-r-- 1 wallabot wallabot 153K nov 27 04:21 Expresiones regulares.html-rw-rw-r-- 1 wallabot wallabot 117K oct 3 16:13 command-line-cheat-sheet.pdf-rw-rw-r-- 1 wallabot wallabot 77K nov 13 00:10 2021-04-23-Calculo-matricial-con-Numpy.ipynb-rw-rw-r-- 1 wallabot wallabot 52K oct 2 04:57 Expresiones regulares.ipynb-rw-rw-r-- 1 wallabot wallabot 15K sep 18 03:29 html.ipynbdrwxrwxr-x 2 wallabot wallabot 4,0K nov 28 14:39 html_filesdrwxrwxr-x 3 wallabot wallabot 4,0K nov 12 01:51 introduccion_pythondrwxrwxr-x 2 wallabot wallabot 4,0K nov 28 14:39 notebooks_translateddrwxrwxr-x 2 wallabot wallabot 4,0K ago 27 03:25 __pycache__-rw-rw-r-- 1 wallabot wallabot 2,6K sep 18 03:32 CSS.ipynb-rw-rw-r-- 1 wallabot wallabot 586 dic 4 02:31 ssh.ipynb
Si queremos que nos muestre los archivos ordenados alfabéticamente, pero al revés, debemos usar la opción -r
InputPythonterminal('ls -lhr')Copied
total 4,5M-rw-rw-r-- 1 wallabot wallabot 255K nov 9 01:13 test.ipynb-rw-rw-r-- 1 wallabot wallabot 287K nov 9 01:46 test.html-rw-rw-r-- 1 wallabot wallabot 586 dic 4 02:31 ssh.ipynbdrwxrwxr-x 2 wallabot wallabot 4,0K ago 27 03:25 __pycache__drwxrwxr-x 2 wallabot wallabot 4,0K nov 28 14:39 notebooks_translated-rw-rw-r-- 1 wallabot wallabot 510K oct 2 04:33 movies.dat-rw-rw-r-- 1 wallabot wallabot 436K oct 2 04:39 movies.csvdrwxrwxr-x 3 wallabot wallabot 4,0K nov 12 01:51 introduccion_python-rw-rw-r-- 1 wallabot wallabot 15K sep 18 03:29 html.ipynbdrwxrwxr-x 2 wallabot wallabot 4,0K nov 28 14:39 html_files-rw-rw-r-- 1 wallabot wallabot 52K oct 2 04:57 Expresiones regulares.ipynb-rw-rw-r-- 1 wallabot wallabot 153K nov 27 04:21 Expresiones regulares.html-rw-rw-r-- 1 wallabot wallabot 498K sep 22 16:48 Docker.ipynb-rw-rw-r-- 1 wallabot wallabot 683K nov 27 04:16 Docker.html-rw-rw-r-- 1 wallabot wallabot 2,6K sep 18 03:32 CSS.ipynb-rw-rw-r-- 1 wallabot wallabot 117K oct 3 16:13 command-line-cheat-sheet.pdf-rw-rw-r-- 1 wallabot wallabot 314K dic 6 00:04 2022-09-12 Introduccion a la terminal.txt-rw-rw-r-- 1 wallabot wallabot 314K dic 6 00:11 2022-09-12 Introduccion a la terminal.ipynb-rw-rw-r-- 1 wallabot wallabot 473K nov 13 00:44 2021-06-15-Manejo-de-datos-con-Pandas.ipynb-rw-rw-r-- 1 wallabot wallabot 77K nov 13 00:10 2021-04-23-Calculo-matricial-con-Numpy.ipynb-rw-rw-r-- 1 wallabot wallabot 280K nov 12 02:07 2021-02-11-Introduccion-a-Python.ipynb
cd (change directory)
El segundo comando será cd (change directory) que nos permite cambiar de directorio
InputPythonterminal('cd /home/wallabot/Documentos/')Copied
Si ahora volvemos a usar ls para ver los archivos que tenemos, vemos que cambian
InputPythonterminal('ls')Copied
aprendiendo-git.pdfbalena-etcher-electron-1.7.9-linux-x64camerasIPDocumentaciongstreamergstreamer_oldjetsonNanokaggleLibrosnerfprueba.txtpytorchwallabotweb
Si a cd, en vez de darle el directorio al que nos queremos mover, le damos el carácter -, volverá al anterior directorio donde estaba
InputPythonterminal('cd -')Copied
InputPythonterminal('ls')Copied
2021-02-11-Introduccion-a-Python.ipynb2021-04-23-Calculo-matricial-con-Numpy.ipynb2021-06-15-Manejo-de-datos-con-Pandas.ipynb2022-09-12 Introduccion a la terminal.ipynb2022-09-12 Introduccion a la terminal.txtcommand-line-cheat-sheet.pdfCSS.ipynbDocker.htmlDocker.ipynbExpresiones regulares.htmlExpresiones regulares.ipynbhtml_fileshtml.ipynbintroduccion_pythonmovies.csvmovies.datnotebooks_translated__pycache__ssh.ipynbtest.htmltest.ipynb
Si nos quisiéramos mover a la home introduciendo solamente cd en la terminal nos llevará.
InputPythonterminal('cd')Copied
pwd (print working directory)
Para obtener el directorio en el que estamos, podemos usar pwd (print working directory)
InputPythonterminal('pwd')Copied
/home/wallabot
Podemos movernos mediante el comando cd mediante rutas relativas y mediante rutas absolutas. Por ejemplo, vamos a movernos a un directorio mediante una ruta absoluta.
InputPythonterminal('cd /home/wallabot/Documentos/')Copied
InputPythonterminal('pwd')Copied
/home/wallabot/Documentos
InputPythonterminal('ls')Copied
aprendiendo-git.pdfbalena-etcher-electron-1.7.9-linux-x64camerasIPDocumentaciongstreamergstreamer_oldjetsonNanokaggleLibrosnerfprueba.txtpytorchwallabotweb
Podemos movernos mediante rutas relativas si solo ponemos la dirección a partir del punto en el que nos encontramos
InputPythonterminal('cd web')Copied
InputPythonterminal('pwd')Copied
/home/wallabot/Documentos/web
También mediante rutas relativas podemos ir un directorio arriba mediante ..
InputPythonterminal('cd ..')Copied
InputPythonterminal('pwd')Copied
/home/wallabot/Documentos
Si en vez de .. ponemos . nos estamos refiriendo al directorio en el que nos encontramos ahora mismo, es decir, si ponemos cd . no nos moveremos, ya que le estamos diciendo a la terminal que vaya al directorio en el que estamos.
InputPythonterminal('cd .')Copied
InputPythonterminal('pwd')Copied
/home/wallabot/Documentos
Vamos a movernos a una ruta en la que tengamos archivos para mostrar el siguiente comando
InputPythonterminal('cd web/portafolio/posts/')Copied
InputPythonterminal('ls')Copied
2021-02-11-Introduccion-a-Python.ipynb2021-04-23-Calculo-matricial-con-Numpy.ipynb2021-06-15-Manejo-de-datos-con-Pandas.ipynb2022-09-12 Introduccion a la terminal.ipynb2022-09-12 Introduccion a la terminal.txtcommand-line-cheat-sheet.pdfCSS.ipynbDocker.htmlDocker.ipynbExpresiones regulares.htmlExpresiones regulares.ipynbhtml_fileshtml.ipynbintroduccion_pythonmovies.csvmovies.datnotebooks_translated__pycache__ssh.ipynbtest.htmltest.ipynb
Información de archivos con file
Si yo no sé qué tipo de archivo es alguno en particular, mediante el comando file puedo obtener una descripción
InputPythonterminal('file 2021-02-11-Introduccion-a-Python.ipynb')Copied
2021-02-11-Introduccion-a-Python.ipynb: UTF-8 Unicode text, with very long lines
Manipulando archivos y directorios
Movámonos primero a la home.
InputPythonterminal('cd /home/wallabot/Documentos/')Copied
Árbol de directorios con tree
Podemos ver toda la estructura de la carpeta en la que estamos mediante el comando tree
InputPythonterminal('tree', max_lines_output=20)Copied
.├── aprendiendo-git.pdf├── balena-etcher-electron-1.7.9-linux-x64│ └── balenaEtcher-1.7.9-x64.AppImage├── camerasIP│ ├── camerasIP.py│ ├── camerasIP.sh│ ├── config.py│ ├── __pycache__│ │ ├── config.cpython-38.pyc│ │ └── config.cpython-39.pyc│ └── README.md├── Documentacion│ ├── Curriculum Vitae (5).pdf│ ├── Firma Pris.PNG│ └── Firma.png├── gstreamer│ ├── basic_tutorial_c│ │ ├── basic_tutorial_1_hello_world│ │ │ ├── basic-tutorial-1...├── upload_page.py└── utils.py873 directories, 119679 files
Pero a la salida tenemos demasiadas líneas, y esto es porque tree es un comando que muestra todos los archivos desde la ruta en la que estamos, por lo que es un poco difícil de leer. Sin embargo, con la opción L podemos indicarle en cuántos niveles queremos que profundice
InputPythonterminal('tree -L 2')Copied
.├── aprendiendo-git.pdf├── balena-etcher-electron-1.7.9-linux-x64│ └── balenaEtcher-1.7.9-x64.AppImage├── camerasIP│ ├── camerasIP.py│ ├── camerasIP.sh│ ├── config.py│ ├── __pycache__│ └── README.md├── Documentacion│ ├── Curriculum Vitae (5).pdf│ ├── Firma Pris.PNG│ └── Firma.png├── gstreamer│ ├── basic_tutorial_c│ └── README.md├── gstreamer_old│ ├── basic_tutorial_c│ └── basic_tutorial_python...├── wallabot│ ├── Microfono - Blue Yeti X│ ├── placa base - Asus prime x570-p│ └── Silla - Corsair T3 Rush└── web├── jupyter-to-html├── jupyter-translator├── portafolio└── wordpress_api_rest30 directories, 12 files
Podemos ver que muestra que hay 30 directorios y 12 archivos, mientras que antes indicaba 873 directorios y 119679 archivos
Crear carpetas con mkdir (make directory)
Si queremos crear un nuevo directorio podemos usar el comando mkdir (make directory) y un nombre
InputPythonterminal("cd /home/wallabot/Documentos/web/portafolio/posts/")Copied
InputPythonterminal('mkdir prueba')Copied
InputPythonterminal('ls')Copied
2021-02-11-Introduccion-a-Python.ipynb2021-04-23-Calculo-matricial-con-Numpy.ipynb2021-06-15-Manejo-de-datos-con-Pandas.ipynb2022-09-12 Introduccion a la terminal.ipynb2022-09-12 Introduccion a la terminal.txtcommand-line-cheat-sheet.pdfCSS.ipynbDocker.htmlDocker.ipynbExpresiones regulares.htmlExpresiones regulares.ipynbhtml_fileshtml.ipynbintroduccion_pythonmovies.csvmovies.datnotebooks_translatedprueba__pycache__ssh.ipynbtest.htmltest.ipynb
Si lo que queremos es crear un directorio con espacios en el nombre, tenemos que poner el nombre entre comillas.
InputPythonterminal('mkdir "directorio prueba"')Copied
InputPythonterminal('ls')Copied
2021-02-11-Introduccion-a-Python.ipynb2021-04-23-Calculo-matricial-con-Numpy.ipynb2021-06-15-Manejo-de-datos-con-Pandas.ipynb2022-09-12 Introduccion a la terminal.ipynb2022-09-12 Introduccion a la terminal.txtcommand-line-cheat-sheet.pdfCSS.ipynbdirectorio pruebaDocker.htmlDocker.ipynbExpresiones regulares.htmlExpresiones regulares.ipynbhtml_fileshtml.ipynbintroduccion_pythonmovies.csvmovies.datnotebooks_translatedprueba__pycache__ssh.ipynbtest.htmltest.ipynb
Vamos a meternos dentro de la carpeta prueba que hemos creado, para seguir viendo allí la terminal
InputPythonterminal("cd prueba")Copied
Crear archivos con touch
En caso de que queramos crear un archivo, el comando que tenemos que usar es touch
InputPythonterminal("touch prueba.txt")Copied
InputPythonterminal("ls")Copied
prueba.txt
Copiar archivos con cp (copy)
Si queremos copiar un archivo lo hacemos mediante el comando cp (copy)
InputPythonterminal("cp prueba.txt prueba_copy.txt")Copied
InputPythonterminal("ls")Copied
prueba_copy.txtprueba.txt
Mover archivos con mv (move)
Si lo que queremos es moverlo, lo que usamos es el comando mv (move)
InputPythonterminal("mv prueba.txt ../prueba.txt")Copied
InputPythonterminal("ls")Copied
prueba_copy.txt
InputPythonterminal("ls ../")Copied
2021-02-11-Introduccion-a-Python.ipynb2021-04-23-Calculo-matricial-con-Numpy.ipynb2021-06-15-Manejo-de-datos-con-Pandas.ipynb2022-09-12 Introduccion a la terminal.ipynb2022-09-12 Introduccion a la terminal.txtcommand-line-cheat-sheet.pdfCSS.ipynbdirectorio pruebaDocker.htmlDocker.ipynbExpresiones regulares.htmlExpresiones regulares.ipynbhtml_fileshtml.ipynbintroduccion_pythonmovies.csvmovies.datnotebooks_translatedpruebaprueba.txt__pycache__ssh.ipynbtest.htmltest.ipynb
Renombrar archivos con mv (move)
El comando mv también nos sirve para renombrar ficheros, ya que si lo que hacemos es moverlo en el mismo directorio, pero dándole otro nombre, al final eso es renombrar el archivo.
InputPythonterminal("mv prueba_copy.txt prueba_move.txt")Copied
InputPythonterminal("ls")Copied
prueba_move.txt
Borrar archivos con rm (remove)
Para borrar archivos o directorios usamos el comando rm (remove)
InputPythonterminal("rm prueba_move.txt")Copied
InputPythonterminal("ls")Copied
Eliminar directorios con rm -r (remove recursive)
Si lo que queremos es eliminar un directorio con archivos dentro, debemos usar el flag -r.
InputPythonterminal("cd ..")Copied
InputPythonterminal('rm -r "directorio prueba"')Copied
InputPythonterminal("ls")Copied
2021-02-11-Introduccion-a-Python.ipynb2021-04-23-Calculo-matricial-con-Numpy.ipynb2021-06-15-Manejo-de-datos-con-Pandas.ipynb2022-09-12 Introduccion a la terminal.ipynb2022-09-12 Introduccion a la terminal.txtcommand-line-cheat-sheet.pdfCSS.ipynbDocker.htmlDocker.ipynbExpresiones regulares.htmlExpresiones regulares.ipynbhtml_fileshtml.ipynbintroduccion_pythonmovies.csvmovies.datnotebooks_translatedpruebaprueba.txt__pycache__ssh.ipynbtest.htmltest.ipynb
Como puedes ver nunca pregunta si estamos seguros, para que pregunte hay que añadir el flag -i (interactive)
InputPythonterminal("rm -i prueba.txt")Copied
rm: ¿borrar el fichero regular vacío 'prueba.txt'? (s/n) s
Sincronizar archivos mediante rsync
Hasta ahora hemos visto cómo copiar, mover y eliminar archivos, pero supongamos que tenemos una carpeta y copiamos esos archivos a otra. Ahora supongamos que modificamos un archivo de la primera carpeta y queremos que la segunda tenga los cambios. Tenemos dos opciones, volver a copiar todos los archivos, o hacer una sincronización mediante rsync
Primero vamos a crear una nueva carpeta en la que creamos varios archivos
InputPython!mkdir sourcefolder!touch sourcefolder/file1 sourcefolder/file2 sourcefolder/file3Copied
Ahora creamos una segunda carpeta que es la que vamos a sincronizar con la primera
InputPython!mkdir syncfolderCopied
InputPython!echo "ls sourcefolder:" && ls sourcefolder && echo "ls syncfolder:" && ls syncfolderCopied
ls sourcefolder:file1 file2 file3ls syncfolder:
Sincronizamos las dos carpetas con rsync, la primera vez solo copiará los archivos de la primera carpeta a la segunda. Para hacer esto, además debemos añadir el flag -r (recursive)
InputPython!rsync -r sourcefolder/ syncfolder/Copied
InputPython!echo "ls sourcefolder:" && ls sourcefolder && echo "ls syncfolder:" && ls syncfolderCopied
ls sourcefolder:file1 file2 file3ls syncfolder:file1 file2 file3
Si ahora creo un nuevo archivo en sourcefolder y vuelvo a sincronizar, se copia solo ese archivo en syncfolder. Para ver que solo se copia un archivo podemos usar el flag -v (verbose)
InputPython!touch sourcefolder/file4Copied
InputPython!rsync -r -v sourcefolder/ syncfolder/Copied
sending incremental file listfile1file2file3file4sent 269 bytes received 92 bytes 722.00 bytes/sectotal size is 0 speedup is 0.00
Pero parece que ha copiado todos los archivos, así que para que esto no pase y copie solo los que se han modificado, hay que usar el flag -u
InputPython!touch sourcefolder/file5Copied
InputPython!rsync -r -v -u sourcefolder/ syncfolder/Copied
sending incremental file listfile5sent 165 bytes received 35 bytes 400.00 bytes/sectotal size is 0 speedup is 0.00
InputPython!echo "ls sourcefolder:" && ls sourcefolder && echo "ls syncfolder:" && ls syncfolderCopied
ls sourcefolder:file1 file2 file3 file4 file5ls syncfolder:file1 file2 file3 file4 file5
¿Y qué pasa si creo un archivo nuevo en syncfolder?
InputPython!touch syncfolder/file6Copied
InputPython!rsync -r -v -u sourcefolder/ syncfolder/Copied
sending incremental file listsent 122 bytes received 12 bytes 268.00 bytes/sectotal size is 0 speedup is 0.00
InputPython!echo "ls sourcefolder:" && ls sourcefolder && echo "ls syncfolder:" && ls syncfolderCopied
ls sourcefolder:file1 file2 file3 file4 file5ls syncfolder:file1 file2 file3 file4 file5 file6
No lo sincroniza, así que es importante tenerlo en cuenta
Algunos flags importantes que hay que tener en cuenta son:
-a: Este flag es un atajo para varias opciones, incluyendo-r(recursivo),-l(copiar enlaces simbólicos),-p(mantener permisos),-t(mantener la hora de modificación) y-g(mantener grupo). Esta opción es útil para hacer una copia exacta de un directorio, incluyendo todas sus subcarpetas y archivos.-v: Este flag activa la salida detallada, que muestra los archivos que se están copiando y el progreso de la operación.-r: Este flag es utilizado para copiar de forma recursiva, lo que significa que copia todas las subcarpetas y archivos dentro de un directorio.-u: Este flag es utilizado para copiar solo los archivos nuevos o modificados. Si un archivo ya existe en el destino y es más reciente que el archivo de origen, no se copia.-n: Este flag se utiliza para hacer una prueba de copia, lo que significa que no se realizan cambios en el destino.--exclude: Este flag se utiliza para excluir archivos o carpetas específicos de la operación de copia. Puedes especificar varios archivos o carpetas para excluir utilizando esta opción varias veces.-z: Este flag se utiliza para comprimir los datos durante la transferencia, lo que reduce el ancho de banda utilizado y acelera la velocidad de transferencia.-h: este flag se usa para mostrar la información en un formato más legible, especialmente cuando se trabaja con grandes cantidades de datos o tamaños de archivos grandes.
Borramos las dos carpetas creadas
InputPython!rm -r sourcefolder syncfolderCopied
Explorando el contenido de los archivos
Para no tener que abrir un archivo desde una interfaz gráfica tenemos varias formas. Voy a copiar un archivo de texto en esta carpeta lo primero.
InputPythonterminal("cd prueba")Copied
InputPythonterminal("cp ../2021-02-11-Introduccion-a-Python.ipynb .")Copied
InputPythonterminal("ls")Copied
2021-02-11-Introduccion-a-Python.ipynb
Cabecera de archivos con head
El primer comando para poder ver dentro de un archivo de texto es head, que nos permite ver las primeras 10 líneas de un archivo, pero si se le mete el flag -n puedes indicar el número de líneas
InputPythonterminal("head 2021-02-11-Introduccion-a-Python.ipynb")Copied
{"cells": [{"cell_type": "markdown","metadata": {"id": "dsaKCKL0IxZl"},"source": ["# Introducción a Python"]
InputPythonterminal("head -n 5 2021-02-11-Introduccion-a-Python.ipynb")Copied
{"cells": [{"cell_type": "markdown","metadata": {
Cola de un archivo con tail
En caso de querer ver las últimas líneas usamos tail
InputPythonterminal("tail 2021-02-11-Introduccion-a-Python.ipynb")Copied
},"vscode": {"interpreter": {"hash": "d5745ab6aba164e1152437c779991855725055592b9f2bdb41a4825db7168d26"}}},"nbformat": 4,"nbformat_minor": 0}
InputPythonterminal("tail -n 5 2021-02-11-Introduccion-a-Python.ipynb")Copied
}},"nbformat": 4,"nbformat_minor": 0}
Si queremos ver continuamente las últimas líneas de un archivo, por ejemplo, queremos estar monitorizando continuamente un archivo de LOG para ver eventos, añadimos el flag -f, esto hará que la terminal se quede continuamente comprobando el archivo, y cada vez que aparezca una nueva línea en él la mostrará
Por ejemplo, si yo monitoreo el log de inicio de sesión en mi máquina
InputPython!tail -f /var/log/auth.logCopied
Dec 1 16:27:22 wallabot gcr-prompter[1457]: Gcr: calling the PromptDone method on /org/gnome/keyring/Prompt/p2@:1.26, and ignoring replyDec 1 16:27:22 wallabot gnome-keyring-daemon[1178]: asked to register item /org/freedesktop/secrets/collection/login/10, but it's already registeredDec 1 16:27:26 wallabot systemd-logind[835]: Watching system buttons on /dev/input/event28 (Logitech Wireless Mouse MX Master 3)Dec 1 16:27:33 wallabot gcr-prompter[1457]: Gcr: 10 second inactivity timeout, quittingDec 1 16:27:33 wallabot gcr-prompter[1457]: Gcr: unregistering prompterDec 1 16:27:33 wallabot gcr-prompter[1457]: Gcr: disposing prompterDec 1 16:27:33 wallabot gcr-prompter[1457]: Gcr: finalizing prompterDec 1 16:27:34 wallabot polkitd(authority=local): Operator of unix-session:1 successfully authenticated as unix-user:wallabot to gain TEMPORARY authorization for action org.debian.apt.install-or-remove-packages for system-bus-name::1.96 [/usr/bin/python3 /usr/bin/update-manager --no-update --no-focus-on-map] (owned by unix-user:wallabot)Dec 1 16:27:42 wallabot systemd-logind[835]: Watching system buttons on /dev/input/event30 (T9-R (AVRCP))Dec 1 16:27:49 wallabot gnome-keyring-daemon[1178]: asked to register item /org/freedesktop/secrets/collection/login/2, but it's already registered
Vemos en las dos últimas líneas mi inicio de sesión cuando he encendido hoy mi ordenador.
Ahora me conecto por SSH a mi propia máquina
InputPython!ssh localhostCopied
wallabot@localhost's password:Welcome to Ubuntu 20.04.5 LTS (GNU/Linux 5.15.0-53-generic x86_64)* Documentation: https://help.ubuntu.com* Management: https://landscape.canonical.com* Support: https://ubuntu.com/advantage1 device has a firmware upgrade available.Run `fwupdmgr get-upgrades` for more information.Se pueden aplicar 0 actualizaciones de forma inmediata.Your Hardware Enablement Stack (HWE) is supported until April 2025.*** System restart required ***Last login: Sun May 8 02:18:09 2022 from 192.168.1.147
En la consola donde estaba monitorizando el inicio de sesión han aparecido dos nuevas líneas
Dec 1 16:32:23 wallabot sshd[25647]: Accepted password for wallabot from 127.0.0.1 port 54668 ssh2Dec 1 16:32:23 wallabot sshd[25647]: pam_unix(sshd:session): session opened for user wallabot by (uid=0)Dec 1 16:32:23 wallabot systemd-logind[835]: New session 4 of user wallabot.
Y cuando cierro la sesión SSH aparecen otras dos líneas nuevas
Dec 1 16:33:52 wallabot sshd[25647]: pam_unix(sshd:session): session closed for user wallabotDec 1 16:33:52 wallabot systemd-logind[835]: Session 4 logged out. Waiting for processes to exit.Dec 1 16:33:52 wallabot systemd-logind[835]: Removed session 4.
El visor de archivos más potente: less
Uno de los comandos más potentes para ver dentro de los archivos es less
InputPythonterminal("less 2021-02-11-Introduccion-a-Python.ipynb", max_lines_output=20)Copied
{"cells": [{"cell_type": "markdown","metadata": {"id": "dsaKCKL0IxZl"},"source": ["# Introducción a Python"]},{"cell_type": "markdown","metadata": {"id": "Ho_8zgIiI0We"},"source": ["## 1. Resumen"]},...},"nbformat": 4,"nbformat_minor": 0}
Al estar dentro de un cuaderno no se puede ver lo que ocurre realmente al usar less, pero cuando lo usamos nos metemos en el documento, podemos movernos a través de él mediante las teclas o con el ratón
Si queremos buscar algo dentro del documento, escribimos el carácter / y lo que queramos buscar. Para cambiar entre las distintas instancias que ha encontrado pulsamos la tecla n, y si queremos volver hacia atrás en las búsquedas pulsamos shift+n
Para salir solo hay que pulsar q
El visor cat
No te permite navegar por el archivo ni hacer búsquedas.
InputPythonterminal("cat 2021-02-11-Introduccion-a-Python.ipynb", max_lines_output=20)Copied
{"cells": [{"cell_type": "markdown","metadata": {"id": "dsaKCKL0IxZl"},"source": ["# Introducción a Python"]},{"cell_type": "markdown","metadata": {"id": "Ho_8zgIiI0We"},"source": ["## 1. Resumen"]},...},"nbformat": 4,"nbformat_minor": 0}
Editor por defecto del sistema xdg-open
Si lo queremos abrir con el editor por defecto del archivo, tenemos que usar xdg-open
InputPythonterminal("xdg-open 2021-02-11-Introducción-a-Python.ipynb")Copied
Navegador de archivos nautilus
Si lo que queremos es abrir la carpeta en la que estamos, usamos nautilus
InputPythonterminal("nautilus")Copied
Y si lo que queremos es que se abra en una ruta determinada, se incluye la ruta
InputPythonterminal("nautilus ~/")Copied
Contador de palabras de un archivo con wc (word count)
Por último, un comando muy útil es wc (word count), que te muestra cuántas líneas, palabras y bytes tiene un archivo
InputPythonterminal("wc 2021-02-11-Introduccion-a-Python.ipynb")Copied
11678 25703 285898 2021-02-11-Introduccion-a-Python.ipynb
Como vemos, el archivo tiene 11678 líneas, 25703 palabras y ocupa 285898 bytes
¿Qué es un comando?
Un comando puede ser cuatro cosas
- Un programa ejecutable, estos normalmente se guardan en la ruta
/usr/bin - Un comando de shell
- Una función de shell
- Un alias
Para ver a qué clase pertenece un comando usamos type
InputPython!type cdCopied
cd is a shell builtin
InputPython!type mkdirCopied
mkdir is /usr/bin/mkdir
InputPython!type lsCopied
ls is /usr/bin/ls
¿Qué es un alias?
Un alias es un comando que definimos nosotros, este se define mediante el comando alias. Por ejemplo, vamos a crear el alias l que lo que haga sea ls -h
InputPython!alias l='ls -l'Copied
Cuando ejecutamos l nos muestra el resultado de ls -h
InputPython!lCopied
2021-02-11-Introducción-a-Python.ipynb
Pero esto tiene el problema de que cuando cerremos la terminal desaparece el alias. Más adelante aprenderemos a crear alias permanentes
Ayuda de los comandos
Ayuda con help
Con muchos comandos de la shell, podemos obtener su ayuda mediante el comando help
InputPython!help cdCopied
cd: cd [-L|[-P [-e]]] [dir]Modifica el directorio de trabajo del shell.Modifica el directorio actual a DIR. DIR por defecto es el valor de lavariable de shell HOME.La variable CDPATH define la ruta de búsqueda para el directorio quecontiene DIR. Los nombres alternativos de directorio en CDPATH seseparan con dos puntos (:). Un nombre de directorio nulo es igual queel directorio actual. Si DIR comienza con una barra inclinada (/),entonces no se usa CDPATH.Si no se encuentra el directorio, y la opción del shell "cdable_vars"está activa, entonces se trata la palabra como un nombre de variable.Si esa variable tiene un valor, se utiliza su valor para DIR.Opciones:-L fuerza a seguir los enlaces simbólicos: resuelve los enlacessimbólicos en DIR después de procesar las instancias de ".."-P usa la estructura física de directorios sin seguir los enlacessimbólicos: resuelve los enlaces simbólicos en DIR antes de procesarlas instancias de ".."-e si se da la opción -P y el directorio actual de trabajo no sepuede determinar con éxito, termina con un estado diferente de cero.La acción por defecto es seguir los enlaces simbólicos, como si seespecificara "-L".".." se procesa quitando la componente del nombre de la ruta inmediatamenteanterior hasta una barra inclinada o el comienzo de DIR.Estado de Salida:Devuelve 0 si se cambia el directorio, y si $PWD está definido comocorrecto cuando se emplee -P; de otra forma es diferente a cero.
Manual con man
Otro comando es man, que hace referencia al manual de usuario.
InputPythonterminal("man ls", max_lines_output=20)Copied
LS(1) User Commands LS(1)NAMEls - list directory contentsSYNOPSISls [OPTION]... [FILE]...DESCRIPTIONList information about the FILEs (the current directory by default).Sort entries alphabetically if none of -cftuvSUX nor --sort is speci‐fied.Mandatory arguments to long options are mandatory for short optionstoo.-a, --alldo not ignore entries starting with .-A, --almost-all...Full documentation at: <https://www.gnu.org/software/coreutils/ls>or available locally via: info '(coreutils) ls invocation'GNU coreutils 8.30 September 2019 LS(1)
Para salir, pulsar q, ya que man utiliza less como visualizador del manual
Información con info
Otro comando es info
InputPythonterminal("info ls", max_lines_output=20)Copied
File: coreutils.info, Node: ls invocation, Next: dir invocation, Up: Directory listing10.1 ‘ls’: List directory contents==================================The ‘ls’ program lists information about files (of any type, includingdirectories). Options and file arguments can be intermixed arbitrarily,as usual.For non-option command-line arguments that are directories, bydefault ‘ls’ lists the contents of directories, not recursively, andomitting files with names beginning with ‘.’. For other non-optionarguments, by default ‘ls’ lists just the file name. If no non-optionargument is specified, ‘ls’ operates on the current directory, acting asif it had been invoked with a single argument of ‘.’.By default, the output is sorted alphabetically, according to thelocale settings in effect.(1) If standard output is a terminal, theoutput is in columns (sorted vertically) and control characters areoutput as question marks; otherwise, the output is listed one per line...‘--show-control-chars’Print nongraphic characters as-is in file names. This is thedefault unless the output is a terminal and the program is ‘ls’.
Para salir, pulsar q, ya que info utiliza less como visualizador de la información
Información de un comando con whatis
Otro comando es whatis
InputPythonterminal("whatis ls")Copied
ls (1) - list directory contents
Wildcards
Las wildcards son caracteres especiales que nos sirven para realizar búsquedas especiales. Por ejemplo, si quiero buscar todos los archivos que terminen en .txt. Vamos a crear unos cuantos archivos para verlas.
InputPythonterminal("touch file.txt dot.txt dot2.txt index.html datos1 datos123 Abc")Copied
InputPythonterminal("ls")Copied
2021-02-11-Introduccion-a-Python.ipynbAbcdatos1datos123dot2.txtdot.txtfile.txtindex.html
Todos los caracteres *
Vamos a buscar ahora todos los archivos .txt
InputPython!ls *.txtCopied
dot2.txt dot.txt file.txt
Vamos ahora a buscar todos los que empiecen por la palabra datos
InputPython!ls datos*Copied
datos1 datos123
Números ?
Pero qué pasa si en realidad lo que queremos es que nos muestre todos los archivos que empiecen por la palabra datos pero seguidos solo de un número, tenemos que poner un signo de interrogación ?
InputPython!ls datos?Copied
datos1
Si lo que queremos es que tenga tres números, entonces tenemos que poner tres signos de interrogación ???
InputPython!ls datos???Copied
datos123
Mayúsculas [[:upper:]]
Si queremos que busque los archivos que empiecen por mayúsculas
InputPython!ls [[:upper:]]*Copied
Abc
Minúsculas [[:lower:]]
Para los archivos que empiecen con minúsculas.
InputPython!ls [[:lower:]]*Copied
datos1 datos123 dot2.txt dot.txt file.txt index.html
Clases
Mediante el uso de corchetes podemos crear clases, así si queremos buscar los archivos que empiecen por las letras d o f seguidas de cualquier carácter
InputPython!ls [df]*Copied
datos1 datos123 dot2.txt dot.txt file.txt
Redirecciones: cómo funciona la shell
Un comando funciona de la siguiente manera
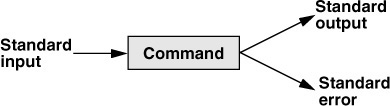
Tiene un standard input, que por defecto es el texto que introducimos por teclado, un standard output, que por defecto es el texto que sale por consola y un standard error que también es, por defecto, un texto que sale por consola, pero que tiene otro formato
Redirección del standard output
Pero con el carácter > podemos modificar el standard output de un comando. Por ejemplo, si queremos listar con ls los archivos de la carpeta en la que estamos, pero no queremos que el resultado se imprima por pantalla, sino que se guarde en un archivo, haríamos lo siguiente ls > lista.txt, esto escribe la lista en lista.txt. Además, si lista.txt no existe, lo crea
InputPython!ls > lista.txtCopied
Vemos que ha creado el archivo y vemos qué hay dentro
InputPythonterminal("ls")Copied
2021-02-11-Introduccion-a-Python.ipynbAbcdatos1datos123dot2.txtdot.txtfile.txtindex.htmllista.txt
InputPythonterminal("cat lista.txt")Copied
2021-02-11-Introduccion-a-Python.ipynbAbcdatos1datos123dot2.txtdot.txtfile.txtindex.htmllista.txt
Vemos que dentro de lista.txt aparece lista.txt, eso es porque primero crea el archivo y luego ejecuta el comando
Hacemos lo mismo, pero con la carpeta padre
InputPython!ls ../ > lista.txtCopied
Si volvemos a ver dentro de lista.txt
InputPythonterminal("cat lista.txt")Copied
2021-02-11-Introduccion-a-Python.ipynb2021-04-23-Calculo-matricial-con-Numpy.ipynb2021-06-15-Manejo-de-datos-con-Pandas.ipynb2022-09-12 Introduccion a la terminal.ipynb2022-09-12 Introduccion a la terminal.txtcommand-line-cheat-sheet.pdfCSS.ipynbDocker.htmlDocker.ipynbExpresiones regulares.htmlExpresiones regulares.ipynbhtml_fileshtml.ipynbintroduccion_pythonmovies.csvmovies.datnotebooks_translatedprueba__pycache__ssh.ipynbtest.htmltest.ipynb
Vemos que se sobreescribe el contenido
Si lo que queremos es que se concatene el contenido, debemos usar >>
InputPython!ls > lista.txtCopied
InputPython!ls ../ >> lista.txtCopied
InputPythonterminal("cat lista.txt")Copied
2021-02-11-Introduccion-a-Python.ipynbAbcdatos1datos123dot2.txtdot.txtfile.txtindex.htmllista.txt2021-02-11-Introduccion-a-Python.ipynb2021-04-23-Calculo-matricial-con-Numpy.ipynb2021-06-15-Manejo-de-datos-con-Pandas.ipynb2022-09-12 Introduccion a la terminal.ipynb2022-09-12 Introduccion a la terminal.txtcommand-line-cheat-sheet.pdfCSS.ipynbDocker.htmlDocker.ipynbExpresiones regulares.htmlExpresiones regulares.ipynbhtml_fileshtml.ipynbintroduccion_pythonmovies.csvmovies.datnotebooks_translatedprueba__pycache__ssh.ipynbtest.htmltest.ipynb
Ahora sí se ha concatenado la información
Esto es muy útil para crear archivos de logs
Redirección del standard error
Si realizamos una operación incorrecta obtenemos un error, veamos qué pasa al redirigir un comando que da un error
InputPython!ls fjhdsalkfs > lista.txtCopied
ls: no se puede acceder a 'fjhdsalkfs': No existe el archivo o el directorio
Como vemos, ha dado un error, pero si ahora vemos dentro de lista.txt
InputPythonterminal("cat lista.txt")Copied
Vemos que el archivo está vacío, eso es porque no hemos redireccionado el standard error a lista.txt, sino el standard output. Como hemos visto en la imagen, hay dos estándares de salida en un comando, el primero es el standard output y el segundo el standard error, por lo que para redireccionar el standard error hay que indicarlo mediante 2>. Vamos ahora así
InputPython!ls kjhsfskjd 2> lista.txtCopied
InputPythonterminal("cat lista.txt")Copied
ls: no se puede acceder a 'kjhsfskjd': No existe el archivo o el directorio
Como vemos, ahora sí se ha redirigido
Redirección del standard output y del standard error
Si queremos redirigirlos dos, usamos lo siguiente
InputPython!ls kjhsfskjd > lista.txt 2>&1Copied
Veamos dentro de lista.txt
InputPythonterminal("cat lista.txt")Copied
ls: no se puede acceder a 'kjhsfskjd': No existe el archivo o el directorio
Si ahora ejecutamos un comando sin errores
InputPython!ls . >> lista.txt 2>&1Copied
Veamos dentro de lista.txt (**ojo**, ahora hemos concatenado)
InputPythonterminal("cat lista.txt")Copied
ls: no se puede acceder a 'kjhsfskjd': No existe el archivo o el directorio2021-02-11-Introduccion-a-Python.ipynbAbcdatos1datos123dot2.txtdot.txtfile.txtindex.htmllista.txt
Cómo se puede ver, se han redirigido, tanto el standard error, como el standard output al mismo archivo
Pipelines
Podemos crear pipelines haciendo que el standard output de un comando se convierta en el standard input de otro. Por ejemplo, vamos a hacer que la salida de ls -lha sea la entrada de grep, que lo veremos más adelante, pero es un comando para buscar.
InputPython!ls -lha | grep -i "txt"Copied
-rw-rw-r-- 1 wallabot wallabot 0 dic 6 00:56 dot2.txt-rw-rw-r-- 1 wallabot wallabot 0 dic 6 00:56 dot.txt-rw-rw-r-- 1 wallabot wallabot 0 dic 6 00:56 file.txt-rw-rw-r-- 1 wallabot wallabot 182 dic 6 01:06 lista.txt
Como podemos ver, lo que hemos hecho ha sido llevar la salida de ls a grep con el cual hemos buscado algún archivo con txt en el nombre
Operadores de control - encadenar comandos
Comandos de manera secuencial
Una forma de encadenar comandos de forma secuencial es separarlos mediante ;. Esto crea diferentes hilos para cada tarea
InputPython!ls; echo 'Hola'; calCopied
2021-02-11-Introduccion-a-Python.ipynb datos123 file.txtAbc dot2.txt index.htmldatos1 dot.txt lista.txtHolaDiciembre 2022do lu ma mi ju vi sá1 2 34 5 6 7 8 9 1011 12 13 14 15 16 1718 19 20 21 22 23 2425 26 27 28 29 30 31
Como podemos ver, primero se ha ejecutado el comando ls, luego se ha impreso Hola gracias al comando echo "Hola" y por último se ha impreso un calendario gracias al comando cal
Vamos ahora a hacer otro ejemplo para ver que se ejecutan de manera secuencial.
InputPython!echo "Before touch;"; ls -lha; touch secuential.txt; echo "After touch:"; ls -lhaCopied
Before touch;total 292Kdrwxrwxr-x 2 wallabot wallabot 4,0K dic 6 01:04 .drwxrwxr-x 7 wallabot wallabot 4,0K dic 6 00:24 ..-rw-rw-r-- 1 wallabot wallabot 280K dic 6 00:28 2021-02-11-Introduccion-a-Python.ipynb-rw-rw-r-- 1 wallabot wallabot 0 dic 6 00:56 Abc-rw-rw-r-- 1 wallabot wallabot 0 dic 6 00:56 datos1-rw-rw-r-- 1 wallabot wallabot 0 dic 6 00:56 datos123-rw-rw-r-- 1 wallabot wallabot 0 dic 6 00:56 dot2.txt-rw-rw-r-- 1 wallabot wallabot 0 dic 6 00:56 dot.txt-rw-rw-r-- 1 wallabot wallabot 0 dic 6 00:56 file.txt-rw-rw-r-- 1 wallabot wallabot 0 dic 6 00:56 index.html-rw-rw-r-- 1 wallabot wallabot 182 dic 6 01:06 lista.txtAfter touch:total 292Kdrwxrwxr-x 2 wallabot wallabot 4,0K dic 6 01:07 .drwxrwxr-x 7 wallabot wallabot 4,0K dic 6 00:24 ..-rw-rw-r-- 1 wallabot wallabot 280K dic 6 00:28 2021-02-11-Introduccion-a-Python.ipynb-rw-rw-r-- 1 wallabot wallabot 0 dic 6 00:56 Abc-rw-rw-r-- 1 wallabot wallabot 0 dic 6 00:56 datos1-rw-rw-r-- 1 wallabot wallabot 0 dic 6 00:56 datos123-rw-rw-r-- 1 wallabot wallabot 0 dic 6 00:56 dot2.txt-rw-rw-r-- 1 wallabot wallabot 0 dic 6 00:56 dot.txt-rw-rw-r-- 1 wallabot wallabot 0 dic 6 00:56 file.txt-rw-rw-r-- 1 wallabot wallabot 0 dic 6 00:56 index.html-rw-rw-r-- 1 wallabot wallabot 182 dic 6 01:06 lista.txt-rw-rw-r-- 1 wallabot wallabot 0 dic 6 01:07 secuential.txt
Como se puede ver, en el primer ls no aparece sequential.txt, mientras que en el segundo sí. Eso quiere decir que los comandos se han ejecutado en orden, uno detrás de otro
Comandos de manera paralela
Si lo que queremos es que los comandos se ejecuten de manera paralela, hay que usar el operador &. Esto hará que se cree un nuevo proceso por cada comando.
Veamos el ejemplo de antes
InputPython!rm secuential.txtCopied
InputPython!echo "Before touch;" & ls -lha & touch secuential.txt & echo "After touch:" & ls -lhaCopied
Before touch;After touch:total 292Kdrwxrwxr-x 2 wallabot wallabot 4,0K dic 6 01:08 .drwxrwxr-x 7 wallabot wallabot 4,0K dic 6 00:24 ..-rw-rw-r-- 1 wallabot wallabot 280K dic 6 00:28 2021-02-11-Introduccion-a-Python.ipynb-rw-rw-r-- 1 wallabot wallabot 0 dic 6 00:56 Abc-rw-rw-r-- 1 wallabot wallabot 0 dic 6 00:56 datos1-rw-rw-r-- 1 wallabot wallabot 0 dic 6 00:56 datos123-rw-rw-r-- 1 wallabot wallabot 0 dic 6 00:56 dot2.txt-rw-rw-r-- 1 wallabot wallabot 0 dic 6 00:56 dot.txt-rw-rw-r-- 1 wallabot wallabot 0 dic 6 00:56 file.txt-rw-rw-r-- 1 wallabot wallabot 0 dic 6 00:56 index.html-rw-rw-r-- 1 wallabot wallabot 182 dic 6 01:06 lista.txt-rw-rw-r-- 1 wallabot wallabot 0 dic 6 01:08 secuential.txt
Ahora se puede ver que no se han ejecutado secuencialmente, ya que primero se han ejecutado los echos, que serán los que menos tarden, y después el resto
Comandos de manera condicional
And
Utilizando el operador &&, un comando se ejecutará cuando el anterior se haya ejecutado satisfactoriamente
InputPython!rm secuential.txtCopied
InputPython!echo "Before touch;" && ls -lha && touch secuential.txt && echo "After touch:" && ls -lhaCopied
Before touch;total 292Kdrwxrwxr-x 2 wallabot wallabot 4,0K dic 6 01:08 .drwxrwxr-x 7 wallabot wallabot 4,0K dic 6 00:24 ..-rw-rw-r-- 1 wallabot wallabot 280K dic 6 00:28 2021-02-11-Introduccion-a-Python.ipynb-rw-rw-r-- 1 wallabot wallabot 0 dic 6 00:56 Abc-rw-rw-r-- 1 wallabot wallabot 0 dic 6 00:56 datos1-rw-rw-r-- 1 wallabot wallabot 0 dic 6 00:56 datos123-rw-rw-r-- 1 wallabot wallabot 0 dic 6 00:56 dot2.txt-rw-rw-r-- 1 wallabot wallabot 0 dic 6 00:56 dot.txt-rw-rw-r-- 1 wallabot wallabot 0 dic 6 00:56 file.txt-rw-rw-r-- 1 wallabot wallabot 0 dic 6 00:56 index.html-rw-rw-r-- 1 wallabot wallabot 182 dic 6 01:06 lista.txtAfter touch:total 292Kdrwxrwxr-x 2 wallabot wallabot 4,0K dic 6 01:08 .drwxrwxr-x 7 wallabot wallabot 4,0K dic 6 00:24 ..-rw-rw-r-- 1 wallabot wallabot 280K dic 6 00:28 2021-02-11-Introduccion-a-Python.ipynb-rw-rw-r-- 1 wallabot wallabot 0 dic 6 00:56 Abc-rw-rw-r-- 1 wallabot wallabot 0 dic 6 00:56 datos1-rw-rw-r-- 1 wallabot wallabot 0 dic 6 00:56 datos123-rw-rw-r-- 1 wallabot wallabot 0 dic 6 00:56 dot2.txt-rw-rw-r-- 1 wallabot wallabot 0 dic 6 00:56 dot.txt-rw-rw-r-- 1 wallabot wallabot 0 dic 6 00:56 file.txt-rw-rw-r-- 1 wallabot wallabot 0 dic 6 00:56 index.html-rw-rw-r-- 1 wallabot wallabot 182 dic 6 01:06 lista.txt-rw-rw-r-- 1 wallabot wallabot 0 dic 6 01:08 secuential.txt
Aquí podemos ver cómo se ha ejecutado uno detrás de otro, es decir, un comando no empieza hasta que el anterior acaba
Pero entonces, ¿cuál es la diferencia entre ; y &&?
En el primero, el secuencial ;, primero se ejecuta un comando y luego otro, pero para que se ejecute un comando da igual que el anterior se haya ejecutado satisfactoriamente
InputPython!rm prueba ; ls -lhaCopied
rm: no se puede borrar 'prueba': No existe el archivo o el directoriototal 292Kdrwxrwxr-x 2 wallabot wallabot 4,0K dic 6 01:08 .drwxrwxr-x 7 wallabot wallabot 4,0K dic 6 00:24 ..-rw-rw-r-- 1 wallabot wallabot 280K dic 6 00:28 2021-02-11-Introduccion-a-Python.ipynb-rw-rw-r-- 1 wallabot wallabot 0 dic 6 00:56 Abc-rw-rw-r-- 1 wallabot wallabot 0 dic 6 00:56 datos1-rw-rw-r-- 1 wallabot wallabot 0 dic 6 00:56 datos123-rw-rw-r-- 1 wallabot wallabot 0 dic 6 00:56 dot2.txt-rw-rw-r-- 1 wallabot wallabot 0 dic 6 00:56 dot.txt-rw-rw-r-- 1 wallabot wallabot 0 dic 6 00:56 file.txt-rw-rw-r-- 1 wallabot wallabot 0 dic 6 00:56 index.html-rw-rw-r-- 1 wallabot wallabot 182 dic 6 01:06 lista.txt-rw-rw-r-- 1 wallabot wallabot 0 dic 6 01:08 secuential.txt
Como se puede ver, primero se ejecuta rm prueba, da un error y aun así se ejecuta ls -lha prueba
En la forma condicional &&, si un comando no se ejecuta satisfactoriamente, el siguiente no se ejecuta.
InputPython!rm prueba && ls -lhaCopied
rm: no se puede borrar 'prueba': No existe el archivo o el directorio
Cómo se puede ver ls -lha prueba no se ejecuta ya que rm prueba ha dado un error
Or
A diferencia del &&, el 'or' ejecutará todos los procesos, sea cual sea su resultado. Se ha de utilizar el operador ||
InputPython!rm prueba || ls -lhaCopied
rm: no se puede borrar 'prueba': No existe el archivo o el directoriototal 292Kdrwxrwxr-x 2 wallabot wallabot 4,0K dic 6 01:08 .drwxrwxr-x 7 wallabot wallabot 4,0K dic 6 00:24 ..-rw-rw-r-- 1 wallabot wallabot 280K dic 6 00:28 2021-02-11-Introduccion-a-Python.ipynb-rw-rw-r-- 1 wallabot wallabot 0 dic 6 00:56 Abc-rw-rw-r-- 1 wallabot wallabot 0 dic 6 00:56 datos1-rw-rw-r-- 1 wallabot wallabot 0 dic 6 00:56 datos123-rw-rw-r-- 1 wallabot wallabot 0 dic 6 00:56 dot2.txt-rw-rw-r-- 1 wallabot wallabot 0 dic 6 00:56 dot.txt-rw-rw-r-- 1 wallabot wallabot 0 dic 6 00:56 file.txt-rw-rw-r-- 1 wallabot wallabot 0 dic 6 00:56 index.html-rw-rw-r-- 1 wallabot wallabot 182 dic 6 01:06 lista.txt-rw-rw-r-- 1 wallabot wallabot 0 dic 6 01:08 secuential.txt
La diferencia entre este y ; es que el || (or) no crea un nuevo hilo para cada comando
Cómo se manejan los permisos
Cuando se listan los archivos de un directorio con el flag -l (long) aparecen unos símbolos al lado de cada archivo.
InputPython!mkdir subdirectorioCopied
InputPython!ls -lCopied
total 288-rw-rw-r-- 1 wallabot wallabot 285898 dic 6 00:28 2021-02-11-Introduccion-a-Python.ipynb-rw-rw-r-- 1 wallabot wallabot 0 dic 6 00:56 Abc-rw-rw-r-- 1 wallabot wallabot 0 dic 6 00:56 datos1-rw-rw-r-- 1 wallabot wallabot 0 dic 6 00:56 datos123-rw-rw-r-- 1 wallabot wallabot 0 dic 6 00:56 dot2.txt-rw-rw-r-- 1 wallabot wallabot 0 dic 6 00:56 dot.txt-rw-rw-r-- 1 wallabot wallabot 0 dic 6 00:56 file.txt-rw-rw-r-- 1 wallabot wallabot 0 dic 6 00:56 index.html-rw-rw-r-- 1 wallabot wallabot 182 dic 6 01:06 lista.txt-rw-rw-r-- 1 wallabot wallabot 0 dic 6 01:08 secuential.txtdrwxrwxr-x 2 wallabot wallabot 4096 dic 6 01:10 subdirectorio
Esto nos da información de cada archivo
Primero veamos qué tipos de archivos hay
- -: Archivo normal
- d: Directorio
- l: Enlace simbólico* b: Archivo de bloque especial. Son archivos que manejan la información de los bloques de datos como, por ejemplo, un USB
Después veremos los tipos de modo:
| Dueño | Grupo | World | ||||||
|---|---|---|---|---|---|---|---|---|
| rwx | r-x | r-x | ||||||
| 1 | 1 | 1 | 1 | 0 | 1 | 1 | 0 | 1 |
| 7 | 5 | 5 | ||||||
- r: read
- w: write
- x: execute
Modo simbólico:
- u: Solo para el usuario
- g: Sólo para el grupo
- o: Solo para otros (world) * a: Para todos
Modificando los permisos en la terminal
Creamos un nuevo archivo
InputPythonterminal("cd subdirectorio")Copied
InputPython!echo "hola mundo" > mitexto.txtCopied
InputPython!cat mitexto.txtCopied
hola mundo
Vamos a ver los permisos que tiene.
InputPython!ls -lCopied
total 4-rw-rw-r-- 1 wallabot wallabot 11 dic 6 01:10 mitexto.txt
Como vemos, tiene permisos de lectura y escritura para mi usuario y el grupo, y solo permisos de lectura para el resto (world)
Cambio de permisos con chmod (change mode)
Para cambiar los permisos de un archivo usamos el comando chmod (change mode), donde tenemos que poner en octal los permisos del usuario, luego los del grupo y por último los del resto.
InputPython!chmod 755 mitexto.txtCopied
InputPython!ls -lCopied
total 4-rwxr-xr-x 1 wallabot wallabot 11 dic 6 01:10 mitexto.txt
Vemos que ahora mi usuario tiene permisos de lectura, escritura y ejecución, mientras que el grupo y el resto del mundo tienen permisos de lectura y ejecución
Vamos a quitar los permisos de lectura solo a mi usuario. Para cambiar solo los permisos de un usuario usamos el identificador simbólico, un + si queremos agregar permisos o un - si queremos quitarlos o un = si queremos restablecerlos y seguido del tipo de permiso
InputPython!chmod u-r mitexto.txtCopied
InputPython!ls -lCopied
total 4--wxr-xr-x 1 wallabot wallabot 11 dic 6 01:10 mitexto.txt
InputPython!cat mitexto.txtCopied
cat: mitexto.txt: Permiso denegado
Como vemos, al quitar permisos de lectura para mi usuario, no podemos leer el archivo.
Le volvemos a poner el permiso de lectura
InputPython!chmod u+r mitexto.txtCopied
InputPython!ls -lCopied
total 4-rwxr-xr-x 1 wallabot wallabot 11 dic 6 01:10 mitexto.txt
InputPython!cat mitexto.txtCopied
hola mundo
Si queremos agregar o quitar permisos a más de un usuario, lo hacemos separando cada permiso por una ,
InputPython!chmod u-x,go=w mitexto.txtCopied
InputPython!ls -lCopied
total 4-rw--w--w- 1 wallabot wallabot 11 dic 6 01:10 mitexto.txt
Como se puede ver, se le ha quitado el permiso de ejecución al usuario y se ha establecido el permiso de solo escritura para el grupo y el resto del mundo.
Identificación de usuario con whoami
Para saber quiénes somos podemos usar el comando whoami (who am I)
InputPython!whoamiCopied
wallabot
Información de usuario con id
Otra manera, que además da más información, es el comando id
InputPython!idCopied
uid=1000(wallabot) gid=1000(wallabot) grupos=1000(wallabot),4(adm),24(cdrom),27(sudo),30(dip),46(plugdev),120(lpadmin),131(lxd),132(sambashare),998(docker)
Este comando nos dice que nuestro ID de usuario es el 1000, el ID de grupo es el 1000 y que pertenecemos a los grupos wallabot, adm, cdrom, sudo, dip, plugdev, lpadmin, lxd, sambashare y docker
Cambio de usuario con el comando su (switch user)
Si queremos cambiar de usuario usamos el comando su (switch user). Para según qué usuario hay que usar sudo (superuser do)
InputPython!sudo su rootCopied
root@wallabot:/home/wallabot/Documentos/web/portafolio/posts/prueba/subdirectorio#
Como vemos, cambia el prompt y ahora indica que somos el usuario root
Vamos a la carpeta home
InputPython!cdCopied
root@wallabot:~#
Pero en Linux hay una carpeta home por cada usuario, esto lo podemos ver si ejecutamos el comando pwd
InputPython!pwdCopied
/root
Voy a crear un archivo en la carpeta donde antes he creado el archivo *mitexto.txt*
InputPython!touch /home/wallabot/Documentos/web/portafolio/posts/prueba/subdirectorio/rootfile.txtCopied
Vuelvo a cambiarme a mi usuario
InputPython!su wallabotCopied
wallabot@wallabot:
Y me voy al directorio donde están los archivos que he creado.
InputPython!cd /home/wallabot/Documentos/web/portafolio/posts/prueba/subdirectorioCopied
Vemos los archivos que hay y sus permisos
InputPython!ls -lCopied
total 4-rw--w--w- 1 wallabot wallabot 11 dic 6 01:10 mitexto.txt-rw-r--r-- 1 root root 0 dic 6 01:22 rootfile.txt
Como vemos, el usuario y el grupo del archivo *rootfile.txt* son el usuario root
Sí, ahora que soy el usuario *wallabot*, intento borrar el archivo rootfile.txt
InputPython!rm rootfile.txtCopied
rm: ¿borrar el fichero regular vacío 'rootfile.txt' protegido contra escritura? (s/n)
Como vemos, nos pregunta si lo queremos borrar, ya que pertenece a otro usuario.
Modificar la contraseña de un usuario
Si quiero modificar la contraseña del usuario que tengo actualmente activo, uso el comando passwd (password)
Primero compruebo qué usuario soy
InputPython!whoamiCopied
wallabot
Y ahora probamos a cambiar la contraseña
InputPython!passwdCopied
$ passwdCambiando la contraseña de wallabot.Contraseña actual de :Nueva contraseña:Vuelva a escribir la nueva contraseña
Como vemos, pide la actual contraseña para poder cambiarla
Links simbólicos
Podemos crear enlaces simbólicos a una ruta determinada mediante el comando ln (link) seguido del flag -s (symbolic), el directorio y el nombre del enlace
InputPython!ln -s /home/wallabot/Documentos/web webCopied
Si ahora listamos los archivos
InputPython!ls -lCopied
total 4-rw--w--w- 1 wallabot wallabot 11 dic 6 01:10 mitexto.txt-rw-r--r-- 1 root root 0 dic 6 01:22 rootfile.txtlrwxrwxrwx 1 wallabot wallabot 29 dic 6 01:28 web -> /home/wallabot/Documentos/web
Vemos el enlace simbólico web que apunta a /home/wallabot/Documentos/web:
Yo ahora me puedo ir a web
InputPythonterminal("cd web")Copied
InputPython!pwdCopied
/home/wallabot/Documentos/web
Configurar las variables de entorno
Ver las variables de entorno con printenv
Con el comando printenv podemos ver todas las variables de entorno
InputPython!printenvCopied
GJS_DEBUG_TOPICS=JS ERROR;JS LOGVSCODE_CWD=/home/wallabotLESSOPEN=| /usr/bin/lesspipe %sCONDA_PROMPT_MODIFIER=(base)PYTHONIOENCODING=utf-8USER=wallabotVSCODE_NLS_CONFIG={"locale":"es","availableLanguages":{"*":"es"},"_languagePackId":"b07c40c9acb9e1d7b3ca14b06f814803.es","_translationsConfigFile":"/home/wallabot/.config/Code/clp/b07c40c9acb9e1d7b3ca14b06f814803.es/tcf.json","_cacheRoot":"/home/wallabot/.config/Code/clp/b07c40c9acb9e1d7b3ca14b06f814803.es","_resolvedLanguagePackCoreLocation":"/home/wallabot/.config/Code/clp/b07c40c9acb9e1d7b3ca14b06f814803.es/6261075646f055b99068d3688932416f2346dd3b","_corruptedFile":"/home/wallabot/.config/Code/clp/b07c40c9acb9e1d7b3ca14b06f814803.es/corrupted.info","_languagePackSupport":true}VSCODE_HANDLES_UNCAUGHT_ERRORS=trueMPLBACKEND=module://ipykernel.pylab.backend_inlineSSH_AGENT_PID=1373XDG_SESSION_TYPE=x11SHLVL=0HOME=/home/wallabotCHROME_DESKTOP=code-url-handler.desktopCONDA_SHLVL=1DESKTOP_SESSION=ubuntuGIO_LAUNCHED_DESKTOP_FILE=/usr/share/applications/code.desktopVSCODE_IPC_HOOK=/run/user/1000/vscode-26527400-1.73.1-main.sockPYTHONUNBUFFERED=1GTK_MODULES=gail:atk-bridge...QT_IM_MODULE=ibusGIT_PAGER=catPWD=/home/wallabot/Documentos/webCLICOLOR=1XDG_DATA_DIRS=/usr/share/ubuntu:/usr/local/share/:/usr/share/:/var/lib/snapd/desktopXDG_CONFIG_DIRS=/etc/xdg/xdg-ubuntu:/etc/xdgVSCODE_CODE_CACHE_PATH=/home/wallabot/.config/Code/CachedData/6261075646f055b99068d3688932416f2346dd3bCONDA_EXE=/home/wallabot/anaconda3/bin/condaCONDA_PREFIX=/home/wallabot/anaconda3VSCODE_PID=3897
Ver una variable de entorno con el comando echo
Para ver una variable de entorno en concreto podemos hacerlo mediante el comando echo seguido del símbolo $ y el nombre de la variable
InputPython!echo $HOMECopied
/home/wallabot
Modificar una variable de entorno para una sesión de terminal
Podemos modificar una variable de entorno para la sesión activa de terminal, por ejemplo, vamos a agregar una nueva ruta a la variable PATH. Primero vemos qué hay en ella
InputPython!echo $PATHCopied
/home/wallabot/anaconda3/bin:/home/wallabot/anaconda3/condabin:/usr/local/sbin:/usr/local/bin:/usr/sbin:/usr/bin:/sbin:/bin:/usr/games:/usr/local/games:/snap/bin
Ahora añadimos un nuevo directorio
InputPython!PATH=$PATH:"subdirectorioCopied
Volvemos a ver qué hay dentro de PATH
InputPython!echo $PATHCopied
/home/wallabot/anaconda3/bin:/home/wallabot/anaconda3/condabin:/usr/local/sbin:/usr/local/bin:/usr/sbin:/usr/bin:/sbin:/bin:/usr/games:/usr/local/games:/snap/bin:subdirectorio
Vemos que se ha añadido el directorio subdirectorio.
El problema de este método es que cuando abramos una nueva terminal no se mantendrá este cambio en PATH
Modificar una variable de entorno para todas las sesiones de terminal
Nos vamos a la carpeta home
InputPythonterminal("cd /home/wallabot")Copied
Aquí, en el home, listamos todos los archivos con el flag -a (all)
InputPython!ls -aCopied
. .eclipse .pki.. Escritorio Plantillas.afirma .gitconfig .platformioanaconda3 .gnupg .profile.audacity-data Imágenes .psensor.bash_history .ipython Público.bash_logout .java .python_history.bashrc .jupyter snap.cache .lesshst .ssh.conda Lightworks .sudo_as_admin_successful.config .Lightworks.thereCanBeOnlyOne .thunderbird.cortex-debug .local Vídeos.cyberghost logiops .vnc.dbus .MCTranscodingSDK .vscodeDescargas .mozilla .wget-hsts.docker MúsicaDocumentos .nv
Vemos que hay un archivo que se llama .bashrc, este archivo es el que tiene la configuración de nuestro bash
InputPythonterminal("cat .bashrc", max_lines_output=3)Copied
# ~/.bashrc: executed by bash(1) for non-login shells.# see /usr/share/doc/bash/examples/startup-files (in the package bash-doc)# for examples...fiunset __conda_setup# <<< conda initialize <<<
Este archivo es el que configura la terminal cada vez que se abre una nueva, por lo que si en él editamos la variable PATH, este cambio se mantendrá para todas las ventanas nuevas de terminal que abramos
Para modificar la variable PATH dentro del archivo de configuración, tenemos que agregar la siguiente línea al archivo
PATH=$PATH:"subdirectorio"Crear alias para todas las sesiones
Ya vimos cómo crear alias de comandos, pero también pasaba que se perdían cada vez que cerrábamos una sesión de terminal. Para que esto no pase, los añadimos también al archivo de configuración .bashrc. Por ejemplo, en mi caso he añadido las siguientes líneas
alias ll='ls -l'
alias la='ls -a'
alias lh='ls -h'
alias lha='ls -lha'
Comandos de búsqueda
Búsqueda de binarios con which
El primer comando de búsqueda que vamos a ver es which que nos permite encontrar la ruta de los binarios
InputPython!which pythonCopied
/home/wallabot/anaconda3/bin/python
Sin embargo, si buscamos algo que no esté en alguna de las rutas del PATH, which no será capaz de decirnos la ruta
InputPython!which cdCopied
Búsqueda de archivos con find
Para buscar un archivo con find tenemos que indicarle desde qué ruta queremos buscar el archivo, seguido del flag -name y el nombre del archivo que queremos buscar.
InputPython!find ~ -name "2021-02-11-Introduccion-a-Python.ipynb"Copied
/home/wallabot/Documentos/web/portafolio/posts/prueba/2021-02-11-Introduccion-a-Python.ipynb/home/wallabot/Documentos/web/portafolio/posts/2021-02-11-Introduccion-a-Python.ipynb
Como vemos, está en su directorio, más la copia que he creado en este notebook y la he guardado en la carpeta prueba
Una cosa muy poderosa de find es que podemos usar wildcards, por ejemplo, si quiero buscar todos los archivos de texto de mi carpeta web.
InputPython!find ~/Documentos/web/ -name *.txtCopied
/home/wallabot/Documentos/web/portafolio/posts/2022-09-12 Introduccion a la terminal.txt/home/wallabot/Documentos/web/portafolio/posts/prueba/lista.txt/home/wallabot/Documentos/web/portafolio/posts/prueba/dot.txt/home/wallabot/Documentos/web/portafolio/posts/prueba/dot2.txt/home/wallabot/Documentos/web/portafolio/posts/prueba/secuential.txt/home/wallabot/Documentos/web/portafolio/posts/prueba/subdirectorio/rootfile.txt/home/wallabot/Documentos/web/portafolio/posts/prueba/subdirectorio/mitexto.txt/home/wallabot/Documentos/web/portafolio/posts/prueba/file.txt/home/wallabot/Documentos/web/wordpress_api_rest/page.txt
Si no queremos que distinga entre mayúsculas y minúsculas, debemos usar el flag -iname. Por ejemplo, si buscamos todos los archivos que contengan el texto FILE, pero usando el flag -iname.
InputPython!find ~/Documentos/web/ -iname *FILE*Copied
/home/wallabot/Documentos/web/portafolio/posts/html_files/home/wallabot/Documentos/web/portafolio/posts/prueba/subdirectorio/rootfile.txt/home/wallabot/Documentos/web/portafolio/posts/prueba/file.txt
Vemos que todos los resultados contienen file y no FILE, es decir, no ha hecho distinción entre mayúsculas y minúsculas
Podemos especificar el tipo de archivo con el flag -type. Solo admite dos tipos f para archivos y d para directorios
InputPython!find ~/Documentos/nerf -name image*Copied
/home/wallabot/Documentos/nerf/instant-ngp/configs/image/home/wallabot/Documentos/nerf/instant-ngp/dependencies/tiny-cuda-nn/benchmarks/image/home/wallabot/Documentos/nerf/instant-ngp/dependencies/tiny-cuda-nn/dependencies/cutlass/media/images/home/wallabot/Documentos/nerf/instant-ngp/dependencies/tiny-cuda-nn/dependencies/fmt/doc/bootstrap/mixins/image.less/home/wallabot/Documentos/nerf/instant-ngp/dependencies/tiny-cuda-nn/data/images/home/wallabot/Documentos/nerf/instant-ngp/dependencies/dlss/NVIDIAImageScaling/samples/media/images/home/wallabot/Documentos/nerf/instant-ngp/data/nerf/fox/images/home/wallabot/Documentos/nerf/instant-ngp/data/image
InputPython!find ~/Documentos/nerf -name image* -type dCopied
/home/wallabot/Documentos/nerf/instant-ngp/configs/image/home/wallabot/Documentos/nerf/instant-ngp/dependencies/tiny-cuda-nn/benchmarks/image/home/wallabot/Documentos/nerf/instant-ngp/dependencies/tiny-cuda-nn/dependencies/cutlass/media/images/home/wallabot/Documentos/nerf/instant-ngp/dependencies/tiny-cuda-nn/data/images/home/wallabot/Documentos/nerf/instant-ngp/dependencies/dlss/NVIDIAImageScaling/samples/media/images/home/wallabot/Documentos/nerf/instant-ngp/data/nerf/fox/images/home/wallabot/Documentos/nerf/instant-ngp/data/image
InputPython!find ~/Documentos/nerf -name image* -type fCopied
/home/wallabot/Documentos/nerf/instant-ngp/dependencies/tiny-cuda-nn/dependencies/fmt/doc/bootstrap/mixins/image.less
Si queremos filtrar por el tamaño del archivo podemos usar el flag -size, por ejemplo, si queremos buscar todos los archivos de más de 200 MB
InputPython!find ~/Documentos/ -type f -size +200MCopied
/home/wallabot/Documentos/kaggle/hubmap/models/13_efficientnet-b7_final_model.pth/home/wallabot/Documentos/kaggle/hubmap/models/12_efficientnet-b7_final_model.pth/home/wallabot/Documentos/kaggle/hubmap/models/14_resnet152_final_model.pth/home/wallabot/Documentos/kaggle/hubmap/models/14_resnet152_best_model.pth/home/wallabot/Documentos/kaggle/hubmap/models/12_efficientnet-b7_early_stopping.pth/home/wallabot/Documentos/kaggle/hubmap/models/efficientnet-b7-dcc49843.pth/home/wallabot/Documentos/kaggle/hubmap/models/13_efficientnet-b7_early_stopping.pth/home/wallabot/Documentos/kaggle/hubmap/models/14_resnet152_early_stopping.pth/home/wallabot/Documentos/kaggle/hubmap/models/12_efficientnet-b7_best_model.pth/home/wallabot/Documentos/kaggle/hubmap/models/13_efficientnet-b7_best_model.pth
Si queremos realizar operaciones tras la búsqueda, usamos el flag -exec
Por ejemplo, voy a buscar todas las carpetas con el nombre subdirectorio
InputPython!find ~/ -name subdirectorio -type dCopied
/home/wallabot/Documentos/web/portafolio/posts/prueba/subdirectorio
Puedo hacer que se borren con el flag -exec
InputPython!find ~/ -name subdirectorio -type d -exec rm -r {} ;Copied
rm: ¿borrar el fichero regular vacío '/home/wallabot/Documentos/web/portafolio/posts/prueba/subdirectorio/rootfile.txt' protegido contra escritura? (s/n) sfind: ‘/home/wallabot/Documentos/web/portafolio/posts/prueba/subdirectorio’: No existe el archivo o el directorio
InputPython!find ~/ -name subdirectorio -type dCopied
Por último, si usamos el carácter ! estaremos indicando que encuentre todo lo que no coincide con lo que hemos especificado
InputPython!find ~/Documentos/web/portafolio/posts/prueba ! -name *.txtCopied
/home/wallabot/Documentos/web/portafolio/posts/prueba/home/wallabot/Documentos/web/portafolio/posts/prueba/index.html/home/wallabot/Documentos/web/portafolio/posts/prueba/Abc/home/wallabot/Documentos/web/portafolio/posts/prueba/datos1/home/wallabot/Documentos/web/portafolio/posts/prueba/2021-02-11-Introduccion-a-Python.ipynb/home/wallabot/Documentos/web/portafolio/posts/prueba/datos123
Como vemos, ha encontrado todo lo que no es un .txt
Comando de búsqueda grep
grep es un comando de búsqueda muy potente, por eso le dedicamos un apartado a él solo. El comando grep utiliza las expresiones regulares, por lo que si quieres aprender de ellas te dejo un enlace a un post donde las explico
Vamos a empezar a ver la potencia de este comando, vamos a buscar todas las veces que aparece el texto MáximoFN dentro del archivo 2021-02-11-Introduccion-a-Python.ipynb
InputPythonterminal("cd /home/wallabot/Documentos/web/portafolio/posts/prueba")Copied
InputPythonterminal("grep MaximoFN 2021-02-11-Introduccion-a-Python.ipynb", max_lines_output=20)Copied
"a = 'MaximoFN' ","'MaximoFN'""string = "MaximoFN" ","'MaximoFN'""string = 'MaximoFN' ","'MaximoFN'""Este es el blog de "MaximoFN" ""print("Este es el blog de \"MaximoFN\"")""Este es el blog de 'MaximoFN' ""print('Este es el blog de \'MaximoFN\'')""Este es el blog de \MaximoFN\ ""print('Este es el blog de \\MaximoFN\\')""MaximoFN ""print('Este es el blog de \nMaximoFN')""Este es el blog de MaximoFN ""print('Esto no se imprimirá \rEste es el blog de MaximoFN')""Este es el blog de MaximoFN ""print('Este es el blog de \tMaximoFN')""Este es el blog deMaximoFN ""print('Este es el blog de \bMaximoFN')"..."funcion2_del_modulo('MaximoFN')""MaximoFN "," print('MaximoFN') "," variable = 'MaximoFN' ",
Sin embargo, si hacemos la misma búsqueda para el texto maximofn
InputPython!grep maximofn 2021-02-11-Introduccion-a-Python.ipynbCopied
No aparece ningún resultado, esto es porque grep es case sensitive, es decir, busca el texto tal cual se lo has introducido, diferenciando mayúsculas y minúsculas. Si no queremos esto, tenemos que introducir el flag -i
InputPythonterminal("grep -i MaximoFN 2021-02-11-Introduccion-a-Python.ipynb", max_lines_output=20)Copied
"a = 'MaximoFN' ","'MaximoFN'""string = "MaximoFN" ","'MaximoFN'""string = 'MaximoFN' ","'MaximoFN'""Este es el blog de "MaximoFN" ""print("Este es el blog de \"MaximoFN\"")""Este es el blog de 'MaximoFN' ""print('Este es el blog de \'MaximoFN\'')""Este es el blog de \MaximoFN\ ""print('Este es el blog de \\MaximoFN\\')""MaximoFN ""print('Este es el blog de \nMaximoFN')""Este es el blog de MaximoFN ""print('Esto no se imprimirá \rEste es el blog de MaximoFN')""Este es el blog de MaximoFN ""print('Este es el blog de \tMaximoFN')""Este es el blog deMaximoFN ""print('Este es el blog de \bMaximoFN')"..."funcion2_del_modulo('MaximoFN')""MaximoFN "," print('MaximoFN') "," variable = 'MaximoFN' ",
Si lo que queremos es que nos devuelva el número de veces que aparece, introducimos el flag -c
InputPython!grep -c MaximoFN 2021-02-11-Introduccion-a-Python.ipynbCopied
105
Si nos da igual si aparece con mayúscula o minúscula, podemos volver a agregar el flag -i, pero no hace falta meterlo separado del flag -c, se pueden introducir juntos
InputPython!grep -ci MaximoFN 2021-02-11-Introduccion-a-Python.ipynbCopied
105
Si ahora queremos todas las veces en las que **no** aparece la palabra MáximoFN introducimos el flag -v
InputPython!grep -cv MaximoFN 2021-02-11-Introduccion-a-Python.ipynbCopied
11573
---
➡️ **Continúa en la Parte 2: red, compresión y procesos**, donde aprenderás a moverte por la red y a controlar los procesos del sistema.