
In the previous parts we saw local version control and working with branches. In this final chapter we make the jump to **remote repositories**, create **aliases** to go faster, save changes without committing them with **stash**, and mark versions with **tags**. 🎸 💾 #GITandRoll
Disclaimer: This post has been translated to English using a machine translation model. Please, let me know if you find any mistakes.
📚 **This entry is part of the _Git Guide_ series**, divided into three chapters that are read in order:
> * Part 1: Local version control
* Part 2: Branches
* 👉 **Part 3: Remote repositories, stash and tags**
Working with remote repositories
When we develop software, we usually do not do it alone; we usually work as a team, so it does not make sense to have a local git repository, but rather to have a remote repository that we all work with and share progress on.
Note: The goal of this post is to explain git. For connecting to remote repositories, I’m going to explain it with GitHub because it is the most widely used git repository hosting service, but I’m not going to go into depth on GitHub
Clone a remote repository (git clone <repository>)
If we start working on a repository that has already been created, the first thing we need to do is clone it. To do that, we need to use git clone <repository>, where <repository> can be a URL or an SSH address. Since large language models and ChatGPT are very much in fashion right now, we’re going to clone an open-source repository created by the community, Open-Assistant; to do that, we’ll run git clone https://github.com/LAION-AI/Open-Assistant
InputPython!git clone https://github.com/LAION-AI/Open-Assistant.gitCopied
Clonando en 'Open-Assistant'...remote: Enumerating objects: 29769, done.remote: Counting objects: 100% (673/673), done.remote: Compressing objects: 100% (310/310), done.remote: Total 29769 (delta 398), reused 577 (delta 354), pack-reused 29096Recibiendo objetos: 100% (29769/29769), 33.61 MiB | 29.29 MiB/s, listo.Resolviendo deltas: 100% (19967/19967), listo.
This creates the Open-Assistant folder for us with all the repository code; we can go inside and see all the code.
InputPython!cd Open-Assistant && lsCopied
ansible deploy model safetyassets discord-bots notebooks scriptsbackend docker oasst-data setup.cfgCODEOWNERS docker-compose.yaml oasst-shared text-frontendCONTRIBUTING.md docs pyproject.toml websitecopilot inference README.mddata LICENSE redis.conf
Deleted the folder
InputPython!rm -r Open-AssistantCopied
Link a local repository to a remote one
If it happens the other way around, if we first start developing locally and then want to synchronize it with a remote repository, we have to do the following
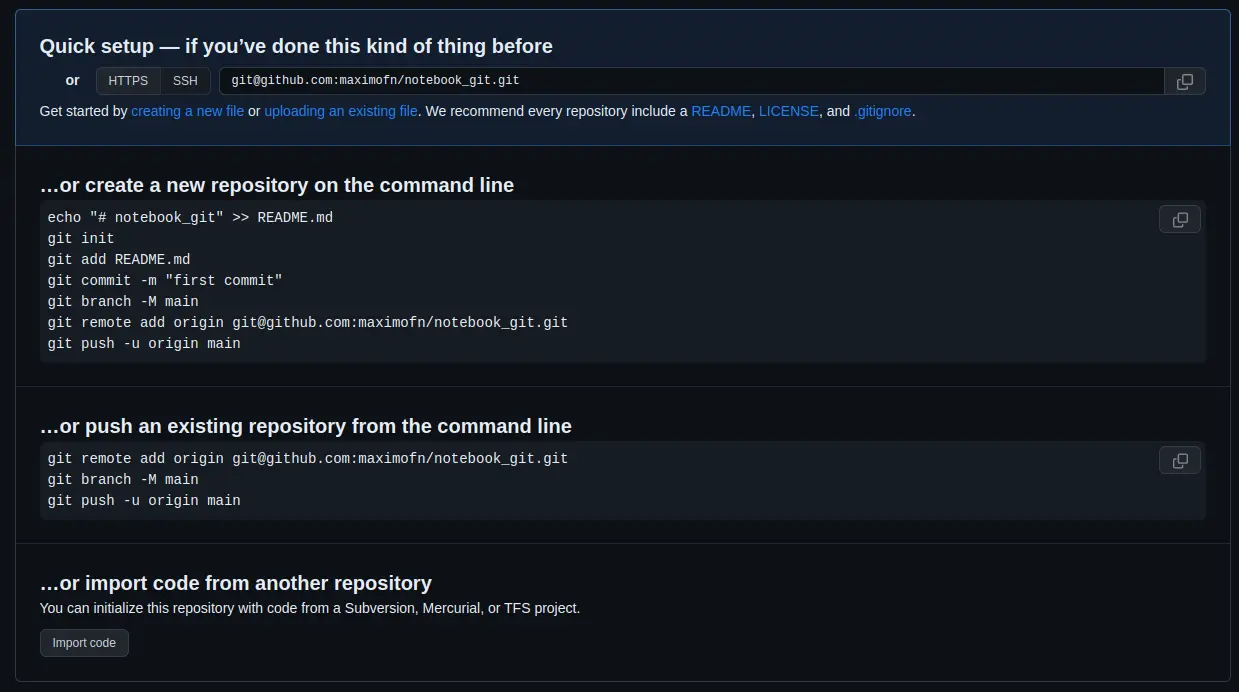
- First, create an empty remote repository; in my case, I created the
notebook_gitrepository on GitHub, which I will delete later - Obtain the repository URL or SSH address
- Synchronize them using
git remote add origin <URL>
The empty repository I created on GitHub looks like this
In my case I am going to use the SSH address, which is git@github.com:maximofn/notebook_git.git
InputPython!cd notebook_git && git remote add origin git@github.com:maximofn/notebook_git.gitCopied
They are already linked, but to make sure we can run git remote -v
InputPython!cd notebook_git && git remote -vCopied
origin git@github.com:maximofn/notebook_git.git (fetch)origin git@github.com:maximofn/notebook_git.git (push)
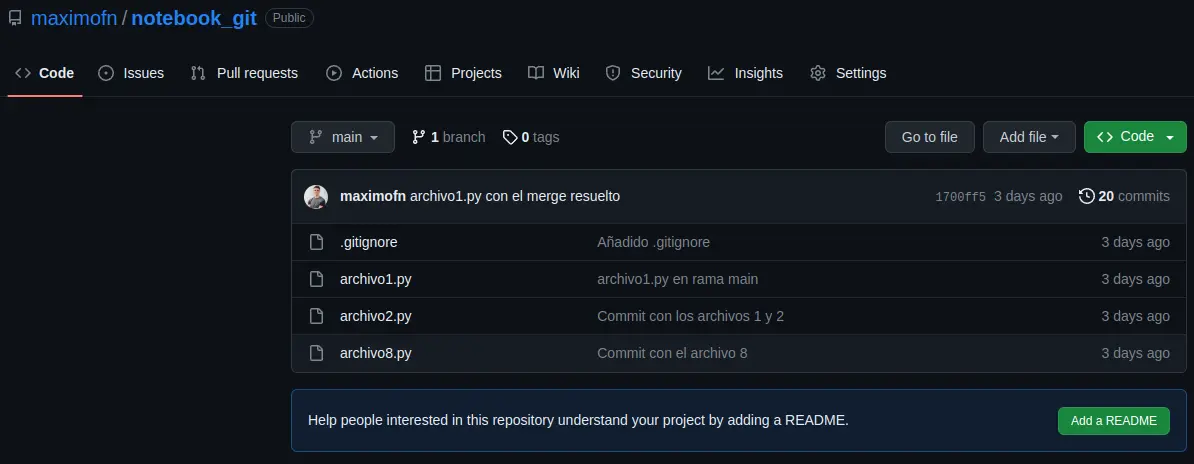
Upload the changes from a local repository to a remote repository (git push)
As we said, they are linked, but if I go to my repository on GitHub, it still looks like this
The local and remote repositories are linked, but now all changes from the local repository need to be sent to the remote one. To do this, you would use git push origin <local-branch>:<remote-branch>, that is, since our main branch is called main and the main branch on GitHub is called main, you would need to run git push origin main:main.
If you remember, Git by default used to call the main branch master, but GitHub by default calls the main branch main, so if each person names their branches locally in different ways, you have to specify which local branch pushes to which remote branch.
You can configure the default connection between branches in git by running git push --set-upstream origin main. This establishes a relationship between the local branch main and the remote branch main. Once this relationship is set up, it is only necessary to run git push to upload the changes made locally to the remote server.
So we establish the connection between branches
InputPython!cd notebook_git && git push --set-upstream origin mainCopied
Enumerando objetos: 51, listo.Contando objetos: 100% (51/51), listo.Compresión delta usando hasta 12 hilosComprimiendo objetos: 100% (38/38), listo.Escribiendo objetos: 100% (51/51), 4.21 KiB | 2.11 MiB/s, listo.Total 51 (delta 18), reusado 0 (delta 0)remote: Resolving deltas: 100% (18/18), done.To github.com:maximofn/notebook_git.git* [new branch] main -> mainRama 'main' configurada para hacer seguimiento a la rama remota 'main' de 'origin'.
Now we can simply do git push to upload the local changes to the remote repository
InputPython!cd notebook_git && git pushCopied
Everything up-to-date
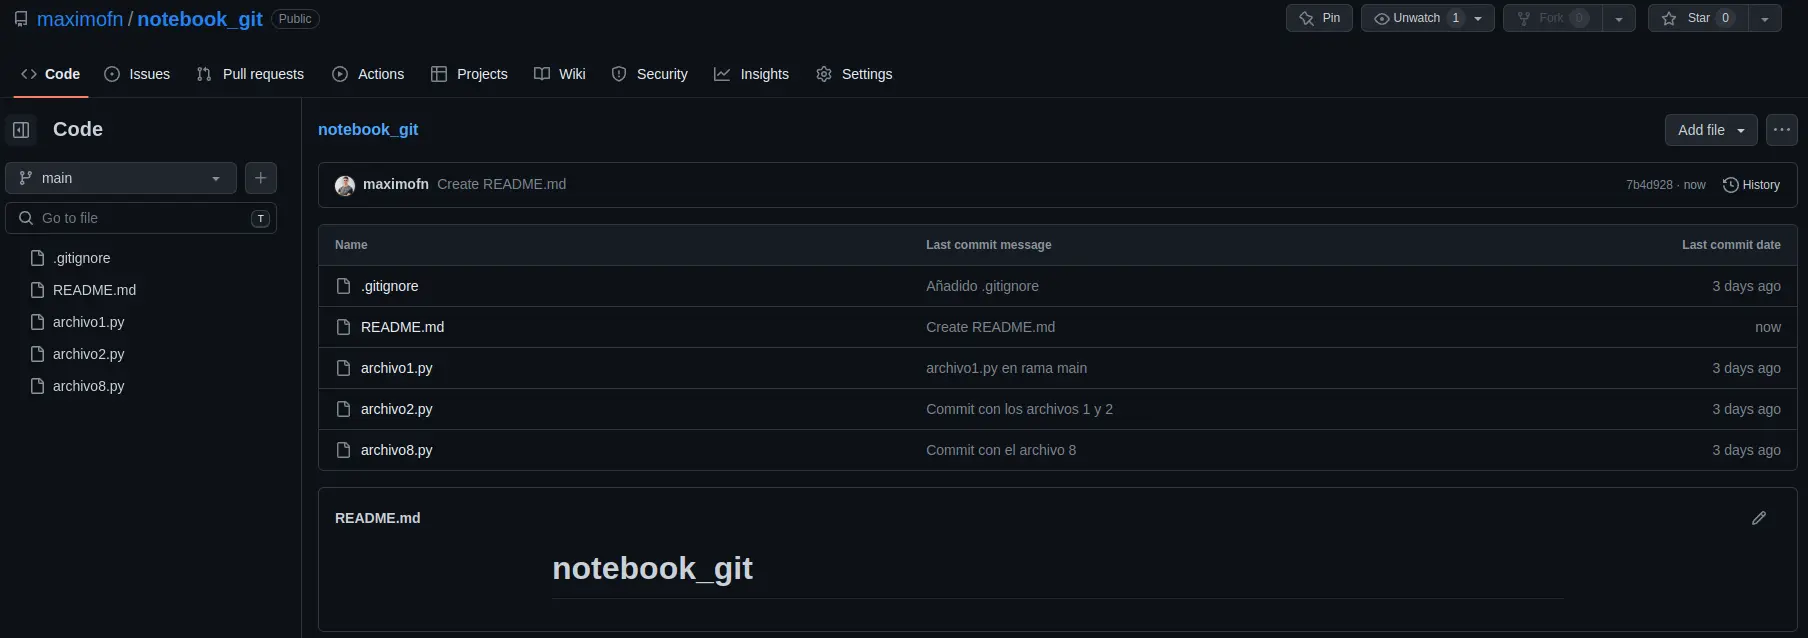
If we now go back to our GitHub repository, it looks like this
If we run an ls in our local repository, we can see that the files we have in the remote repository are also in the local repository; in other words, we have synchronized the local and remote repositories
InputPython!cd notebook_git && ls -aCopied
. .. api_keys.py archivo1.py archivo2.py archivo8.py .git .gitignore
The only ones not in the remote repository are api_keys.py, which is the one we added to the .gitignore file, that is, the one we told git not to track. And .git, which is where the configuration of our local repository is stored and which should not be pushed to the remote repository, because each person will have their own git configuration and therefore it does not need to be synchronized
Download changes from a remote repository to a local repository (git pull)
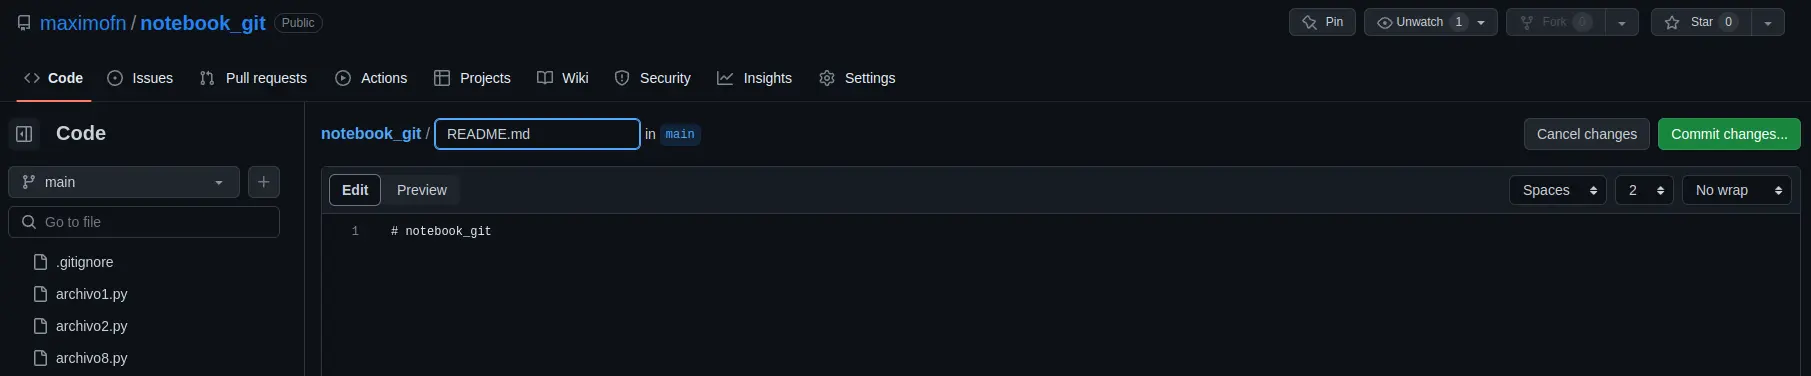
Now we’re going to do the reverse: we’re going to pull down the new changes that have been made in the remote repository. If we look at how the remote repository is set up, we can see that there is a button that says Add a README, so we click it to add one
When you click, an editor will open. We leave what GitHub has filled in and save the changes by clicking the Commit changes... button.
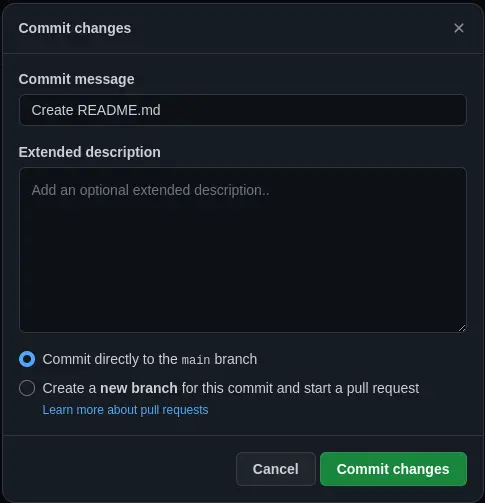
A window will appear asking us for a commit message; we leave the default one and click Commit changes
By doing that, the repository will look like this.
A new file called README.md has been created, but if we run ls in the local repository we will not find it
InputPython!cd notebook_git && ls | grep READMECopied
So we need to bring the changes from the remote repository into the local one; to do this, we have to run git pull origin <rama remota> to tell Git which remote branch we want to fetch data from, but just like before we can establish a relationship between the remote branch and the local branch in the following way git branch --set-upstream-to=origin/<rama local> <rama remota>, but since our local branch is called main and GitHub’s remote branch is also called main, we would have to change the above to git branch --set-upstream-to=origin/main main.
Once this is done, to download the new changes from the remote repository to the local one, you only need to run git pull
Let's set up the branch relationship with git branch --set-upstream-to=origin/main main
InputPython!cd notebook_git && git branch --set-upstream-to=origin/main mainCopied
Rama 'main' configurada para hacer seguimiento a la rama remota 'main' de 'origin'.
Now we can bring the changes from the remote repository to the local repository with git pull
InputPython!cd notebook_git && git pullCopied
remote: Enumerating objects: 4, done.remote: Counting objects: 100% (4/4), done.remote: Compressing objects: 100% (2/2), done.remote: Total 3 (delta 1), reused 0 (delta 0), pack-reused 0Desempaquetando objetos: 100% (3/3), 646 bytes | 646.00 KiB/s, listo.Desde github.com:maximofn/notebook_git679bb49..527e07a main -> origin/mainActualizando 679bb49..527e07aFast-forwardREADME.md | 1 +1 file changed, 1 insertion(+)create mode 100644 README.md
As we can see, it says that README.md has been added, we verify it by running ls
InputPython!cd notebook_git && ls | grep READMECopied
README.md
We have the file locally
Synchronize remote and local branches
As we have seen, we have had to synchronize the remote and local branches in order to upload and download the data. However, if we first create the repository on GitHub and then clone it, this synchronization is no longer necessary.
Alias
Each time we have wanted to make a log we have used this command git log --graph --oneline --decorate, however remembering this command is quite complicated, in fact I do not remember it, every time I have wanted to use it I have had to look it up because I did not remember it, so it would be very good to have a way to abbreviate it.
For this, Git offers alias, so you can create aliases for the commands you want. To do this, you have to run git config --global alias.<alias name> "command"
Therefore, we are going to call git tree the command git log --graph --oneline --decorate, since it allows us to see the history, with the branching and merging of branches as if it were the growth of a tree, so we do git config --global alias.tree "log --graph --oneline --decorate"
**Important**: The word
gitshould not be included in the command
InputPython!git config --global alias.tree "log --graph --oneline --decorate"Copied
If we now go to our repository and run git tree, we will see the history as we did before
InputPython!cd notebook_git && git treeCopied
* 527e07a (HEAD -> main, origin/main) Create README.md* 679bb49 archivo1.py con el merge resuelto|\| * 32851c3 archivo1.py en rama rama_con_conflicto* | 53f909b archivo1.py en rama main|/* 52acb97 Merge squash de los commits de la rama branch_squash* 274529c Merge branch 'branch_no_fast_forward' into main|\| * 8df3429 (branch_no_fast_forward) file2| * e4e23c9 file1* | 8bdf4d8 file3|/* 94149fc (branch_fast_forward) Eliminado hola.py* 4484e70 Eliminado archivo4.py* 564ccfb (new_branch2) Commit con el archivo 8* 5168f78 Eliminado archivo7.py* 4bb9d75 (new_branch) Commit con el archivo 7* ea615a9 Eliminado archivo5.py* e3153a5 Commit con los archivos 4 y 5* 0b09cfa Añadido .gitignore* 04ebd1f Commit con los archivos 1 y 2* c4930d7 Tercer commit, hola.py* 6e99e73 Segundo commit, hola.py* 1c95e4f Primer commit, hola.py
As we can see, our alias has been created
Existing Git command aliases
Command aliases can be created for commands that already exist in Git; in fact, it is a practice many people use, especially to shorten them, so we’re going to create one. We’re going to make an alias for the git status command and rename it to git st like this: git config --global alias.st "status"
InputPython!git config --global alias.st "status"Copied
Let's test it now
InputPython!cd notebook_git && git stCopied
En la rama mainTu rama está actualizada con 'origin/main'.nada para hacer commit, el árbol de trabajo está limpio
We already have the git status command simplified to git st
Command aliases that are not git-related
We can create command aliases that are not for git, for example, because we think git needs that new command. It is done the same way, with the exception that the command must be preceded by !, that is, it would be git config --global alias.<alias name> "!command"
When we have seen the conflicts, we have seen that git told us where they were, but to resolve them we have to edit the code ourselves, so we can create a git alias so that we can open a file with the text editor we want. In my case I’m going to create an alias that will open the files with vscode; for that I have to run git config --global alias.code "!code"
InputPython!git config --global alias.code "!code"Copied
We tested it
InputPython!cd notebook_git && git code README.mdCopied
After doing this, README.md opened in VSCode for me
List with all the aliases
In case we do not remember the aliases we have created, we can view the global Git configuration, but since this can be a bit overwhelming because it gives us a lot of information, we can filter it so it shows only the aliases we have created. To do this, we use git config --get-regexp ^alias\.
InputPython!git config --get-regexp ^alias.Copied
alias.tree log --graph --oneline --decoratealias.st statusalias.code !code
We obtain the aliases that we have created
But even better, we can create an alias to get the aliases; to do this, we run git config --global alias.alias "config --get-regexp ^alias\."
InputPython!git config --global alias.alias "config --get-regexp ^alias."Copied
If we now run git alias
InputPython!git aliasCopied
alias.tree log --graph --oneline --decoratealias.st statusalias.code !codealias.alias config --get-regexp ^alias.
We get the list with all our aliases
Stash store (git stash)
Suppose we are working on a branch, we have several modified files, we have not made a commit, and for whatever reason we have to switch to another branch. For example, we are on a branch developing a new feature, and we have to leave it halfway done because there is a critical bug on the main branch
One solution would be to make a commit to save the changes and come back later. But maybe we've left the code halfway done and don't want to make a commit. So for that, the stash was invented, which is like a storage place where you leave your code stored so you can recover it later.
It is a stack, which means that the last thing in is the first thing out
Let's see how to do it; first, we create a new branch that we'll call new_feature
InputPython!cd notebook_git && git branch new_featureCopied
We switched to her
InputPython!cd notebook_git && git switch new_featureCopied
Cambiado a rama 'new_feature'
Let's modify archivo2.py and archivo8.py
InputPython!cd notebook_git && echo "print('new_feature')" >> archivo2.py && echo "print('new_feature')" >> archivo8.pyCopied
We run a git status to check that they have been modified
InputPython!cd notebook_git && git statusCopied
En la rama new_featureCambios no rastreados para el commit:(usa "git add <archivo>..." para actualizar lo que será confirmado)(usa "git restore <archivo>..." para descartar los cambios en el directorio de trabajo)modificados: archivo2.pymodificados: archivo8.pysin cambios agregados al commit (usa "git add" y/o "git commit -a")
Let's add archivo8.py to the staged area
InputPython!cd notebook_git && git add archivo8.pyCopied
We run git status again
InputPython!cd notebook_git && git statusCopied
En la rama new_featureCambios a ser confirmados:(usa "git restore --staged <archivo>..." para sacar del área de stage)modificados: archivo8.pyCambios no rastreados para el commit:(usa "git add <archivo>..." para actualizar lo que será confirmado)(usa "git restore <archivo>..." para descartar los cambios en el directorio de trabajo)modificados: archivo2.py
As we can see, we have two modified files, one of which is also in the staged area. If we now had to switch branches, to avoid losing the changes we could make a commit, or save them in the stash store, so we are going to do the latter using git stash
InputPython!cd notebook_git && git stashCopied
Directorio de trabajo y estado de índice WIP on new_feature: 527e07a Create README.md guardados
If we now run git status again, let's see what happens
InputPython!cd notebook_git && git statusCopied
En la rama new_featurenada para hacer commit, el árbol de trabajo está limpio
The modified files no longer appear; it’s as if we had made a commit
**Important**: Newly created files, which have never been tracked by Git, will not go to the repository, so with new files it is necessary, at least, to first run a
git add
If I now create a new file and try to move it to the repository, it will give me an error
InputPython!cd notebook_git && touch archivo9.pyCopied
InputPython!cd notebook_git && git statusCopied
En la rama new_featureArchivos sin seguimiento:(usa "git add <archivo>..." para incluirlo a lo que se será confirmado)archivo9.pyno hay nada agregado al commit pero hay archivos sin seguimiento presentes (usa "git add" para hacerles seguimiento)
InputPython!cd notebook_git && git stashCopied
No hay cambios locales para guardar
InputPython!cd notebook_git && git statusCopied
En la rama new_featureArchivos sin seguimiento:(usa "git add <archivo>..." para incluirlo a lo que se será confirmado)archivo9.pyno hay nada agregado al commit pero hay archivos sin seguimiento presentes (usa "git add" para hacerles seguimiento)
As we can see, archivo9.py has not been saved in the repository, so it should have been added with git add.
InputPython!cd notebook_git && rm archivo9.pyCopied
Everything to stash (git stash -u -a)
As we have seen, only the files that Git is tracking are sent to the staging area, but if we have newly created files, or ignored files, they will not be sent, so to solve this we can use the flags -u or --include-untracked to send the new files that Git has not yet tracked, and the flag -a or --all to include everything, even ignored files
List of stashes (git stash list)
As we mentioned, the stash acts like a stack, so if we use this stash many times, in reality we will have a list of stashes, and to see the ones we have stored we can use git stash list
InputPython!cd notebook_git && git stash listCopied
stash@{0}: WIP on new_feature: 527e07a Create README.md
As we can see, we only have one, which indicates the branch (on new_feature), the latest commit (Create README.md), and an identifier (527e07a)
Stash with description (git stash push -m <description>))
As we have seen, the list gives us the branch and the last commit, but this information is only useful for knowing where we started modifying before saving to the history. It also returns us an identifier that doesn’t tell us much, so we can add an initial description to the stash with git stash push -m <description>
First, we run git status to see what we have uncommitted
InputPython!cd notebook_git && git statusCopied
En la rama new_featureArchivos sin seguimiento:(usa "git add <archivo>..." para incluirlo a lo que se será confirmado)archivo9.pyno hay nada agregado al commit pero hay archivos sin seguimiento presentes (usa "git add" para hacerles seguimiento)
We have archivo9.py, but remember that it has never been tracked by git, so to include it in a stash we need to use the -u flag or the -a flag, so we create a new stash with a description using the command git stash push -u -m <descripción>
InputPython!cd notebook_git && git stash push -u -m "archivo9.py"Copied
Directorio de trabajo y estado de índice On new_feature: archivo9.py guardados
We pulled the list from the stash
InputPython!cd notebook_git && git stash listCopied
stash@{0}: On new_feature: archivo9.pystash@{1}: WIP on new_feature: 527e07a Create README.md
The new one already appears much more clearly
Retrieve the latest stash (git stash pop)
As we have said, the stash is a stack with stores, so when it comes to retrieving them we will do it the same way as a stack, always retrieving the last one.
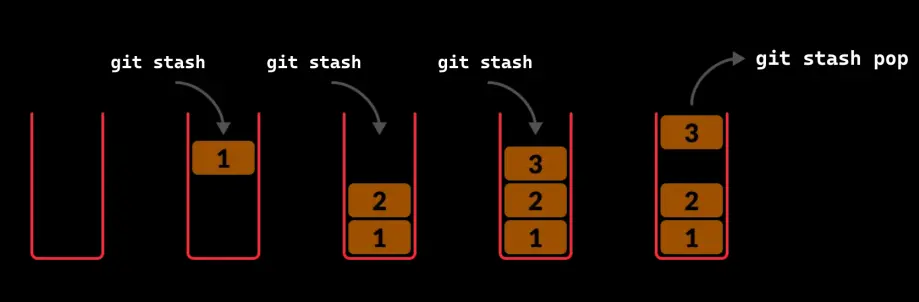
To recover the latest stash, we have to run git stash pop
First, we run a git status to make sure we don’t have any pending changes.
InputPython!cd notebook_git && git statusCopied
En la rama new_featurenada para hacer commit, el árbol de trabajo está limpio
Now we recover the last stash
InputPython!cd notebook_git && git stash popCopied
En la rama new_featureCambios a ser confirmados:(usa "git restore --staged <archivo>..." para sacar del área de stage)nuevos archivos: archivo9.pyDescartado refs/stash@{0} (0246b0e922f654e7fc68cfeaf26e24fc511feb37)
If we run git status again, we will see that we once again have archivo9.py pending to be committed
InputPython!cd notebook_git && git statusCopied
En la rama new_featureCambios a ser confirmados:(usa "git restore --staged <archivo>..." para sacar del área de stage)nuevos archivos: archivo9.py
And if we check the stash list, we’ll see that we only have one left
InputPython!cd notebook_git && git stash listCopied
stash@{0}: WIP on new_feature: 527e07a Create README.md
Delete a stash (git stash drop <position>)
If we want to delete a stash, we have to run git stash drop <position>, where <position> is the position the stash occupies in the list.
We obtain the list of stashes
InputPython!cd notebook_git && git stash listCopied
stash@{0}: WIP on new_feature: 527e07a Create README.md
In our case, we only have one and at position 0 (stash@{0}), so to delete it we would have to run git stash drop 0; however, I’m not going to do it because I’m going to remove it right afterward with another command
Delete all stashes (git stash clear)
If we want to empty the entire stash list, we have to run git stash clear
InputPython!cd notebook_git && git stash clearCopied
If we now request the stash list
InputPython!cd notebook_git && git stash listCopied
We get nothing because we have removed everything
Let's leave everything as it was, let's do a git status to remember the changes we had pending
InputPython!cd notebook_git && git statusCopied
En la rama new_featureCambios a ser confirmados:(usa "git restore --staged <archivo>..." para sacar del área de stage)nuevos archivos: archivo9.py
We see that we are on the new_feature branch and that we have archivo9.py pending to be committed. Since we created it for the example, we delete it and return to the main branch
InputPython!cd notebook_git && git reset archivo9.pyCopied
InputPython!cd notebook_git && rm archivo9.pyCopied
InputPython!cd notebook_git && git switch mainCopied
Cambiado a rama 'main'Tu rama está actualizada con 'origin/main'.
Tags
When we are developing code, there come moments when we generate versions, for example v1.1, v1.2, etc. To have this more controlled, Git provides us with tags.
Create a new tag (git tag -a <tag_name> -m "<message>")
To create a tag, we have to run git tag -a <tag_name> -m "<message>"
For example, we are going to create a tag in the current version of the repository, for this I will do git tag -a v_tag -m "Tag con el repositorio en la parte final, en la que explicamos los tags"
InputPython!cd notebook_git && git tag -a v_tag -m "Tag con el repositorio en la parte final, en la que explicamos los tags"Copied
Tag list (git tag)
To see the tags we have created, we can run git tag
InputPython!cd notebook_git && git tagCopied
v_tag
Create a tag from an old commit (git tag -a <tag_name> -m "<message>" <hash>)
Let's do a git tree to see the history
InputPython!cd notebook_git && git treeCopied
* 527e07a (HEAD -> main, tag: v_tag, origin/main, new_feature) Create README.md* 679bb49 archivo1.py con el merge resuelto|\| * 32851c3 archivo1.py en rama rama_con_conflicto* | 53f909b archivo1.py en rama main|/* 52acb97 Merge squash de los commits de la rama branch_squash* 274529c Merge branch 'branch_no_fast_forward' into main|\| * 8df3429 (branch_no_fast_forward) file2| * e4e23c9 file1* | 8bdf4d8 file3|/* 94149fc (branch_fast_forward) Eliminado hola.py* 4484e70 Eliminado archivo4.py* 564ccfb (new_branch2) Commit con el archivo 8* 5168f78 Eliminado archivo7.py* 4bb9d75 (new_branch) Commit con el archivo 7* ea615a9 Eliminado archivo5.py* e3153a5 Commit con los archivos 4 y 5* 0b09cfa Añadido .gitignore* 04ebd1f Commit con los archivos 1 y 2* c4930d7 Tercer commit, hola.py* 6e99e73 Segundo commit, hola.py* 1c95e4f Primer commit, hola.py
Although it doesn’t say so in the description, when we made commit 4bb9d75 was when we finished the version control part locally, so it would also be good to have a tag from that moment. To do that, what we need to do is create a tag by adding the hash from that moment
InputPython!cd notebook_git && git tag -a v_local -m "Tag con el repositorio en la parte de control de versiones de manera local" 4bb9d75Copied
If we now make a list of the tags, the new one appears
InputPython!cd notebook_git && git tagCopied
v_localv_tag
And if we look at the commit history
InputPython!cd notebook_git && git treeCopied
* 527e07a (HEAD -> main, tag: v_tag, origin/main, new_feature) Create README.md* 679bb49 archivo1.py con el merge resuelto|\| * 32851c3 archivo1.py en rama rama_con_conflicto* | 53f909b archivo1.py en rama main|/* 52acb97 Merge squash de los commits de la rama branch_squash* 274529c Merge branch 'branch_no_fast_forward' into main|\| * 8df3429 (branch_no_fast_forward) file2| * e4e23c9 file1* | 8bdf4d8 file3|/* 94149fc (branch_fast_forward) Eliminado hola.py* 4484e70 Eliminado archivo4.py* 564ccfb (new_branch2) Commit con el archivo 8* 5168f78 Eliminado archivo7.py* 4bb9d75 (tag: v_local, new_branch) Commit con el archivo 7* ea615a9 Eliminado archivo5.py* e3153a5 Commit con los archivos 4 y 5* 0b09cfa Añadido .gitignore* 04ebd1f Commit con los archivos 1 y 2* c4930d7 Tercer commit, hola.py* 6e99e73 Segundo commit, hola.py* 1c95e4f Primer commit, hola.py
At the point in the history where we created the tag, the tag we created now appears: * 4bb9d75 (tag: v_local, new_branch) Commit with file 7
Switching between tags (git reset --hard <tag> or git reset --soft <tag>)
Just as we can move between different commits in the history, we can also move between tags. This has the advantage that we can move to another point in history without having to know the hash; by knowing the name of the tag we assigned at that moment, we can move simply by doing git reset --hard <tag> or git reset --soft <tag>
First, let's do an ls to see the files we have
InputPython!cd notebook_git && lsCopied
api_keys.py archivo1.py archivo2.py archivo8.py README.md
We also do a git tree to see where in the history we are.
InputPython!cd notebook_git && git treeCopied
* 527e07a (HEAD -> main, tag: v_tag, origin/main, new_feature) Create README.md* 679bb49 archivo1.py con el merge resuelto|\| * 32851c3 archivo1.py en rama rama_con_conflicto* | 53f909b archivo1.py en rama main|/* 52acb97 Merge squash de los commits de la rama branch_squash* 274529c Merge branch 'branch_no_fast_forward' into main|\| * 8df3429 (branch_no_fast_forward) file2| * e4e23c9 file1* | 8bdf4d8 file3|/* 94149fc (branch_fast_forward) Eliminado hola.py* 4484e70 Eliminado archivo4.py* 564ccfb (new_branch2) Commit con el archivo 8* 5168f78 Eliminado archivo7.py* 4bb9d75 (tag: v_local, new_branch) Commit con el archivo 7* ea615a9 Eliminado archivo5.py* e3153a5 Commit con los archivos 4 y 5* 0b09cfa Añadido .gitignore* 04ebd1f Commit con los archivos 1 y 2* c4930d7 Tercer commit, hola.py* 6e99e73 Segundo commit, hola.py* 1c95e4f Primer commit, hola.py
Now we move to the point where we have created the v_local tag using git reset --hard v_local
InputPython!cd notebook_git && git reset --hard v_localCopied
HEAD está ahora en 4bb9d75 Commit con el archivo 7
If we now run ls again, we see that we don't have the same files
InputPython!cd notebook_git && lsCopied
api_keys.py archivo1.py archivo2.py archivo4.py archivo7.py hola.py
If we also look at the history, we see that we have changed from one point in history to another
InputPython!cd notebook_git && git treeCopied
* 4bb9d75 (HEAD -> main, tag: v_local, new_branch) Commit con el archivo 7* ea615a9 Eliminado archivo5.py* e3153a5 Commit con los archivos 4 y 5* 0b09cfa Añadido .gitignore* 04ebd1f Commit con los archivos 1 y 2* c4930d7 Tercer commit, hola.py* 6e99e73 Segundo commit, hola.py* 1c95e4f Primer commit, hola.py
To go back to the last point in the history, since we have also created a tag, it will be enough to run git reset --hard v_tag
InputPython!cd notebook_git && git reset --hard v_tagCopied
HEAD está ahora en 527e07a Create README.md
We look back at the history to check that we have returned to the last moment in the history
InputPython!cd notebook_git && git treeCopied
* 527e07a (HEAD -> main, tag: v_tag, origin/main, new_feature) Create README.md* 679bb49 archivo1.py con el merge resuelto|\| * 32851c3 archivo1.py en rama rama_con_conflicto* | 53f909b archivo1.py en rama main|/* 52acb97 Merge squash de los commits de la rama branch_squash* 274529c Merge branch 'branch_no_fast_forward' into main|\| * 8df3429 (branch_no_fast_forward) file2| * e4e23c9 file1* | 8bdf4d8 file3|/* 94149fc (branch_fast_forward) Eliminado hola.py* 4484e70 Eliminado archivo4.py* 564ccfb (new_branch2) Commit con el archivo 8* 5168f78 Eliminado archivo7.py* 4bb9d75 (tag: v_local, new_branch) Commit con el archivo 7* ea615a9 Eliminado archivo5.py* e3153a5 Commit con los archivos 4 y 5* 0b09cfa Añadido .gitignore* 04ebd1f Commit con los archivos 1 y 2* c4930d7 Tercer commit, hola.py* 6e99e73 Segundo commit, hola.py* 1c95e4f Primer commit, hola.py


