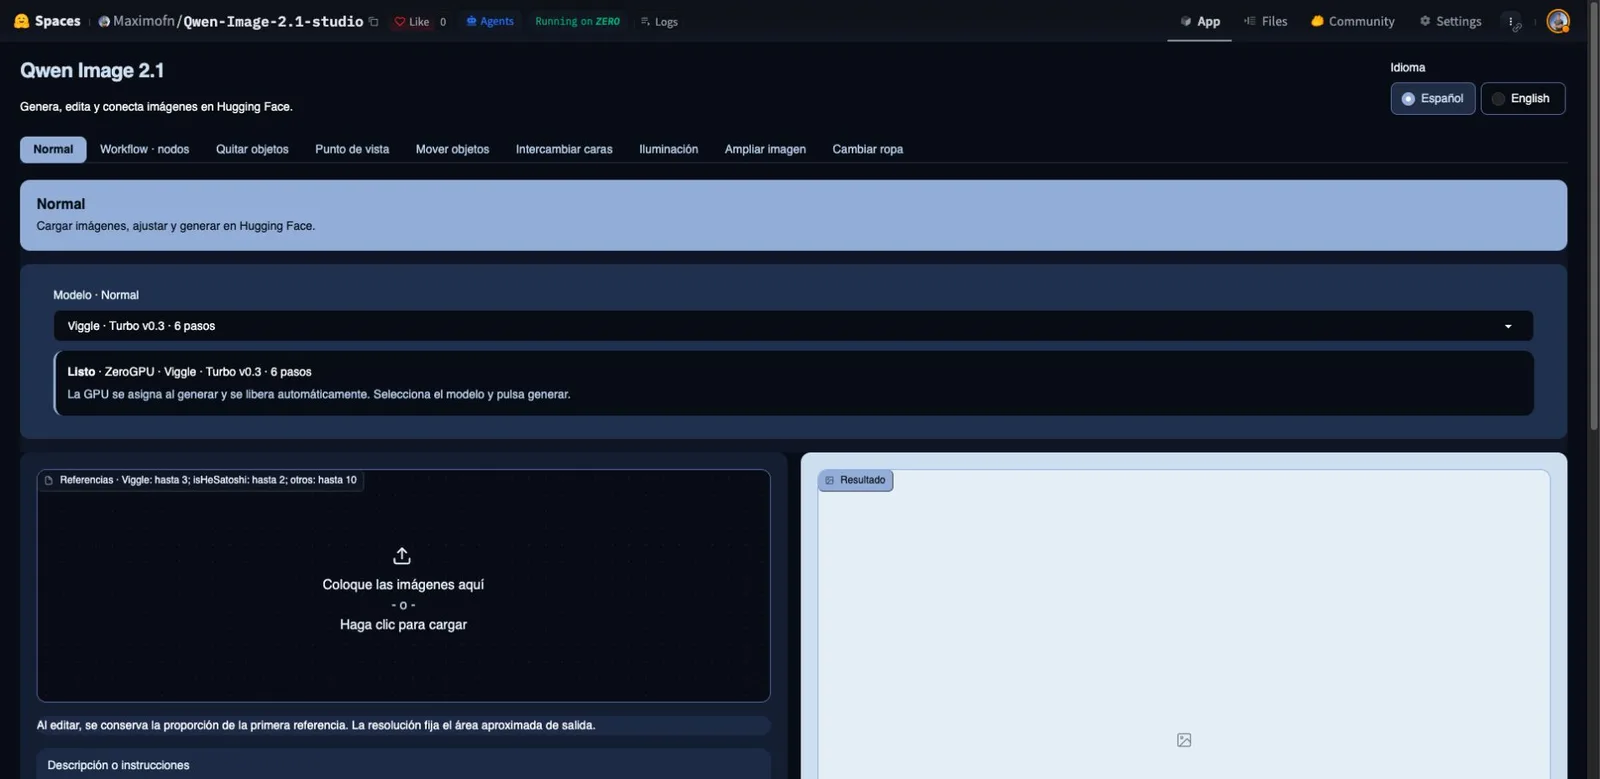
I wanted to use Qwen Image 2.1 on wallabot, a desktop computer I use as an AI server, from a comfortable interface. Generating an image was just the start: I also wanted to edit references, connect nodes and take advantage of the tools the community was publishing.
This project continues the work I described in Running Qwen3.8-27B locally on two RTX 3090s: vLLM, MTP and a private API. There I explained how I installed the text model on wallabot, compared engines and set up the on-demand service with Home Assistant and private access over Tailscale. For Qwen Image 2.1 I followed the same approach: measure on my hardware first, then integrate the model into the server. You don't need to have read that article: here I explain the machine and the decisions you need to follow this project from scratch.
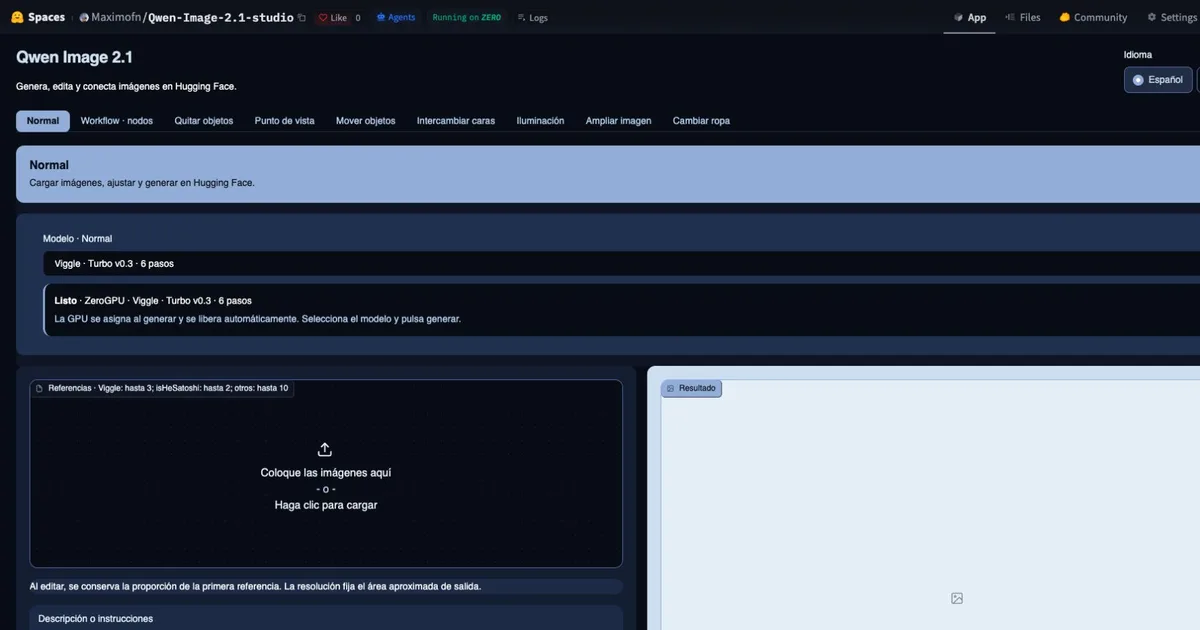
I started from the official Spaces for generation and editing and workflow. A Space is an application hosted on Hugging Face, a platform where AI models and demos are shared. Gradio is the Python library that turns generation functions into a web app with buttons, forms and images. It also creates an API.
First, measure on my hardware
Which computer I used and why it matters
Wallabot runs Ubuntu. It has an AMD Ryzen 5 3600 processor, 32 GiB of RAM and two NVIDIA RTX 3090 graphics cards.
Each RTX 3090 has 24 GiB of VRAM. The two do not automatically become one 48 GiB card: you have to split the work and respect what fits on each one. The GPUs connect to the motherboard through PCI Express, abbreviated PCIe, the link they use to exchange data with the rest of the computer. In this build one uses 16 communication lanes, x16, and the other four, x4. That limits data exchange differently; it does not mean an image takes exactly four times longer on one card.
There is no NVLink bridge, a direct physical connection between cards. I also didn't get direct access from one GPU to the other's memory, known as P2P. That's why it mattered which part of the model each card ran and how much data had to move between them.
During the tests I capped each GPU at 150 W, compared with its usual 350 W limit. Watts measure power: how much it can draw at a given moment. That ceiling limits the power the card can use and helps control heat; it does not fix the whole computer's draw at 300 W, because the processor, disks and cooling also run. I ran one model at a time and separated the time to load its files into memory from the time to generate the image.
What changes between the six model variants
A model stores what it has learned in millions of numbers, called weights. Those numbers take up space on disk and in memory. Quantizing means representing some of them with fewer bits, approximating their values so they take less space. A bit is the smallest unit of digital information. Reducing precision can change the image and requires compatible software; on its own it does not guarantee more speed.
I compared the original version and five alternative distributions. Unsloth, BennyDaBall, ModelsLab and abenzerps are the authors or teams that publish those conversions. The names in the table indicate how the model's numbers are stored or used:
- Original BF16: Qwen's reference version. BF16, short for bfloat16, represents weights with 16-bit numbers. I used it to check behavior without adding a conversion to 8 or 4 bits. It needs more memory for the same weights; on top of that, you have to reserve room for temporary computations.
- Unsloth FP8: uses 8-bit representations to reduce the space taken by the converted weights. FP stands for floating point: a way of representing numbers over a wide range. On my RTX 3090s, the software adapts those weights to compute at a compatible precision; these cards do not run FP8 multiplications natively. Memory savings and speed have to be measured separately.
- BennyDaBall NVFP4: uses an NVIDIA format that stores groups of weights as 4-bit values plus auxiliary scales to interpret them. In the test I kept that storage and decompressed the values to compute on the RTX 3090s, which have no native FP4 compute. It does not mean every component of the model takes four bits, nor that total memory use is a quarter of the original.
- ModelsLab NVFP4 W4A4: proposes 4 bits for both weights, W, and activations, A, the intermediate results passed between model layers, in its generation component. Its Nunchaku engine uses compute routines that require Blackwell-generation cards. My RTX 3090s belong to an earlier generation, Ampere, so I rejected this variant as incompatible. I never generated images with it.
- Unsloth GGUF Q4_K_M: GGUF is a file format that packages weights and the information needed to load them. It is not a precision in itself: there are GGUFs with different quantizations. I chose Q4_K_M, a recipe that mostly uses 4 bits per weight, with different blocks and precisions depending on the part. I ran it with a GGUF loader in ComfyUI; the components that interpret references and do the final image conversion stayed in BF16.
- abenzerps GGUF Q4_K_M: another GGUF distribution, tested with the same quantization family. Its author calls it "Uncensored" and describes the absence of a built-in content checker. That label does not describe an improvement in precision or speed. My tests used benign scenes and instructions, so they do not verify that property or show it behaves the same in any program.
Each runnable variant went through nine cases: a small initial 512 × 512 pixel test, generation at 1024 × 1024, repeating the same seed, another seed, Spanish text, transparency, editing with one reference image, editing with two, and generation at 2048 × 2048. The seed is the number that initializes the random noise generation starts from; repeating it helps compare results with the same settings. Steps are the iterations the model uses to refine the image. I used 40 in the main cases. I call 1024 × 1024 "1K" and 2048 × 2048 pixels "2K"; 2K has four times as many pixels, not two.
| Variant | Load | Generate 1K | Edit 1K | Generate 2K | VRAM GPU 0 / 1 | GPU Wh / 1K |
|---|---|---|---|---|---|---|
| Original BF16 | 33.0 | 173.2 | 215.3 | 988.2 | 19.01 / 20.68 | 10.48 |
| Unsloth FP8 | 20.1 | 162.8 | 187.0 | 738.1 | 9.88 / 13.26 | 8.47 |
| BennyDaBall NVFP4 | 16.3 | 126.1 | 165.8 | 723.3 | 8.62 / 10.52 | 6.70 |
| ModelsLab W4A4 | Incompatible with this hardware. No inference times. | |||||
| Unsloth GGUF Q4_K_M | 17.9 | 109.3 | 133.4 | 472.5 | 10.49 / 17.52 | 5.94 |
| abenzerps GGUF Q4_K_M | 16.8 | 111.4 | 136.0 | 473.1 | 10.86 / 17.52 | 6.23 |
A lower value means less time in this test. It is not a quality score.
The numbers need context
Wh, or watt-hours, measure accumulated energy: how much was consumed over an interval. For example, holding 100 W for an hour consumes 100 Wh. I sampled the power of both GPUs roughly every two seconds and added up their consumption over each generation. I did not measure consumption at the wall. That figure does not include everything the computer and its power supplies draw.
How I monitored the computer during the tests
Wallabot has liquid cooling for the processor and both GPUs: three loops, each with a pump that circulates the liquid and a radiator that transfers its heat to the air. Each GPU radiator has three fans; the CPU one, one. Another three fans bring fresh air into the case: that's ten fans in total, plus the three pumps. The radiators exhaust hot air through the top, the bottom and the back.
The computer is powered by two supplies: a main one for the motherboard and the rest of the machine, including the upper GPU, and another for the auxiliary power of the lower GPU. A power supply converts mains electricity into the voltages the components need. Both are fed through a UPS, an uninterruptible power supply: a battery with electronics that keeps the machine on during an outage. Mine is a CyberPower CP1500EPFCLCD, with a nominal capacity of 900 W, and it reports its status to the computer over USB.
I didn't want to pick a model just because it finished sooner. I logged this data to also know whether the machine was still fit to work:
- Temperatures: readings from the GPU sensors, in degrees Celsius. AI workloads generate heat; monitoring lets the test stop if the cards exceed the set limit. A sensor does not necessarily measure every hot spot or every brief peak.
- RAM and VRAM: how much space programs took in main memory and on each card. The GPU 0 / 1 column shows the two cards separately as they were numbered in the test; it is not a shared memory pool.
- UPS status: whether it was running on mains or on battery, the battery percentage and its load. Here "load" means the fraction of its power capacity in use, not remaining battery. I did not use that percentage as a precise measurement of wall consumption.
- Pumps: their available tachometer signals, in RPM, revolutions per minute. I watched one GPU pump and the CPU one; I had no independent reading of all three. Seeing a pump spin does not by itself prove the liquid is circulating properly, nor does it report the RPM of every fan.
- Driver errors: messages from the NVIDIA software that lets the operating system talk to the GPUs. I looked for compute faults or loss of access to a card, in addition to checking that images were generated.
The guards required both GPUs present and below 80 °C, the UPS running on mains, at least 80 % battery, UPS load no higher than 80 % and observed pump signals of at least 2000 RPM. These are limits chosen for this installation, not universal requirements for using Qwen. If a GPU disappeared, the test stopped and no further load was allowed without confirming the cleanup.
The first 1K generation ran after the small initial test. So its time does not represent a fully cold start: part of the software and data could already be prepared.
To run BF16 I used Diffusers, a Python library for image models. For the quantized variants I used ComfyUI, which organizes generation into connected operations. They are different execution engines. In addition, for the GGUFs I swapped how tasks were split between the cards. The table compares these complete configurations: it does not let you attribute each time difference solely to reducing weight bits. That's also why I did not copy Blackwell GPU timings published by another author into my table.
Generation has several parts: the encoder turns instructions and references into representations the model can process; the DiT is the component that refines the image over the steps; the VAE turns the final internal representation into the pixels we see. Splitting them across cards lets the whole thing fit, but also forces their results to be transferred.
What changed when I swapped the GPUs
Placing the encoder on GPU 1 and DiT/VAE on GPU 0, I repeated generation and editing with FP8 and Benny. At 1K and 40 steps, FP8 dropped to 102.1 s and Benny to 88.5 s; editing took 126.1 s and 113.3 s, respectively. These are later tests, separate from the initial table, without clearing the file cache.
This taught me that work placement matters. I couldn't choose a format by looking only at file size or by mixing results from different distributions.
There were also two real lockups
During an edit with NVFP4 Benny and another with GGUF Unsloth, Xid 79 appeared: the system could no longer talk to a GPU over its PCIe link. NVIDIA identifies that code as the GPU falling off the bus, the communication path between components. It is a symptom; the message alone does not identify the part or condition that caused it (NVIDIA Xid catalog).
Then came the Turbo accelerators
Next I added Viggle v0.3, Turbo8 and isHeSatoshi, LoRA adapters on top of the BF16 base. A LoRA is an extra set of weights that modifies the model's behavior without replacing all its files. In these Turbo profiles it's used to get images in fewer steps. Each has its own execution recipe, steps and other settings, so swapping the adapter file while keeping the previous parameters isn't enough.
| Profile | Steps | Generation | Editing | GPU Wh / generation |
|---|---|---|---|---|
| Viggle v0.3 | 6 | 28.31 s | 37.13 s | 1.771 |
| Turbo8 | 8 | 35.11 s | 46.02 s | 1.934 |
| isHeSatoshi r128 | 6 | 26.73 s | 35.47 s | 1.614 |
The time reduction was useful for working from the web app. Fidelity deserves its own evaluation: some edits altered textures or the background and fine artifacts appeared. Fewer steps does not prove quality equivalent to the base.
Turning it into a wallabot service
I separated the interface, the web app you see in the browser, from the engine, the program that loads the weights and generates images. Gradio has no direct access to the GPUs: it sends operations to a broker, a coordinator that checks whether they can run and reserves the cards. They talk over a Unix socket, a local channel between processes on the same computer that doesn't need to open a network port. A separate gateway exposes the commands used by Home Assistant, my home automation system, to show the status and control the model from its dashboard.
Home Assistant reaches the control gateway with its own authorization.
The broker is a piece specific to my installation. Cloning the Space's public repository does not by itself reproduce that local service; the self-hosted branch needs a broker installed and configured separately. I used Docker containers, environments that isolate processes and let you limit their resources and accessible files. The interface sits on an internal container network, with no direct outside access and no GPU. Code and weights are mounted read-only so generation can't modify them; the produced images go to another folder. systemd, the Linux service manager, keeps the broker, web app and gateway running. For admin tasks I used tmux, which keeps a terminal alive even if the remote session disconnects. I typed the password for admin privileges myself, without storing it in scripts.
The reservation is shared with the server's resource manager. Only one engine is active: if I want to load another profile, I first have to unload the previous one. Here unloading from the GPU means stopping the engine and freeing its memory, not deleting the files stored on disk. Doing so restores the power limits; after 15 minutes without generating, the model is released automatically. Checking the status does not reset that timer.
An independent selection in each tab
I started with Normal and Workflow, and kept adding the specialized Spaces until I reached nine tools. The initial global selector stopped making sense once I added models valid for only one operation. Now each tab has its own selector, controls and status; the GPUs are still shared.
- Normal and Workflow: generate and edit, using forms or by connecting blocks called nodes; for example, text → generation → image.
- Remove objects: draw boxes; the two Object Remover profiles appear as recommended.
- Viewpoint: rotation and height with Viewpoint Orbit.
- Move objects: select and reposition elements of a scene.
- Face swap: face reference and target image.
- Lighting: place lights and regenerate with Relight.
- Expand image: extend the framing with Outpaint.
- Change outfit: photo and instructions, with an optional clothing reference.
If the loaded engine isn't valid for the tab, generating returns an error before processing the images. If I try to load another engine while one is active, the web app asks to unload it first. That check is repeated in the broker so two simultaneous requests can't bypass the exclusion.
I also added states and buttons in Home Assistant, tested cancellations and reloads, and verified the PNGs downloaded over HTTPS. The node editor takes the full width. The web app starts in Spanish, can switch to English and shows resolutions with aspect ratio and pixels on both axes. Examples are served from stable files so thumbnails don't depend on temporary paths.
Using it inside my Tailscale network
Tailscale connects my devices into an encrypted private network, even when they aren't in the same house or on the same Wi-Fi. That network is called a tailnet. With Tailscale Serve I can expose the web app over HTTPS, which encrypts the browser connection and lets you verify the server through its certificate. Serve forwards requests to a local proxy: a program that checks access and routes each address to the right application. My proxy uses Caddy. The /image21/ path leads to Gradio. I did not enable Funnel, the feature that would publish the service outside the private network.
I explicitly allowed my four devices: Mac, phone, Raspberry and the server itself. That way I can open the web app without another username and password form. Authorization still exists in Tailscale and in the proxy rules: it is not the same as allowing any device on my home network, the LAN, or on the tailnet. The admin APIs keep their own separate credentials.
My local workflow
- Connect the device to Tailscale with its authorized identity.
- Open the server's private HTTPS address and the
/image21/path. - Pick the tool and a compatible model in its tab.
- Press Load on GPUs and wait for the ready state.
- Upload the image or write the prompt, generate and download the result.
- Unload the model before loading another, or when finished.
The address follows this format; here I use a made-up name, not my real address:
https://machine.example-tailnet.ts.net/image21/I verified real HTTPS access from the Mac, the Raspberry and the server, and rejection of unauthorized origins. The phone's rules were verified, but actually opening it from Android wasn't checked in that battery. I configured the proxy to trust only Serve's known chain; accepting identity headers from any origin would have allowed the client to be impersonated.
An important fix when putting Gradio behind the proxy
The initial web app built file links without the /image21 prefix. I adjusted the Normal and Workflow mounts and tested a real PNG download. HTML opening correctly does not guarantee that files, the iframe or generation events work under a subpath.
Bringing the Studio to Hugging Face
Next I created the Space Maximofn/Qwen-Image-2.1-studio. I prepared a separate repository for the Space. I added the public code and examples and sent them to the Space's repository with a push. Git LFS takes care of storing large files, such as images, without including their full contents in every Git version.
git clone git@hf.co:spaces/Maximofn/Qwen-Image-2.1-studio
cd Qwen-Image-2.1-studio

# With Git LFS installed and the SSH key configured on HF:
git lfs install --local
git lfs pull
I chose the Space's Gradio application mode, called the SDK in its configuration, with Python 3.12 and Gradio 6.28.0 to keep gr.Workflow and the language integration I had tested. The Space's README file holds the SDK configuration; dependencies and model revisions are pinned in the repository. The 46 example images are public and their hashes, digital fingerprints that let you check whether a file has changed, are documented; Git LFS stores 45 objects, because two files share content.
Detect the environment, not the machine name
Hugging Face provides SPACE_ID as an environment variable: a value the system hands to the program at startup. The code checks whether it has a value to choose between two modes of operation:
- On wallabot, without
SPACE_ID: the buttons to load and unload the model from the GPUs appear and its status is polled. The interface sends commands to the local broker. Before loading another engine you have to free the previous one. The selectors include the variants compatible with each tab, including the FP8, NVFP4 or GGUF engines in the tools that support them. - On Hugging Face, with
SPACE_ID: the load and unload buttons, their API functions and the queries to wallabot's broker are not created. The Space runs its own engine and offers only the profiles implemented there: the BF16 base and its adapters. To switch profile you just select it and generate; each request activates the corresponding adapters.
Being on Hugging Face does not necessarily mean having ZeroGPU. The code also checks ACCELERATOR and SPACES_ZERO_GPU. On ZeroGPU, the provider assigns the GPU when generating and releases it when done. With a dedicated GPU, the engine stays ready on that GPU. On a CPU-only Space, the web app can open, but generating shows an error because this implementation needs a GPU. None of those cloud variants use the broker or wallabot's private configuration.
So detection changes the controls, the model list and execution, without depending on the computer's name. This is its essential part, reduced to explain the idea:
import os

IS_SPACE = bool(os.getenv("SPACE_ID"))
MANUAL_GPU_CONTROL = not IS_SPACE
ZERO_GPU = IS_SPACE and (
    os.getenv("ACCELERATOR", "").startswith("zero-")
    or os.getenv("SPACES_ZERO_GPU", "").lower() in {"1", "true", "t"}
)

# Only create manual buttons and callbacks in the local environment.
if MANUAL_GPU_CONTROL:
    create_local_controls()
The final function in the example stands for mounting the controls, not a Gradio API.
In the real code, on Spaces neither those buttons, nor the API endpoints that would run them, nor the periodic queries to the local broker are created. The code that runs operations also rejects manual load and unload operations. A CPU Space can open the editor, but returns a GPU-required warning when generating.
On ZeroGPU the lifecycle changes
With ZeroGPU, the app uses a shared GPU from the provider during generation and releases it when the function that needs it finishes. I don't have a card permanently reserved for the Space. I prepared a BF16 base and eleven adapters at startup, keeping them separate instead of permanently merging their changes into the base. Each request activates the corresponding adapters and settings. When going back to the original model they're deactivated, so it doesn't inherit another tool's behavior.
Manual load and unload
1. Select a valid profile in the tab. 2. Load: the broker reserves the GPUs. 3. Generate with a single active engine. 4. Unload with the button or after 15 minutes without generating. To switch engines you must free the previous one.
Pick and generate
1. Select a BF16 recipe and its adapters. 2. Generate: the request activates the recipe. 3. Assign GPU: ZeroGPU runs the inference. 4. Release GPU: the provider frees it when done. The shared weights stay ready; there are no manual buttons.
The cloud version's selector offers 15 profiles, that is, combinations of model, adapters and settings, that share that BF16 implementation: the general ones and the specialized ones. I didn't add FP8, NVFP4 or GGUF to that list, because their local engines are not part of this port. Each tab and each visitor keep their own selection. A dedicated GPU on a Space is a different case: in the current implementation it keeps the set of generation operations, called the pipeline, ready, and also uses adapter selection.
In Python, the @spaces.GPU decorator on a function tells Hugging Face which operation needs a GPU and how long to reserve it. I requested size xlarge for that allocation. I imported the spaces library before Torch, the library that runs the model's computations, and launched Gradio with demo.launch(). The first port didn't register a GPU function correctly at startup. I fixed the startup and disabled SSR in Workflow: that mode built part of the interface on the server and caused problems in the node app. The experience showed that startup had to be adapted to the Hugging Face environment.
import spaces  # Before importing Torch and the backend.
from hf_backend import run_pipeline, gpu_seconds

@spaces.GPU(duration=gpu_seconds, size="xlarge")
def generate_on_gpu(body):
    return run_pipeline(body)

# The full app uses Gradio's native launch.
# This snippet is explanatory, not a standalone app.
Other adjustments were less flashy but necessary: fixing example paths, setting up the initial connections between image nodes and sizing the time reservation by the effective steps. A six-step Turbo profile shouldn't reserve quota as if it were going to run forty. The first startup downloaded about 33 GB for the base; the full set prepared with adapters came to around 37.9 GB.
Test the web app, not just that the install finishes
From the browser I ran 14 inferences across the nine tabs, using 13 different profiles and the public examples. I tried switching models in Normal, Object Remover and Lighting, and using different profiles in different tabs. The selectors kept their state and each request produced an output with the corresponding recipe.
| Tab | Profile | Steps | Output | Time |
|---|---|---|---|---|
| Normal | BF16 / Turbo8 / Viggle | 40 / 8 / 6 | 1024 × 1024 | 10.02 / 3.14 / 2.66 s |
| Workflow | isHeSatoshi | 6 | 1024 × 1024 | 3.10 s¹ |
| Remove objects | Turbo / Standard | 6 / 40 | 1280 × 832 | 3.61 / 13.33 s |
| Viewpoint | Orbit | 40 | 768 × 768 | 6.83 s |
| Move objects | Move Turbo | 6 | 1248 × 832 | 6.65 s |
| Face swap | BFS Turbo | 6 | 832 × 1248 | 4.32 s |
| Lighting | Pruna / Viggle | 8 / 6 | 832 × 1248 | 3.81 / 4.65 s |
| Expand image | Outpaint v2 | 25 | 1376 × 768 | 17.90 s² |
| Change outfit | Outfit Swap | 25 | 832 × 1248 | 8.89 s |
¹ Node execution time. ² Plus 2.9 s to describe the scene. Relight generated at 832 × 1248 px and exported at 1021 × 1536 px.
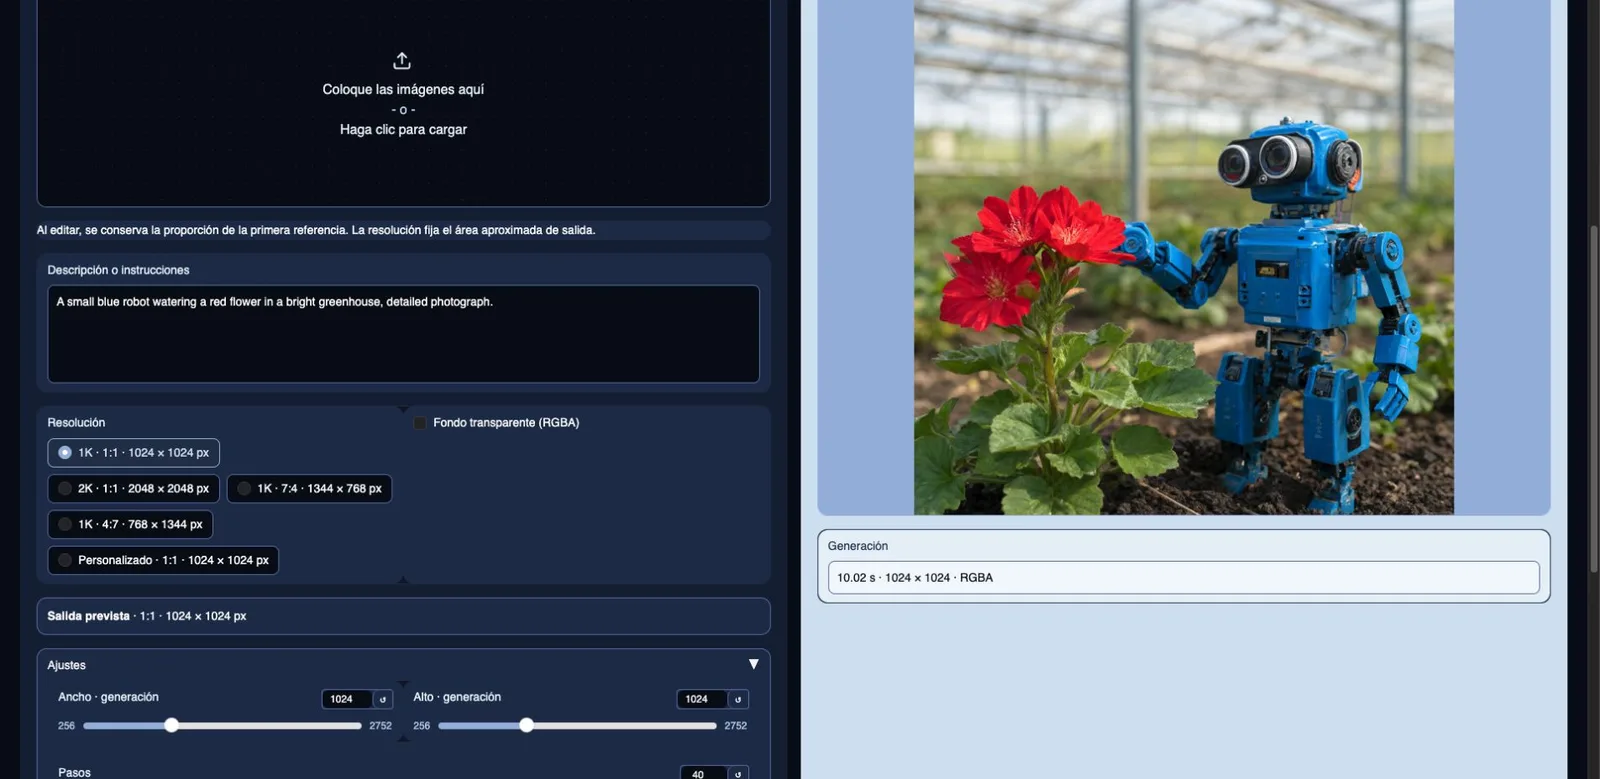
These times are not a uniform benchmark against my RTX 3090s: hardware, steps, images and measurement all change. I also didn't measure the provider's energy or VRAM. Physically releasing the GPU is ZeroGPU's documented behavior; I did not verify it with my own telemetry.
Some specific limits remained: I didn't test BFS Base or Outpaint v1 in that battery, nor the seven-view GIF or Workflow's edit node. Object Remover Turbo left traces in one case that Standard cleaned up better. Orbit produced a rear view when asked for a 90° turn to the right. An inference that completes does not guarantee perfect geometry, identity or fidelity.
Two ways to use the same tool
At home I have explicit control over the model and my GPUs, with access from authorized devices. On Hugging Face I can share the interface and pick a recipe per generation, leaving temporary GPU assignment to ZeroGPU.
The most useful things were measuring first, keeping the web app and inference separate, and adapting to each environment's capabilities. The result is a Studio with nine tools, clear behavior when switching models and tests that distinguish what works from what still needs checking.
Code and references
The numbers in the tables come from my tests between October 5 and 8, 2026. External sources describe the models and platforms; they do not certify my measurements.
- Studio public code and running Space
- Qwen Image 2.1 project and official announcement
- ZeroGPU documentation
- Tailscale Serve
- NVIDIA Xid catalog